Is your virtual desktop out of control?

I don’t know about you, but my computer desktop gets wayyyyyyyyy out of control (truth be told, my physical desktop needs some help, as well, but no one but me can help me there!). The icons on my computer desktop run amok. I have all kinds of 1/2 completed documents out there (temporary storage while I’m working on them). I have shortcuts to favorite programs. I have shortcuts to frequently used folders. I have some training PDF’s that are waiting for me to have time to work on them. I try to drag them into a logical order – Programs, you go ‘stand’ on this side. Training docs, you go to the lower-right quadrant. Truly temp files…please locate yourselves in the top-right corner. Etc. That’s all fine and dandy until I add a new icon to the desktop and it simply takes the ‘next available’ space. Then, I try to reorganize them, but the Windows ‘arranging’ features work against me (even if I have the ‘auto arrange’ feature turned off). In the end, I give up, Windows wins, and I just have to hunt and hunt to find the icon that I’m seeking when I need it :-).

I know that Apple products handle desktop organization more elegantly, but do we Windows users have to deal with what we’ve got?…or can we take control?

WE CAN TAKE CONTROL!!!

I ran across a free utility that allows Windows users to better ‘herd’ (i.e. organize) desktop icons by creating designated types of groupings that users can more readily manage. I downloaded the free version, but the paid version ($19.95) allows additional controls. Even with the free version, I’m happy that I can now find what I’m looking for on my desktop.

The utility is called “Fences” (makes sense because it puts ‘fences’ around your desktop icons, isolating them in logical groups). It is made by Stardock and is available for download here: download “Fences” here.

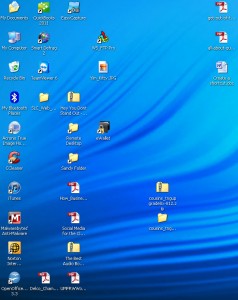
For demonstration purposes, I picked a desktop that wasn’t HORRENDOUSLY cluttered to be able to show an example of the before and after.

Here’s the before image:

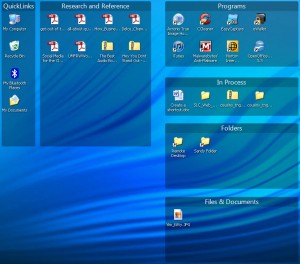
Here’s the after image:

I was able to move the location of the fences, rename the fences, add/remove icons from the fences very easily. New icons get added to the ‘non-fenced’ locations…then you can drag them within whichever fence you like.

All-in-all, I like being able to ‘tidy up’ my desktop simply by organizing the icons in a fashion which makes sense to me. Users can change a number of aspects of the appearance of the fences, but what you see above is the default. You can also back up your settings, so that you can recover, in case someone ‘messes’ with your desktop.

From an efficiency standpoint, just like having a good filing system in a filing cabinet, or good organization to your virtual documents, having good organization for your virtual desktop is essential to being able to work in the most effective manner possible – Now I just have to work on my physical desktop!

More lessons From my (now) 84-year-old Uncle

A while ago I wrote about some lessons that I’d learned from my 83-year-old Uncle (check it out here). When last we visited, he was deciding between purchasing an iPad or a Kindle, or some other e-reader. My last blog post included a mea culpa that my iPod is from the last decade (and early in the decade, at that). I don’t have a tablet PC. I don’t have an e-reader. Yet.

I’ll set the stage by saying that I was visiting with my uncle and we’d discussed and discussed the relative merits of an iPad or an e-reader. Unfortunately, I couldn’t give very good advice because I didn’t have direct experience with either one. I’m not against any of the technology – in fact, I love it – but its not a part of my personal arsenal – yet. I don’t feel obliged to be an early adopter – despite the fact that I make my living from technology. Sometimes, being ‘first on the block’ is fun…sometimes, it’s painful. I pick and choose…sometimes I have more patience than others.

Anyway, back to the subject…my uncle and I are sitting around discussing the alternative devices available. While he’s terrific at researching various products, he doesn’t like going shopping (he doesn’t know what he’s missing!), so going out to touch/feel each one isn’t high on his list of ‘fun things to do’. I suggested that we go out to one of the big, box stores which have a variety of products available to test out. Maybe actually seeing one ‘in person’ would help him make up his mind. I was sure that my suggestion would fall on deaf ears. Instead, in a flash, we were in the car, heading out to the store. Not only did we ‘touch and feel’, we purchased!!! I was, to quote a dear Aussie friend of mine, gobsmacked. We walked in and 15 minutes later, we walked out with an iPad (Generation 1, but that is fine for his use). The touch/feel part of the process lasted mere moments…he wanted to do his ‘test driving’ from the comfort of his own easy chair! Clearly, he’d already made up his mind when we left the house – he just didn’t share that detail with me :-).

Home we go to begin this new odyssey of experiencing an Apple product and the wide world of ‘apps’. I haven’t been around before when he’s gotten a new electronic ‘toy’. While I know that he reads the directions, it was a little disconcerting to him when there were virtually no directions in the iPad packaging. Granted, the setup was fairly intuitive to me, but not to him. He sat himself down at the old PC Desktop, and searched online for a ‘real’ set of directions. In very little time, he had a complete manual downloaded to the desktop for further study. Me, I just blasted ahead, figuring it out as I went!! Luckily, we came to the same place – an iPad ‘talking to’ the iTunes on the desktop – in a relatively short period of time.

Fast forward four weeks – to my next visit…So, how does he like the iPad? Loves it. He’s explored and ferreted out an amazing number of apps. He’s installed apps that sync certain information between the desktop and the iPad. He’s rediscovered an old passion – following stocks – and has found four or five apps to help him with this hobby. He’s found an app that manages his passwords and can run on the PC and the iPad, so they’re always in sync (eWallet). He’s found several photo editing apps to adjust/update images that he wants to appear on our family tree site (www.ourfamilytreeinfo.com. He’s downloaded all of the main e-reader programs, allowing himself to read books from Barnes & Noble or Borders or Amazon. He’s found an app that allows him to create a more PC-like folder system on the iPad. The list goes on and on and on.

When I asked him how the desktop computer was doing, he said that he didn’t know…he hadn’t been on it for three weeks!!!

So, my 84-year-old Uncle has managed to move virtually his entire desktop presence to his iPad…and in a relatively short period of time. You’d think that I could figure out whether I want an e-reader or iPad sometime soon, wouldn’t you?!?!

My one consolation is that he actually needed me to help him set up an FTP program on the iPad…hooray for small, face-saving favors!!!

Some iOS ideas (that’s Apple’s Operating System for PC users)

Everywhere I go, I see iPads, iPhones and iTouches. While I admire each of these devices, I must do a mea culpa here and admit that I have yet to purchase one. No, I’m not an Apple hater. I think that their devices are slick and elegant. I have an (albeit Generation 2) iPod. I love it. It is years and years old, and still works just fine.

Here’s my issues (not that you care, but I know someone will bring it up, so I might as well ‘fess up right away).

1. I don’t have an iPad because I think that I might like a smaller, more compact e-reader. I’m not going to invest in both devices right now, so I will pick, and I’m leaning to the e-reader side of the world. I love how easy they are to read outdoors (I love the beach), and how small they are. While iPads are more versatile, I think that I’d get the most use out of the e-reader feature, rather than alot of the other things.

2. I don’t have an iPhone because, quite frankly, I actually use my smartphone as, yes, a phone! The service for both AT&T and Verizon is terrible in my home…therefore, the iPhone is out of the question for me until the service of the phone portion is improved.

3. I don’t have an iTouch because my ancient iPod still works perfectly well, and I can’t see throwing it away while its working and doing everything that I need it to do. Additionally, I have my Android phone which does the non-music chores that the iTouch does in addition to playing music.

All that said, I have had an opportunity to play around with an iPad (more on that in a later post) and find it quite a pleasant experience…not life-changing, but perfectly fun. I’ve played on a few iTouch and iPhone devices, as well. Sleek and elegant, for sure.

Unfortunately, because I don’t own an Apple device constructed in this decade, I don’t pay attention to that many iThing articles. Then, every once and a while, I feel guilty being so PC-centric (or Android-centric), so I’ll read an article that comes along. Today, when I saw an article titled My iOS Love Affair, I had to pop it open and read it. It mentions a product called ‘Splashtop’ which, for $1.99, allows users to view their Apple laptop, desktop, or Windows machines remotely. While I can’t check it out personally, it sounded very interesting. Perhaps some Mac/iPad users can let me know if it works as slickly as it sounds.

I also came across Ten Ways to Work Smarter on Your iPad which seemed to offer several good tips. I could see myself using them – if and when I actually get an iPad!

What are your favorite Apple tools? As I get closer to purchasing one, I find myself more interested in the ‘toys’ that are available.

Can I open my Google Docs from Microsoft Office – you betcha!!

UPDATE 9/13/13: Google Cloud is no more. Google Docs have taken over. A myriad of methods to transfer docs back and forth between systems has arisen. To find the one which suits you, please use the search engine of your choice (Google, Bing, Yahoo) and enter something like “transfer from google docs to msn skydrive” where you substitute the ‘other’ system name for ‘msn skydrive’.

Forgive me for having been ‘absent’ for a couple of weeks. Somehow, the 4th of July holiday took away more time than just a 3-day weekend!!

More and more people utilize Google Docs to share and store documents, spreadsheets and the like. I’ve talked about a number of ways to utilize and access Google Docs in other posts (“Alternative to Microsoft Office” or “Is there an easier way to access my cloud storage” or “Simple, free way to begin using Cloud Computing”).

While I’m a HUGE believer in utilizing this powerful tool to give me access to documents and spreadsheets from anywhere (including my smartphone), or when collaborating with other people, I actually don’t like the Google Docs interface for actually WORKING – composing, editing, updating, etc. Probably because I’m just so darned used to the Microsoft Office series of buttons, commands and interfaces. I often find myself downloading a Google Doc document, editing in Office, then uploading to Google Docs again. What a waste of time and counter-productive!!

I was thrilled, therefore, when I came across the following utility offered by Google:
Click here for Google/Office Connect

Just download and install and ‘voila’…you can work on your Google Docs documents from within Microsoft Office. Here’s how it works:

1. Download and install the app from this location: Download Google Cloud Connect (compatible with XP, Vista, Windows 7 and Office 2003, 2007 or 2010)

2. After the utility is installed, open up Word, Excel, Powerpoint and you will see a new toolbar:

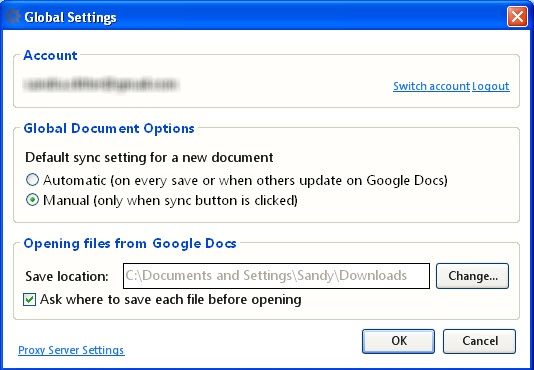
3. Click the ‘Login’ button and log in to your Google account. Once you have done this, you will be taken to a settings screen:

Select the settings that you want the sync to use – I would recommend leaving ‘automatic’ checked, so the Google Docs documents always stay ‘fresh’. This is particularly important if you’re collaborating with people because you want to be sure that you pick up any changes, and vice-versa. You can also change the default save folder – or have it challenge you whenever you save a document.

4. Open any document from your desktop and hit the ‘Sync’ button to send them to Google Docs. From this point forward (as long as you have the ‘automatic’ flag flipped), this document will always be saved to both your desktop and Google docs.

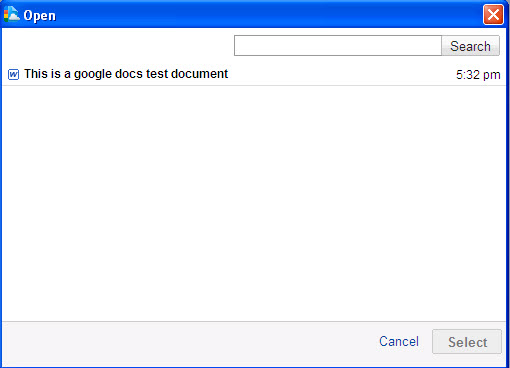
5. Now, click the ‘Google Cloud Connect’ button and you’ll see this box:

If you select the ‘Open from Google Docs’ choice:

The documents that you synced from your desktop now show up in Google Docs!!

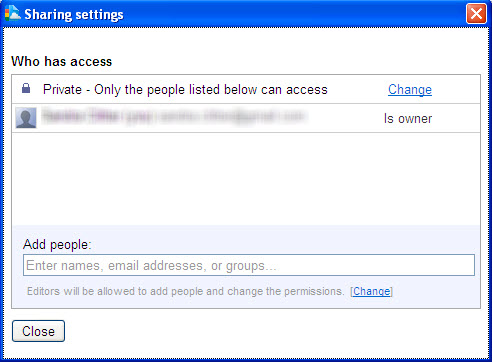
6. One fabulous feature is that you can share a document with others from within Office. Simply hit the ‘Share’ button. Looks just like the ‘Share’ button within Google Docs.

For me, this is sort of the ‘best of all possible worlds’. I can pick the documents that I want stored ‘in the cloud’. I can work on them in the setting that makes the most sense to me – no more trying to figure out how you do such-and-such in this interface or that interface – you only have to use ONE interface.

Check it out…see what you think…let me know. I’ve just started playing around with it, so I may change my mind, but it’s a nice tool to know about.

Narrowing down your Google Searches using Date Range Filters

Heavens to Murgatroyd!!! (Sidenote: When I typed this phrase, I decided that I had to find the origin of the phrase…check it out here).

When I do some Google searches, the sheer abundance of information (or irrelevant information) can be overwhelming. While I might try to refine my search terms to better narrow the results, there are times when the sheer volume can still ‘drown out’ the information you’re seeking. Is there a way to better narrow down the results (besides adding more keywords)? Of course, there is!

Here’s how you can do it…

First, run your search as you normally would using the best search string you can think of to obtain the results you’re looking for. NOW, look at the left side of the screen (that’s real estate that I often don’t notice…I’m too busy looking at the results themselves).

Google Search Filters

You’ll notice that there are a number of ways to narrow the search. If you’re looking for news articles only, just click the ‘News’ icon. Want blog postings, click ‘Blog’. Etc.

Those aren’t the best filters in my mind…to me the BEST filter is down in the ‘Any Time’ area lower on the page – CUSTOM RANGE.

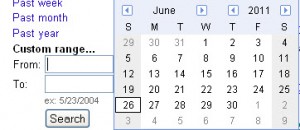
Google Search Custom Date Filter

Just click on this, and enter any date range you want, or just a ‘from’ or a ‘to’ date. You don’t need to fill in both. For information posted BEFORE January 1, 2005, enter ‘1/1/2005’ in the ‘To’ field. That’s all you have to do. Irrelevant results are instantly removed from your listing.

There’s some much more complicated way to limit Google results, but I’ll use the tools they give me anytime!!

Happy Searching!!

Alternatives to Microsoft Office

Microsoft Office is an intrinsic part of my business. I use Outlook almost every minute of the day. Excel is open on my computer most of the time. Word is used daily. I develop all kinds of systems (and access to systems) using Access (no pun intended). I don’t know how I could run my business without these tools, but maybe that’s because I’m just so used to them. They are familiar. I’m comfortable with them. I know, almost without thinking, where to go to find something and do whatever task needs to be done.

That’s all wonderful until I need to upgrade. I’ll admit it, I’m still on Office 2003 (yes, really). Why? Well, besides being resistant to the new ‘ribbon’ features in Office 2007/2010 (why, oh why, did they move everything around, so that novices can find things, but experienced users get lost?), there is the $500 price tag (well, $499.99 to be accurate) to upgrade from something which is working perfectly well to something I’m going to have to re-learn (NOTE: There are versions of Office which run $279.99, but I have to have Access to do the work I need to do for my clients, and that comes in the $499.99 version). I’ll certainly upgrade, probably when I upgrade my computer, but in the meantime, I’m stretching my software dollars. If I amortize the cost of Office over the number of years I’ve used this version and the amount of time I’ve spent on the various programs, I’ve got nothing to complain about! For under $100/year, I’ve got an incredible tool.

…but I use Office ALL THE TIME! I get my ‘money’s worth’. That’s not true for everyone…

For a lot of people – business people and home users alike, there is just no way they can justify the investment. If you’re a more ‘casual’ desktop user and don’t need to be locked into the Office world, there are now a myriad of FREE alternatives available to you. I would strongly advise downloading and trying out the following FREE, FREE, FREE or low-cost software. Pick the one which suits you best. Depending upon whether you use more spreadsheet ‘stuff’ or document ‘stuff’ or presentation ‘stuff’, may determine which you prefer. It might also depend upon which software makes the most sense to you from a general navigation perspective.

So what are these ‘savior’ alternatives? Check them out below:

Open Office – www.openoffice.org – Free
Google Docs – docs.google.com – Free
Libre Office – www.libreoffice.org – Free
SoftMaker Office – www.softmaker.com – $80
Zoho – www.zoho.com – Free for individuals

Google Docs and Zoho are both web-based. That’s great if you want to access your information anywhere, but there are two drawbacks to consider to web-based software:

First, your data is stored completely on someone else’s server…make sure you back it up to your local machine regularly. Even the ‘big guys’ have accidentally deleted user data! Being in the ‘cloud’ does NOT mean ignoring backup procedures.
Second, if you don’t have a good internet connection, or you don’t have one at all, working on web-based software can be difficult to impossible.

Each of the softwares listed above has its own ‘character’ (although LibreOffice and OpenOffice are remarkably alike since LibreOffice grew out of a defection by OpenOffice users). All of the alternatives have free trial periods (or remain free), so feel free to try them all out. You decide which one might be better than the other for your particular uses!

What are your favorites…or do you stick with the familiar Microsoft Office environment?

Create your own keyboard shortcuts

Shortcuts. We all know and love ’em. Whether they are computer related, or not, shortcuts make you feel like you’re getting more done in less time…you’re being more productive…you’re not wasting time on repetitive tasks, etc. We’ve all been there…wondering if there wasn’t an ‘easier way’. Well, I can’t help out with shortcuts in life, but I can shed some light on computer shortcuts (of the Windows variety). I’m sure that our regular Mac readers will tell us if a similar “self-service” feature exists in the Apple world.

There are a number of programs that I use frequently that I don’t want to add to my Windows XP Quick Launch toolbar (or, for Windows 7 users, the Taskbar), but to which I want quick access. I don’t necessarily want to go back to my desktop or to the entire programs listing. I know the program I want to use, and I want to be able to get there quickly – without taking my hands off of the keyboard. We’ve talked about ‘built-in’ keyboard shortcuts like CTRL+C and CTRL+V for ‘copy’ and ‘paste’, but what about shortcuts to programs that Windows doesn’t know I consider important?

Well, there is a solution, and its a very easy one!!! YEAH!!!

Simply go to your Program Listing (yes, you have to go there this one time to do the setup!) and follow the process below.

Select the program from the program list (but don’t click on it):
Select the program from the program list

Right-click on the program you have highlighted, then click the ‘Properties selection:

Right-click on the program icon

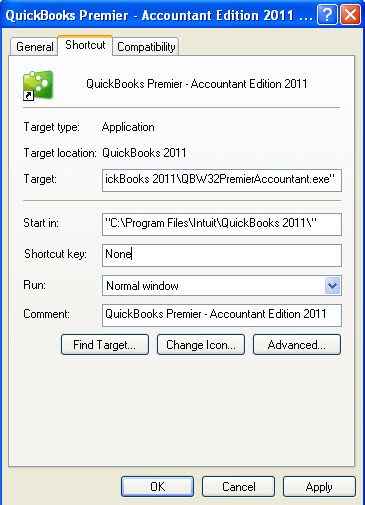
Click on the ‘Shortcut’ tab (this is true in either Windows XP or Windows 7, but the tab looks slightly different between the two versions), and put your cursor in the ‘Shortcut Key’ field (click ‘into’ the ‘Shortcut Key’ field). You can’t highlight the contents of that field. You can’t erase the ‘None’ that’s there. You just have to ‘squat’ in that field:

Select the properties option

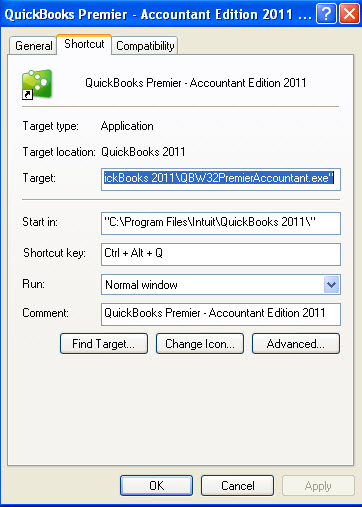
Now, once you’re in that field, simply press the keystroke that you want to use to open this program on the keyboard. In this case, because it is Quickbooks, I pressed the “CTRL+Q” buttons…notice…the system changed it to “CTRL+ALT+Q” because “CTRL+Q” was already taken by the system. That’s OK with me. You’ll probably need three keys to get a combination that works. CTRL+Shift or CTRL+ALT are both good places to start, then add a letter key that makes sense to you.

Press the shortcut keys you want to achieve the keyboard shortcut for this program

Now, press ‘Apply’ and ‘OK’. Go back to your keyboard and press the keyboard combination you just entered. VOILA!!! The program will open:

Your file begins opening

Trust me, you can do it in less than a minute! A couple of frequently-used programs, set up in this manner, will make you feel eminently more productive :-).

What printer should I buy – Laser or Inkjet?

We all know that we can buy an inexpensive printer (maybe it is even thrown in with our computer purchase for ‘free’), but we end up spending a fortune on ink. Printers that use a single cartridge with all colors in it are typically more expensive to operate because you end up replacing ALL colors of ink, when the first color runs out. When the colors are stored in separate cartridges, you only need to replace the colors as they run out, thereby assuring that you empty every color before replacing them. So, while one printer might be quite inexpensive to purchase, it might be very expensive to operate over time.

Typically, I have purchased inkjet printers. My primary rule of thumb when purchasing a printer – make sure all the ink cartridges can be replaced separately. Beyond that, I look at the other features (I currently use an all-in-one), and determine if they are worth the money (beyond being a basic printer).

I have never totally understood why I would purchase a laser printer over an inkjet printer. I know that laser printers are typically higher volume, but that was my total understanding (admittedly, not much) of the difference…and that difference I understood only vaguely.

So, I took particular interest in an article in PC World titled “Should your office buy and inkjet or laser printer?“.

You can read the details if you’re interested, but here’s what I took away from the discussion:

Inkjets work well for printing photos, and other items that are not ‘plain paper’.
Inkjets are easier to maintain (for mere mortals!)
Inkjets are s-l-o-w (you don’t need to tell me that!)
Inkjet print quality isn’t the greatest on plain paper
Inkjets don’t handle alot of paper at one time (small tray size)

Laserjets print clear, crisp text on plain paper
Laserjets print quickly
Laserjets print high volume (larger tray sizes)
Laserjets are larger/heavier than their Inkjet brethren
Laserjets don’t print photos well
Laserjets (particularly color ones) tend to have more maintenance costs associated with them

I had always heard that the cost of ink was far more economical in Laserjets than in Inkjets, but apparently, that line is blurring (why not help to further confuse me!?!). Lower-end cost Laserjets may actually have more expensive ink cartridges, making the cost savings on the printer itself less attractive when you have to purchase more expensive ink for the life of the printer.

My take-away from this is that it is best to buy the right printer for the type of printing that you typically do. If you need speed, buy a laserjet. If you like printing up photos of the grandkids, stick to the inkjet. I’m sure that, with time, the line will actually get blurrier with the cost of laserjets and LCD printers coming down, while some lovely, higher-end inkjets appear on the market.

And another note: I ABSOLUTELY recycle every ink cartridge that I empty. It is the right thing to do. That said, Ana Fernandez-Parmet, a friend of mine who owns Parmetech, an office technology provider, says that there are now printers which are ‘green’ and print using cartridge-less ink! As I understand it, these are Laserjets, and the ink simply ‘melts’! Now THAT is a technology that I can get behind :-). I hope that that concept is adopted by some of the lower-volume printers out there.

Are directions to your business/home in online maps missing or incorrect?

Saturday, while I was putting stuff out on my driveway for a yard sale, I realized that maps – the kind you used to get at the gas station or AAA – are quickly becoming a thing of the past…maybe even collector’s items. I actually thought about pulling them back into the garage, but decided that I’d let someone else make ‘millions’ from my old Esso (remember that?) maps of New Jersey.

Like many people, I use online directions and mapping (typically Yahoo Maps, Google Maps or Mapquest) to get from place to place. No, I don’t have a GPS in my car yet. I know that my smartphone can act as a GPS, but it drains the battery very quickly, so I don’t use it. I try to plan ahead {grin} and print off my directions. There are times when I have NO IDEA where I’m going (no familiarity with the town or area), so I’ll print off directions from more than one site. Why? Because I have found times when the online maps fail me!! They tell me to turn left into a brick wall, or make me get off at a different exit than the signs indicate I should. It can be frustrating, but usually, I get where I’m going.

Real trouble can arise when you try to find something relatively new. Say, for example, your friends just moved into a new development. The directions get you as far as the entrance to the development, but not through the maze of the development itself. Or perhaps, as happened with one of my clients, your address changes with the Post Office (no, the business didn’t move…the USPS simply changed the address), so now the old address is the one in the mapping, but the new address is the one that people need. If you put the new address into mapping software, you end up about 3 miles away from the ‘real’ location you’re trying to reach.

I’ve always thought that you just have to wait it out, that the maps will eventually get changed. I never knew ‘how’ Google or Yahoo or Mapquest would ‘know’. I just figured that they have some way of ‘catching up’. For my client, it’s been 18 months, and the maps are still wrong. I didn’t know that there was a way to get the Google Maps, at least, caught up.

Imagine my surprise when I stumbled upon Google Map Maker. Google Map Maker allows you to map things previously unmapped (e.g. your favorite corner tappy or pizza joint), fill in buildings on your college campus, create walking paths, and yes, even correct locations!

Click here to go to Google Map Maker for the US

Edits that you make will be reviewed before going live. You can move addresses if they show up in the incorrect location. You can add local spots, so they will appear on maps. You can add building outlines to show greater detail than just a dot on a map. Add walking paths, parks, bike paths, etc.

I almost can’t wait until the next time the directions fail – I’m empowered to go in and help to correct the situation, so others don’t get stuck! Yes, I have already submitted the address change for my client’s location.

I’m not sure if Mapquest or Yahoo have similar self-updating options available. I looked, but didn’t find any links. I’d be happy to post the links if someone happens to have them.