Tech Tips

Windows 7 Keyboard Shortcuts

Hi, All! Sorry that I’ve been remiss in my postings…its not for lack of subject matter, but more from a hectic holiday season and end of year work. Anyway, that’s not excuse, but it is an explanation (of sorts).

Now, I haven’t upgraded to Windows 7 as of yet, but I know that more and more people are migrating from XP. I will make that leap with my next computer…it’s just not time yet. I know some people who love it, and some who dislike it, but overall, it seems to be a sound operating system (the best of Vista without alot of the overhead in Vista).

I always love picking up keyboard shortcuts for any program in which I work. For instance, if I want to copy something to my clipboard, I almost never hit “{edit}{copy}” from the toolbar:
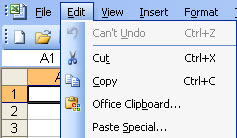
copy menu

I also don’t use the button style icons for copying information:

copy buttons

Instead, I use the CTRL+C command which means that my fingers never have to leave the keyboard and go to the mouse. I hold the Control button down (the one on your keyboard labeled ‘CTRL’), then I hit the ‘C’. That copies the file/information into my clipboard (think of the ‘clipboard’ as a virtual storage center for information on the move – any of the three approaches – the menu, the buttons, or the shortcut do the same thing…its just three different ways to accomplish that same task – don’t think that they are three different commands. They are NOT.), then I put my cursor wherever I want that copied item pasted, and I hit CTRL+V (i.e. I hold the Control button down (the one on your keyboard labeled ‘CTRL’), then I hit the ‘V’). That will paste the information from the clipboard onto my document (or into another file, or whatever). Copy/Paste (CTRL+C and CTRL+V) work anywhere – copying from cell to cell in Excel, or copying/pasting information in Word, or copying a file from one place to another. (By the way, CTRL+X is the ‘cut’ command and physically removes the information from location #1 and moves it to location #2 when you ‘paste’ it (CTRL+V or the equivalent).

Anyway…sorry for that detour, but some people might not know what a ‘keyboard shortcut’ is…I find that these ‘keyboard shortcuts’ save me amazing amounts of time. So, when I just ran across a document containing 200 Windows 7 shortcuts, I downloaded it immediately.

“The Complete Windows 7 Shortcuts eBook by Nitin Agarwal” appears to be FABULOUS. It is FREE, and is available as either a PDF or XPS document. Some of the shortcuts are the same in XP as they are in Windows 7. Some may not exist in XP, but its worth giving it a shot if you find an interesting command and aren’t on Windows 7. I’m going to try some of the ones that I didn’t know about, and see if they exist in XP. If they do, terrific. If they do not, then it will be an encouragement to upgrade.

If you want to find out more, please go to:

Windows 7 Keyboard Shortcuts

You don’t even have to enter your e-mail address…the file is there for downloading. Scroll to the bottom of the screen, and look for this link…this is the download:

keyboard shortcuts

Let me know which are your favorite shortcuts! (Mine might be Windows Logo key+D to display the desktop without minimizing all of the open programs).
Does a sluggish or slow computer mean I need to buy a new one?

I don’t know about you, but I get very annoyed by the concept of ‘disposable technology’. What you ask, is that? “Disposable technology” implies that there is a planned obsolescence in the gadgets and gizmos that we buy. In truth, that’s correct. Technology is being developed so quickly, that before you even unpackage that brand new thingamajig, it’s replacement is already in the pipeline. That said, just because something is available for sale doesn’t mean that YOU need to purchase it!

Case in point: My 3-year-old laptop. My laptop is getting cranky. It takes a longggg time to boot. Programs crash for no apparent reason. Searches require a trip to Starbucks to get coffee to stay awake while the process is running. Sounding like I need a new laptop, right? I could very well justify the purchase, as I typically tell people that a laptop is only designed for 2-3 years of use (desktops for 3-4 years). Once you’ve gotten that much out of the machine, it doesn’t owe you a thing! OK, but I don’t WANT to purchase a new laptop right now!!! The computer works fine (thank you Lenovo for building a fairly rugged piece of equipment)…its just terribly, slowwwwwww.

Why is it slow? Well, every time you install/uninstall software, little bits and pieces of debris are left along the way. Over time, those bits of debris accumulate into a pile of junk that gets in the way of the computer operating efficiently. No different than your tool bench getting disorganized after a while because you fail to hang every item back in its place. Eventually, you need to do a major housecleaning.

So, what are the alternatives with a computer? A virtual ‘housecleaning’.

Once I’ve tried all of the typical diagnostics (scan disk, defrag, anti-virus scan, anti-malware scan), and the speed is still not what I remember, it’s time for more radical steps – but steps that most people can do themselves if they have a little patience (oh yes, and some time). How do you do a ‘virtual housecleaning’? Reinstall the operating system (in my case, Windows XP), and then reinstall all of the programs. While this is a time-consuming process, it’s not as scary as it sounds – as long as you FOLLOW A PLAN!!!!

This article in PC World gives a terrific step-by-step guide to revitalizing an older computer:
How to reinstall Windows without losing your data

MOST IMPORTANT TIP: HAVE ALL OF YOUR DATA BACKED UP BEFORE YOU BEGIN!!! If you’ve done that, then it’s just a question of time…and all of your critical information will still be available after you resurrect your machine.

Maybe this is one of your New Year’s Resolutions! I know that it is one of mine :-).

Does your computer have alot of programs you never use?

It’s almost the New Year (well, 10 days away), and close enough to start thinking about my New Year’s resolutions. Every year, my first resolution (after ‘taking more time for myself’) is to clear off my desk and clean up my computer. I do NOT want to admit how I fare on any of the three categories (miserably, most of the time). I might get my desk clear for a day or two, but it quickly returns to it’s former, cluttered self (I don’t know HOW that happens!?!?!?). I do better some times than others at taking time for myself. The last resolution – cleaning up my computer – rarely gets attacked…or, if it does, half-heartedly.

Why? Well, because its a pain to identify the ‘junk’ on my computer and then uninstall everything. There just never seems to be time in the day to attack this particular issue. I’d rather work on the ‘take more time for myself’ than ‘clean up my computer’ (or my desk, for that matter).

All these reasons for procrastination, or re-prioritization, were rendered moot by an article I happened upon in PC World (one of my very favorite resources for tips and tricks). “How to Remove Crapware and other Unwanted Software from your Computer” offers two great step-by-step sets of instructions (with screenshots) for cleaning up your computer. Honestly, the first approach (going into the Control Panel > Add/Remove Programs) is the approach that I avoid because I’m not always sure what I need and don’t need. The second approach recommended in the article really appeals to me. PC Decrapifier is designed to ‘clean’ new computers of all the extra ‘junk’ that comes pre-installed on them – not the stuff that you install, then decide you don’t want.

I’m going to give this program a try (honestly, I haven’t tried it yet – it’s in my New Year’s resolution list!), and see how it works. I never did that when I initially set up my computer, so there may be a bunch of things just clogging the system. We’ll see. Wish me luck, and let me know how you make out on your New Year’s resolutions – particularly the technology ones!!

Happy Holidays, Everyone!!!!

Inexpensive Gift Idea: Tech Support Care Package

‘Tis the season of pulling one’s hair out trying to come up with good gift ideas. Sometimes the best ideas are those which come from the heart, rather than the pocketbook. I just learned about another fabulous Google offering which I had NEVER HEARD of before. Usually, when one hears ‘Google product’, one thinks of free and/or inexpensive. They’ve done it again!!

Google has created/packaged a new ‘Computer Tutorials’ which they are labeling ‘Teach Parents Tech’, but which can be sent to ANYONE (yourself included). While the tutorials focus on very basic items, and on Google products, they are still very valuable to technophobes, or non-techy folks.

I believe that this is a brand-new Google feature, as there are only 16,161 senders as of this writing. I have already fired off a few to dear members of my family who lovingly refer to me as the ‘Help Desk’. If I can direct them to one of these videos, it’s much easier than trying to explain over the phone, and having everyone get exasperated at everyone else :-).

So, where do you find this ‘gift’? Simply go to:

http://www.teachparentstech.org

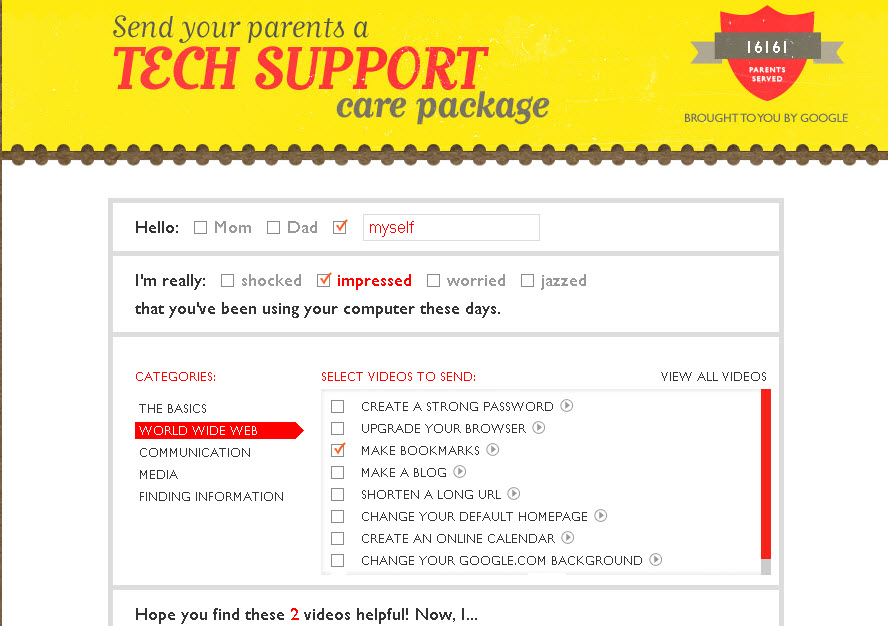
Here’s what you’ll find…remember, this is going to send the recipient (even if its you) and e-mail with embedded video links, so first, you have to create the e-mail. Simply fill in the blanks, select the videos you want to share, then click the ‘Preview’ button (at the bottom of the screen, not shown on this image):

(REMEMBER: The links and buttons and checkboxes, etc. in the images below do NOT work…these are ‘screenshots’ of the Google screens – not ‘live action’. To try it out for yourself, go to http://www.teachparentstech.org)

Google Tutorials Select Screen

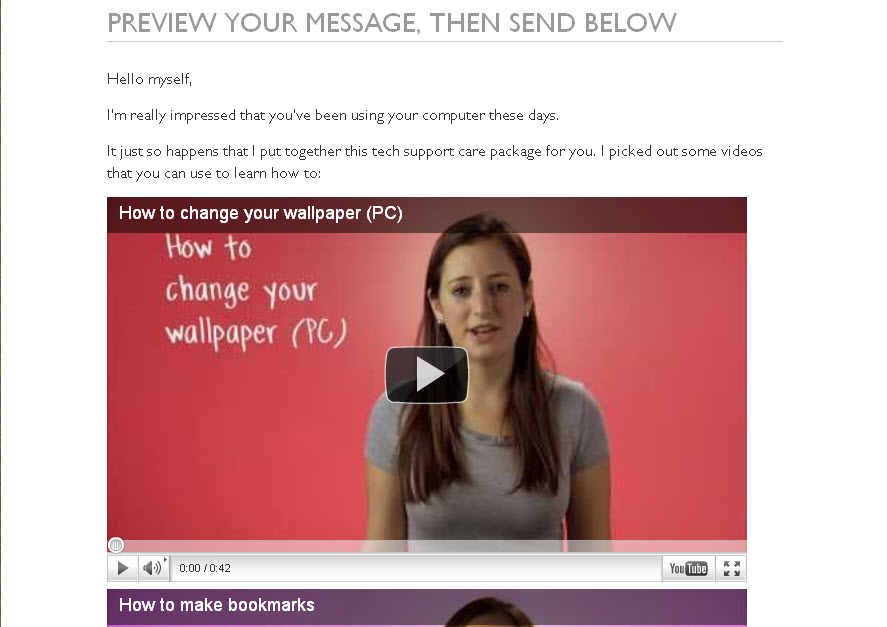
Next, you review what you’re sending. Check out your handiwork, and make sure that you’re sending the correct tips (even if it’s to yourself – nothing says you can’t give yourself a gift, right?):

Google Tutorials Preview

Enter the to/from e-mail addresses:

Google Tutorials E-mail

Lastly, send it off…you’ll get a confirmation:

Google Tutorials Confirm

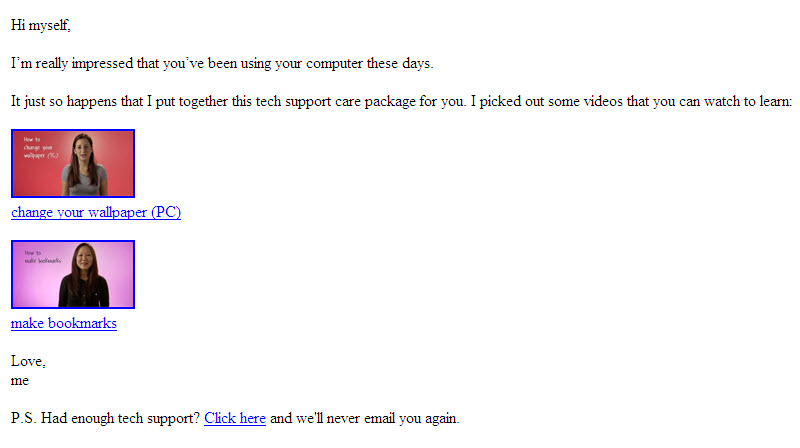
Then, the e-mail will arrive (you’ll get a copy and the recipient will get a copy)…here’s what it looks like:

Check it out…help yourself, or someone else, or both of you!

Is your Firefox Browser getting slow? Quick tip that may help…

This is just a really quick, down-and-dirty tip for Firefox users (if you don’t know what it is, Firefox is an Internet Browser that’s NOT Internet Explorer, but IS really good)…

If you find your Firefox (Mozilla) seems to run terribly slow after you download something from the internet, try this:

Open up your Browser
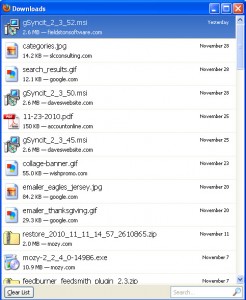
Press CTRL+J (that means “press the ‘control’ key on your keyboard at the same time that you press the letter ‘J’ on your keyboard – press the ‘control’ key first, then press the ‘J’ key). That will open up a list of downloads you’ve gotten via Firefox:

See that little ‘Clear List’ button on the lower-left side. Click it. That will clear the list of downloads (not the downloads themselves, but the list of the downloads). Close/re-open your browser. See if it starts behaving better when you download your next file.

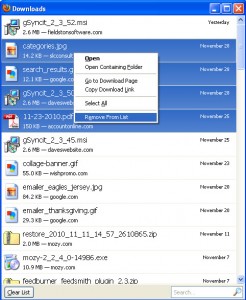
Even better for some of us that get off on discovering silly things…let’s say you want to preserve a portion of the list of downloads, but want to delete a bunch of others. Simply highlight the files that you want to eliminate from the list and right-click the group when you’re done:

Select the ‘Remove From List’ choice at the bottom of the list. Only those downloads that you’ve highlighted will be removed. Remember, the files remain on the computer, only the record in Firefox that they’ve been deleted are removed.

Give it a whirl. See if it gets your browser running a bit smoother after your next download.

(Thanks to PCWorld for this reminder…it’s one of those things that I know, but I wouldn’t remember when I needed to remember)

Creating PDF’s for free

I don’t know about you, but there are plenty of times when I want/need to turn a document (be it a Word, Excel, web page, online receipt, etc.) into a PDF document. If you’re not sure why you’d want to do this, please read on. If you want to do it, but don’t think you have the resources (i.e. it costs more than you want to spend for a PDF writer), then read on. If you’re already creating PDF’s, then you can skip this post :-)!

Most of us have heard the term ‘PDF’. Most of us have no idea (nor do we care to know) what ‘PDF’ stands for. For those of you who have a burning desire to know, ‘PDF’ stands for ‘Portable Document Format’. You can take this format anywhere. In other words, this is a file type which can be read on ANY type of computer, regardless of most of the software installed. As long as the computer has a PDF Reader installed (and PDF Readers are free), you can open/view these files.

A PDF document is most frequently read using Adobe’s Acrobat Reader which is installed on most computers (there are other PDF readers, but this one is the most popular). You may not even know it is there. If you receive a document whose little image/icon looks like this:

pdf icon

Then, you use a Adobe’s PDF reader to view it.

So, now to answer the burning question, “Why would I want to create PDF’s”?

I like PDF files for a couple of reasons. First, I like them because no one can easily edit them. They are ‘closed’ files. Whatever information is contained in the document is what’s in the document. (Note: There are ways to ‘open’ PDF files and make them editable again, but it takes more effort and additional software and most people won’t/can’t do it.)

So, if you ever create files that you want to share with other people – regardless of the software they have on their computer, or if you have files that you want to send to others, but you do NOT want them to make any changes to the file (perhaps a legal agreement or contract), then you might want to CREATE YOUR OWN PDF files.

A second reason for wanting to print to PDF is if you want to save web pages (or any other report or document outside of the typical Word/Excel area), to your computer for handy reference. Perhaps you want to save a receipt for an online purchase, but don’t necessarily want to waste the paper. Print that receipt to a PDF file instead of to paper. You’ve helped the environment, yet protected yourself by capturing the information on the online transaction. ANY document/page that can be printed to a standard printer can be printed to a PDF document instead.

While the Adobe reader is free, the Adobe software that allows you to create PDF files is, IMHO (in my humble opinion), priced fairly steeply. I might create a PDF document once a week. Frequently enough that I want a good, reliable tool to help me do it, but not often enough to want to make a big investment in the software. When I heard that there was free software out there that allows you to create PDF’s, I checked them out.

My favorite is CutePDF writer (found at http://www.cutepdf.com). There is a professional version with a bunch of bells and whistles that I wouldn’t use which costs $49.95, but the FREE version (downloadable from the link above) works wonderfully!!!! I have used it for years.

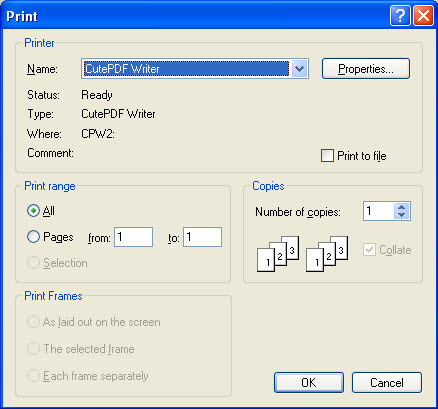
You download a small program, and run the installation. Then, it seemingly disappears…where did it go?!?! There’s no desktop icon for it. Honestly, I thought the install had gone awry. WRONG! The PDF Writer actually emulates (acts like) a printer that you have installed on your computer. So, when I go to ‘print’

CutePDF Writer

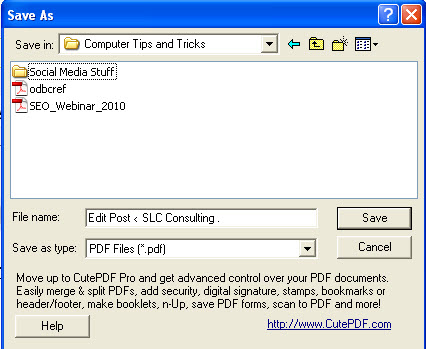
I simply select the CutePDF printer from my list of printers as shown above, then save the newly created file with any name I want, to any location I want:

CutePDF Writer Save As

Done. Easy as that. So, instead of printing out on paper, the document ‘prints’ to a PDF file, which you can then handle as you would any other virtual document you might have.

I’ve got to admit it…this is one of my absolutely favorite ‘toys’! There are other free PDF writers out there, but this one works fabulously well, and has never given me one iota of a problem.

Do you misplace files on your computer? Google Desktop to the rescue!

The other day, I had to locate a file on my computer that had been sent to me over a year ago. Really!?!? How am I supposed to remember where I put it?

I don’t know about you, but just as I am likely to misfile my paper records, I can just as easily (perhaps more easily) misfile my virtual files and records. While Windows has a weak file finding feature (say ‘file finding feature’ three times fast!), I find it clunky and slow. Likewise, Outlook has what I feel is a weak search feature for finding ‘stuff’ in e-mails. What if I don’t know whether the information I’m looking for is an e-mail or a document? What if I don’t remember who sent it or where I stored it?

When I had to locate that file, it was no big deal. Google, the defacto king of all things ‘Search’ allows you to search the information on your computer – just as you would search the web. After all, if Google can find thousands of search results across the entire World Wide Web in nano-seconds, it should be capable of finding one document on my computer. It is.

You’re already used to Google’s search features. If you go to http://desktop.google.com, you can read about Google Desktop’s features. To activate it on your computer, download and install the Google Desktop application. Once installed, Google Desktop will scan and index your computer, just as it does the internet. You don’t need to do anything…it does it automatically, and continues to do it as files are added/changed. The information and indexing never leaves your computer. It is not transmitted back to Google, so it remains private.

Once indexed, you can search your desktop quickly and accurately – just as you would perform a search on the web. Search results will tell you how many files were found containing the search string – and in what types of files. I find this particularly useful because sometimes the item I’m looking for is in an e-mail, sometimes it is in a Word document. Yet other times, it is in an image, or in a Powerpoint. I don’t necessarily know where my information is located.

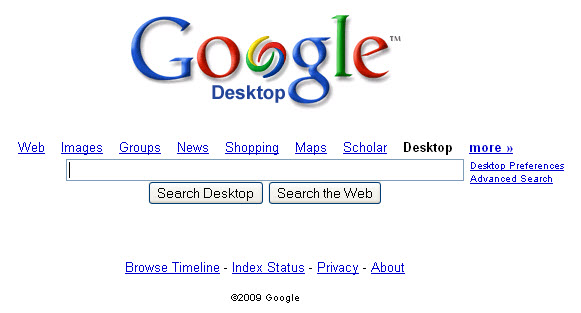
To give you a quick idea of what Google Desktop looks like, this is the ‘main’ search page:

Google Desktop

Looks remarkably like the ‘regular’ Google, doesn’t it? Makes me feel nice and comfortable.

Now, enter a search and check out the results:

Google Desktop search results

The results are listed below (just as web results would be, but I cut them out of this image for brevity’s sake), but what I love is the fact that it separates the results by type of file. Therefore, I can narrow down the results quickly and easily. “Finding” a file on my computer now usually takes only a second or two, rather than a huge *sigh* and the beginning of a manual search (or Windows Search) that may take me, at best, several minutes, and at worst, never allow me to find what I’m looking for. If Google Desktop finds an e-mail stored in my Outlook, there is a link which allows me to go directly to the original e-mail.

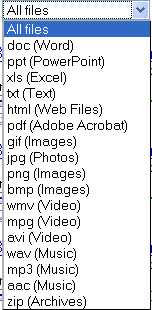
If you click on ‘files’, then Google Desktop allows you to further filter by type of file quickly and easily:

Google Desktop search file types

Oh…and did I mention the price? Free!

Getting the word out: Economical e-mail blasting

Whew!!! First, I want to thank everyone who has given me such phenomenal feedback on this nascent blog. You have been wonderful in your reception. Your enthusiasm encourages me to make sure that I keep doing what I thought you wanted me to do – share my experiences and tidbits that I come across as I go through my days with the ‘rest’ of the world. Well, OK…you all may not exactly be the entire ‘rest’ of the world, but you’re a mighty bunch, and you’re ‘my bunch’!

For many of you, this blog is one of the first that you’ve subscribed to. For others, it seems to sit apart in your mind from others for the style and simplicity. Yeah! That’s what we’re trying to accomplish.

Naturally, a lot of questions have resulted from the how’s and why’s of getting this blog off the ground. I’ve addressed much of that in the last three posts, but now, I’m getting questions about ‘how much did the initial e-mail blast cost’, or ‘how did you do the initial e-mail blast’, or ‘can I use something like this in my business?’

The answer: IT WAS FREE and EASY and FUN TO DO!!! Don’t believe me? Just go to http://www.mailchimp.com to find out. As to the question ‘Can you use it?’ the answer is: If you want an easy, inexpensive (‘free’ counts as ‘inexpensive’ to me) way to communicate on a regular basis with your customers, then ‘yes’, you can use it. There aren’t too many people who do NOT want an effective way to communicate with their clients and prospects.

MailChimp is a tool that I found when trying to find an e-mail blast system for a volunteer organization to which I belong. We were looking for a way to reach small groups of people (100 or so people in a bunch of different lists). Somewhere along the way, I stumbled upon MailChimp. MailChimp allows up to 1,000 subscribers in your list for FREE. You can send up to 6,000 e-mails per month for FREE. There is a little MailChimp logo at the bottom of the e-mail, but even the paid e-mail blasting systems put their logo in the footer. It’s not intrusive, and informs recipients that the e-mail is not ‘spam’, but part of an organized email campaign or delivery system, and allows the users the appropriate subscribe and opt-out alternatives.

What does all that mean? First, tools like this allow you to compose an e-mail once, then send it to a longgggg list of recipients of your choosing. E-mail services tend to view these e-mails as ‘good’ e-mails (not spam). You need to allow mass e-mail blast recipients to ‘opt out’ (i.e. not receive) e-mails from you any more, and services such as MailChimp offer that opportunity to the recipients, making you a ‘good’ e-mail blaster (rather than a ‘spammer’).

Within the 1,000 person, 6,000 e-mail limits of your free account (you can pay for larger lists, or for more e-mails per month), you can send 6 e-mails to 1,000 people, or 12 e-mails to 500 people, etc. The two counts are the maximums, but you can break it down in whatever fashion you want. I have a few clients who each send blasts to about 500 people, once a week or so. The ‘free’ version of MailChimp accommodates those needs perfectly!

Once you get by the cost (or lack thereof), comes the question: But how hard is it to use? I find it easier to use than other contact management systems with which I have worked. First, there is the little monkey dude (I’ve named him ‘George’ in my mind after ‘Curious George’ from the books by the same title) who is always helping you out. He’s a friendly sort! Corny, but friendly. Second, there are great tutorials available. Third, the screens are relatively uncluttered, so working your way through the steps is pretty easy.

If you have a format you want to use, you can copy/paste the HTML code into the screens, and create your e-mails from there. If you don’t have a pre-designed format (or you don’t have access/knowledge of HTML code), MailChimp has templates that you can use and customize to suit your needs. You can even set up e-mail blasts for your RSS feed. I haven’t tried that one yet, but I might sometime down the road…just to see how it functions.

The reports are beyond belief!! You can track the growth of your list, and you can track the activity of your campaigns (e-mail blasts). Yes, you can even see exactly WHO read your e-mail (and how many times). You can push your e-mail to the Social Sites, if that’s part of your marketing plan. You can ‘set it and forget it’. What?!?! Create the campaign/e-mail blast when you have time to do it, then set the time that it is to be sent. Whenever you set the ‘send’ time, the e-mail will go, allowing you to work ahead without bunching up the e-mails and annoying the recipients.

I’ve found that the free MailChimp has very few restrictions over the paid version – only the quantities of number of e-mails sent and size of list determine if you should/can remain on the free version. If your business supports more e-mails or a larger list, then you can pay by EITHER the number of e-mails sent OR the size of the list. Your pick. The charges, based upon my experience, seem very reasonable.

At any rate, MailChimp is a marvelous way to gain experience with managing your e-mail blasts without having to spend a fortune. Check it out! Give it a whirl! E-mail lists are ‘importable’ from any number of programs, so you don’t even have to key/re-key the contact information.

When you sign up, just tell ‘George’ hello for me…you’ll soon be ready for a banana break (you’ll know what I mean once you’ve tried it)!

How on earth did you create your blog? Part 3

In parts 1 and 2 of this article, we covered how to get a blog established and how to tweek it once you’ve installed it to represent your style. Here, we’re going to speak more to the posts themselves, and some other, miscellaneous items. This is it gang, for the ‘how did you create your blog’ series. We’ll go back to more ‘normal’ discussions after this.

Once I got my blog set in terms of the look and feel, and the functionality that I wanted (BTW, I was aiming for ‘bright and happy’ on the look, and ‘clean and simple’ for the functionality), I was ready to begin publishing! Remember, you are ‘publishing’. When you post to a blog (either as the original author or adding a comment), you are ‘publishing’ to the world…and its a much bigger world than is ever going to pick up a book…you never know when someone will read it. So, put your best foot forward, and don’t say anything you’d mind your mother reading :-).

Creating a post is very, very simple. Simply enter a title, add some text, and click ‘publish’. That said, there are a few things you want to think about when writing:

1. Your Title counts where Google and SEO (Search Engine Optimization) is concerned! Make it meaningful and pertinent to the discussion. The title weighs heavily in Google rankings.

2. You can add ‘Categories’ to your post which will group them in the navigation of your site. They are also used for Google/SEO rankings, but categorize by what makes sense, so users can find the information they are looking for easily. On this blog, the categories are:

SLC Blog Categories

You determine the Categories that each post belongs to. You can add as you go along – you don’t need to know all of them up front. Right now, these are the ones that we are using, but we may add more as we go along. The ‘Blog’ category wasn’t there initially, but made sense after we started these articles.

3. Before you publish, you can add ‘tags’ to the posts. “Tags” are more specific than broad categories, however, they are picked up by Google/SEO for search engine rankings. For instance, while this post is in the category ‘Blogging’, the tags will be ‘SEO’, ‘blogging’, ‘social media’, ‘blog categories’ and ‘blog tags’. The tags are much more specific than the categories.

For WordPress, there is a great FAQ on Categories vs. Tags here.

My last step, after I had gathered a bunch of posts and published them on the blog (I re-purposed content that I had previously used on my LinkedIn Group – there’s nothing wrong with doing that) was to send out a blast e-mail to most everyone in my list of Contacts. That may well be how you got here. Tell your contacts what you’re up to, what your blog is about, and why they might want to subscribe or check it out. Then, let them come!!

One note (and this may be the most important one)…you may have heard that content on Blogs is picked up by Google very quickly. I’m here to tell you that they (whomever ‘they’ are) weren’t kidding!!!! I posted my first blog article on October 29th, 2010 at 8:15pm. I had a Google Alert on ‘SLC Consulting’, with a link to my first blog article, in my Inbox on October 31st, 2010 at 4:52pm. I wish that my original site had been picked up that quickly (that took months…not less than 48 hours). That time was totally organic – I did nothing to try to ‘push’ the indexing through. I didn’t have tags yet. I didn’t post a link elsewhere. Basically, that first post was just sitting there, looking sexy :-)…and Google found it. For those people looking to drive traffic to their sites (that’s not my primary goal, but I know that it is foremost for some people), that is a compelling reason for starting a blog.

How on earth did you create your blog? Part 2

Now that you’re hooked, and you’ve made the commitment to writing a blog, you need to install your platform. Again, for purposes here, I’m discussing only WordPress (because its what this blog is using), but there are all kinds of others out there. Google’s blog creator is ‘Blogger’ which you can find at www.blogger.com. Google ‘free blog services’ and you’ll get myriad of alternatives.

So, back to what I encountered as I established this blog…

As we discussed in Part 1, I installed WordPress on my website, so that I host the blog, rather than WordPress hosting the blog (both alternatives are available). Next, I selected and installed a theme that expressed my ‘personality’ or the ‘personality’ of the blog.

Here was the first lesson: When doing most anything on WordPress, first you ‘install’ it, then you ‘activate’ it, then you ‘configure’ it. ‘Installing’ it downloads the appropriate files to your site. ‘Activating’ it actually makes the item operational on your site. ‘Configuring’ something means putting in your variables (e.g. the URL for your blog, or your Twitter address, etc.)

Next, I created a post – and commented on my own post. It was something innocuous that I could use to see what the site would look like when it was up and running. I actually tried installing and activating several themes before I decided that I liked this look and feel. One neat thing about a blog (unlike a LinkedIn discussion) is that you can edit or delete a discussion any time you want. So, you can put test ‘stuff’ out there, and see what it feels like and looks like to the community at large. If you change your mind later, just delete the post, or alter the blog configuration.

Because I want people to be able to subscribe to this blog, I went to the ‘plugins’ area and searched for a couple of plugins which would allow people to subscribe to the blog in various ways. I ended up using ‘Feedburner Feedsmith’ plugin to control the e-mail subscriptions. I was surprised, but not displeased, when I found that this was a Google product (my Google signon got me into the Feedburner site). Once the plugin was installed and activated, I sort of ‘lost’ it. That’s one tip to pass along: Once you install and activate a plugin, it will show up SOMEWHERE else in your tools for actual configuration and maintenance. In this case, the Feedburner plug-in appeared in my ‘widgets’ section. From there, I could configure it to suit my needs. The Feedburner plugin on my site controls the e-mail subscription area. I can see exactly WHO has subscribed to the e-mail subscription for the blog, how often those subscribers have visited, etc.

This is the portion of this Blog that is controlled by Feedburner:

Feedburner appearance on live site

Feedburner Installed on this blog

I also wanted to allow people to subscribe via and RSS feed, Twitter or use a graphic to subscribe to the e-mail service. There were lots of alternatives (and I certainly did NOT try them all – I tried them until I found one that worked for me), and I settled upon ‘Subscription Options’ by Tom Saunter. Again, I downloaded and activated it, then had to hunt around until I ‘found’ where it had been stashed in my control panel. Voila! I found it under ‘Widgets’ again (just like Feedburner). I dragged the widget to the location I wanted it, put in several configuration pieces of information and I was done. Pretty darned easy, once I got the hang of A) looking for the Plug-In elsewhere once installed and activated, and B) figuring out that there is minor configuration once you activate it. This is the portion of the blog that is controlled by the ‘Subscription Options’ plugin:

Subscription Options

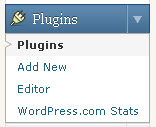
Lastly, I installed a plug-in to track the statistics on the blog itself. The plugin is not so creatively, but certainly effectively named “WordPress.com Stats”. Again, installed and activated…oops…need to sign up for a WordPress login in order to get an API code (whatever that is!)…got the code, entered the code…and where did the stats go? Hmmm…this one isn’t for the ‘public’, but for the Administrator, so it stays on the ‘behind the scenes side of the world’. This one is found in the Plugins area of the WordPress control panel:

WordPress.com Stats PlugIn

Now, when I click on that item in the navigation, I get a visual look at the activity on the blog. Very useful if you’re trying to quantify the success you are having with your blog.

After each PlugIn was installed, I checked how it performed from the ‘front side’. Tweaks and adjustments to get it ‘just so’ were required, but the basic functionality simply ‘was’. It just ‘appeared’ because I had activated and configured the plugin.

So, three steps to most plug-ins: Install, Activate, Configure. Only the configuration step really varies from plugin to plugin.

Next time, we’ll talk about the categories, tags and the big ‘launch’.