Tech Tips

What does “Defrag” do anyway?

OK…so you know that you’re supposed to “defrag” your computer, but most people don’t know why they’re doing it, or what it’s supposed to accomplish. Others don’t know where/how to do it. Here’s a quick lesson.

“Defragging” your computer is short for ‘defragmenting’. Computer hard drives get disorganized as information is added and deleted. While a computer is ‘smart’ enough to be able to locate/assemble this ‘disorganized’ information, it can operate faster if the information is stored ‘neatly’. How exactly, does information get ‘disorganized’ on a computer?

I like to use the analogy of a filing cabinet. If you are filing papers in a filing cabinet, you can store information in various drawers, and within the drawers, in various folders. Inside the folders, you can store information oldest to newest, newest to oldest, or haphazardly. If you’re in a hurry, you might misfile a paper. Perhaps you put it in the wrong place in the file. Maybe you put it in the wrong folder. Worse, you put it in the wrong drawer, altogether. Finding that misplaced piece of paper takes longer and longer the more misplaced you filed it. I’m not telling you anything you don’t know…its common sense.

Now, let’s think of your computer. Your computer ‘files’ documents (electronic files) as you work on them and save them. Every time you ‘file’ your electronic document, your computer looks for the first available space to stick the piece of paper. You’re computer doesn’t work alphabetically…it works on the first available space. If only part of the file fits into the space, then it actually rips the file apart and stores some parts of the file in one place, and some in another. Then, your computer writes a separate ‘note’ to itself telling itself all the places it filed that document. Don’t worry…your computer is good at this tracking. Unfortunately, the more files it gets, stored in more places, the longer it takes to locate the various pieces of the file and present them to you.

So…what is “Defrag”? “Defragging” your computer means that you’re going to reorganize all the files on your computer, so that they are stored logically. When you defrag your computer, you tell your computer to go reorganize itself! You tell it to go through all the files, gather them together in a logical fashion (rather than the ‘haphazard’ way they are stored when you first save them), then store them in the the most accessible (for a computer) manner.

Once your computer is defragged, it will be able to locate/access files faster. The more defragmented the hard-drive (think disorganized), the longer it takes to access the files.

Windows computers all have a built-in defragmentation tool. To locate it go to Start-Programs-Accessories-System Tools, then finally, select ‘Disk Defragmenter’. Differing versions of Windows have different Defragmenters, so I won’t show screen shots because your version might look different than mine. Once you open up the program, select a drive to be defragmented (typically ‘C’), then ‘Defragment Selected Volume’, and ‘Start’. This utility is basic, but functional.

If you want a Defragmentation Tool that is a bit more sophisticated (e.g. one which will automatically defrag, but is smart enough to know when you’re working on your machine, so it shouldn’t try to defrag), try Smart Defrag. It’s a FREE tool, easy to download and install, but offering some features that the basic Windows Defragmentation Utility doesn’t offer, click here for Smart Defrag Download.

Warning: If you’ve never ‘defragged’, this process can take quite a while. I recommend starting it at night, and letting it run while you sleep! It should be done by morning!

Lessons a Phila Biz Learned Updating Its Old Website – Tips for Hiring a Web Developer

One of my clients, Ellen Fisher (Publisher of the Women’s Yellow Pages of Greater Philadelphia) and I had the pleasure of speaking with Joseph Mutidjo, a reporter for SmallBizTechnology.com. The following is a reprint of the article he wrote describing the process we went through when updating Ellen’s website.

Lessons A Phila Biz Learned Updating Its Old Web Site: Tips for Hiring A Web Developer

March 24, 2011 by Joseph Mutidjo
Originally published here: SmallBizTechnology.com

New Women's Yellow Pages SiteChange can be hard, even when you have to let go of that faithful 10 year-old website.

Ellen Fisher, the founder and publisher of the Women’s Yellow Pages of Greater Philadelphia, knew she had to update the 3,000-page website she first launched in 1999. That was back when she saw the Internet as the way of the future for her print directory of women-owned businesses and women’s organizations.

“If I wanted to stay in business I had to make certain changes. Our database was working fine, but our website was in frames and not good for search engine optimization,” explained Fisher. “We didn’t want to redo everything, since our data collection processes worked well, but our clients wanted to be able to advertise online (in addition to listings), so we needed to create that real estate on our website and be able to manage this new offering.”

Fisher hired Sandra Clitter, owner of SLC Consulting, as the project manager and technical lead for the job. The two ladies first met at a small networking event hosted by the National Association of Women Business Owners (NAWBO).

“We hired her to do a few little tweaks to the database and then realized we were in love—with the way she worked with us,” Fisher said.

Fisher emphasized that when looking for an IT consultant or web developer to partner with, small business owners should not just look for a good programmer (or someone with good technical skills), but someone “who is interested in learning about your business in detail.”

Original Women's Yellow Pages SiteClitter was surprised Fisher had kept her site running for so long as they did with decade-old technology. The two had several brainstorming sessions to define the site’s purpose, outline the problems and craft effective solutions. Clitter presented Fisher with several solutions at varying price points, and discussed the pros and cons to each solution.

“Careful consideration has to be given to the purpose of the website—who is visiting, why are they there, are they conducting transactions, or simply getting information, is the information updated frequently or only occasionally. Answers to each of those questions should determine a different path for the technology underlying the website,” Clitter said.

They settled on a solution that cost $10,000, and started the 6-month renovation project—together. Clitter points out that building or rebuilding a website should be a close collaboration between client and provider.

“Clients often don’t realize that they need to participate in the project themselves in order to make sure that their substantial knowledge of their business are accommodated and incorporated as appropriate. Additionally, because we’re dealing with technology, an area that’s very uncomfortable for many people, there is an ongoing education process required. . . . The owner of the site should understand how/why the various components of technology have been chosen, even if they can’t understand the specific technology itself,” she said.

Many small business owners “hang on to their old site for longer than its useful life” because of their unfamiliarity with and fear of new technology, noted Clitter. A website, as with anything else, has a lifespan. She explained a “plain ol’ HTML page really never stops working,” but a website can have its visual component as well as functional underpinnings become obsolete.

“Make the website maintenance a part of the business budget each and every year—updating various parts that are ‘worn,’ or have better solutions can help it run longer. Like any other technology, websites need ‘tune-ups,’ just as a piece of hardware or other software does. Like hardware, organizations need to have a website replacement period and build it into the budget. It is unlikely that many computers of five years or older are still in place, functioning efficiently—and it is likely that websites of that age or older should also not be in place,” Clitter said.

Fisher said the updated website is a “stellar product,” and impressions have increased significantly. Five years from now, here’s looking forward to the roll out of another stellar website.

By Joseph Mutidjo, Reporter, Smallbiztechnology.com

What the heck is an ‘add on’, ‘add in’, or ‘plug in’?

Does it seem to you like you need to learn a new language every week as technology marches forward. First, you figure out that a ‘mouse’ isn’t some small, furry creature hiding in your walls. Next, a ‘virus’ isn’t something that you have to go to the doctor to cure. Then, ‘tweet’ is no longer something said by a bird! What!?!?!

The list goes on and on. We’ve all gotten those e-mails that have a long list of computer terminology that used to mean one thing, but now means something entirely different. Don’t you end up laughing out loud (aka LOL) and nodding your head? I know that I do.

And, those are the ‘major’ terms that we run across. So while we’re desperately struggling to keep up with those ‘popular’ terms, there’s another entire subculture of terms bubbling up. Those terms are the ones that might be casually mentioned in an article, included in the instructions for yet another contraption you’re trying to set-up or untangle, be the label for a menu choice on a screen, etc. They’re not big and flashy terms, but they’re tiny ones that just sneak up on you! All of a sudden, you’re surrounded by them…it’s time to figure out what they mean :-).

Today, let’s tackle one group of these ‘other’ terms. I seem to find myself running across terms like ‘Add-on’, ‘Add-in’ and ‘Plugin’ more and more frequently. While there may be some fine distinctions between these words, to me they are all part of one ‘class’ – basically, little programs that you can utilize to make bigger programs work more to your liking. Actually, they are quite ingenious! They allow you to customize applications…what a great concept!!! Who used to use the slogan ‘Have it your way’? I think that belongs to Burger King, but plug-ins and add-ons allow you to have your programs work your way.

First, a program is created with some basic functionality. It might even be a pretty sophisticated program (e.g. WordPress [in which this blog is created], Outlook [my e-mail/calendar/contacts program of choice], or Firefox [my browser of choice]). But regardless of how sophisticated the program, there’s always going to be ‘one more feature’ that you just WISHED you had. Some feature that would make it soooo much easier, or more convenient, when utilizing that particular software.

Enter the plug-in or add-on. These are tiny programs that run in conjunction with other, typically larger, programs. Each plug-in or add-on has a very specific job – a job that the ‘parent’ program doesn’t do. They enhance the larger program, adding a functionality that you may need, but that not everyone may want. I’ll give you a few examples.

In Outlook, I wanted to be able to sync all my information to my Gmail account – INCLUDING NOTES. I found a plug-in to Outlook (the one I found is called gSyncIt [available from Fieldstone Software]) which does just that. Install it and kabang! I can sync my Outlook Notes to my Gmail account.

Another example is in WordPress. Among the valuable comments made by many blog readers, there are also a bunch of people who make rude or unpublishable comments (consider it blog spam). In order to filter them out, you can add a plug-in called Akismet which automatically filters out ‘spam’ comments. Install it, and blog spam is significantly reduced.

This blog also uses a Statistics plug in, so that I can see, at a glance, what the traffic to the blog looked like for a given time period. This plug-in functions like Google Analytics, but just for the blog. Most interesting to me about this plug-in is that WordPress itself put it out to enhance its own tool. They realize that this feature might not be important to all bloggers, so they allow us the ability to install it (plug it in, as it were) if we want to use it.

The last example that I’ll give here is a Firefox Add-In. I often need to FTP something to the web (‘FTP’ stands for ‘File Transfer Protocol’ and is the way that web-pages are published, or information is passed to/from the web). Internet Explorer has an FTP utility built in, but many people don’t need it, so it just adds baggage to the program. Firefox doesn’t deliver it by default, but users can install FireFTP to the Firefox browser and voila! I can FTP from Firefox, just as I would via IE.

All of these little ‘tools’ make my online life much easier.

Bottom line: If you use a program and find yourself saying ‘I wish this program did X’, then try Googling the program name along with a brief description of the added functionality you wish you had, and see what pops up. More and more programs are allowing plug-ins, add-ons, add-ins (whatever you want to call them) to their programs. Take advantage of them! Your computing life may improve drastically.

P.S. Both Firefox and WordPress have pages dedicated to helping you find valuable add-ins. Here are links to those:
Firefox
WordPress

Cheap and easy way to capture screen shots of your computer

Whether you’re trying to create documentation in a ‘how to’ manual, or send a screenshot to your boss, or trying to explain to Tech Support what’s going on with your computer, being able to do isolated screen captures is a marvelous capability to have.

First, you should know that to capture your entire screen, you only have to press the ‘PrtSc’ or ‘PrtScn’ button on your computer keyboard (usually found above the numbers keys or the F-keys). Then, open up any word processing document and click or right-click and paste or CTRL+V. Voila! Your entire screen appears in the document.

But sometimes, you only want an isolated part of your screen. What do you do then?

If you’ve read this blog in the past, you’ll see images embedded – many of them bits and pieces of my computer screen, rather than the entire screen.

For instance, if I want to show you a piece of the window I’m editing this post in, I might show something like this:

easy capture image sample

So, how the heck do I do this? There are two tools that I use – one is FREE and one costs about $50. Why not just use the free tool? Well, because the tool that you pay for has some more features that I find useful, but I started with the free tool.

As you all know, I like a free tool wherever possible…if I need to upgrade, I do so when I’m actually capable of using the additional features.

So, the two tools are:
Easy-Capture (FREEWARE)
Snag-It (30-day free trial, $49.95)

Not only do these tools allow you to capture screenshots from your computer, they also allow you to do simple image editing – which for me, is all the image editing that I’m capable of doing. I want to crop, adjust the size, adjust the color, etc. Mind you, these tools aren’t PhotoShop, but if you only need to work on an image occasionally, and just need to make simple changes, then these tools may work for you.

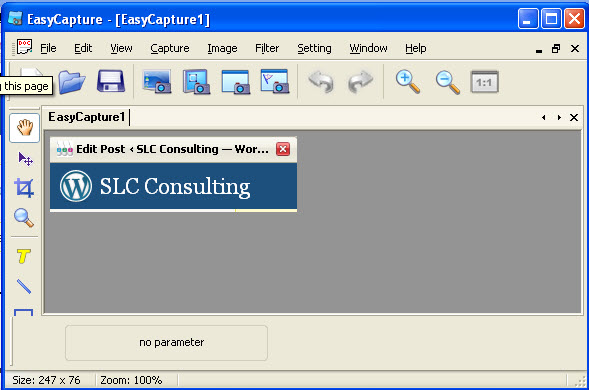
How do they work? What do they look like? I’ll use the Easy-Capture as an example:

easy capture main screen

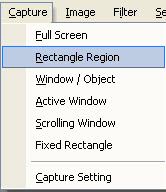
You simply select the type of capture you want to do from the ‘Capture’ menu:

easy capture capture menu

Once you’ve picked the type of area you want to capture, you’ll be given further instructions (in this case, I said that I wanted to capture a ‘rectangle region’, and it gives me this image:

easy capture area capture

The instructions tell me to ‘lasso’ the area that I want. It took me a couple of tries the first time, but once I got the hang of it, it was very easy. When I release the mouse, the image that I ‘caught’ appears in the capture window:

easy capture image captured

From here, I can use the toolbar at the top, or the icons on the sides to manipulate the image and save it. I can save the image in a variety of formats (the typical jpg, gif, bmp, etc.). Once it’s saved on my computer, I can place it anywhere I want.

Both these tools download and install quickly without alot of computer ‘overhead’ (i.e. they’re don’t hog all of the computer resources). I use them ALL THE TIME, yet I don’t even use all the functionality that they have available. Like most things in life, I use what I get comfortable with. Tools like Photoshop by Adobe, while incredibly flexible actually have TOO MANY features for me. Additionally, I don’t need an expensive tool to do something this basic.

I find that Easy-Capture or Snag-It have all of the image capturing and photo editing capabilities that I need.

HTTP or HTTPS: What’s the difference and why should I care?

(Another question from one of our readers…thanks for helping me with ideas!)

I don’t know about you, but as each day passes, I find that more and more of my daily financial transactions occur on the web. I check my bank balances online. I write checks online. I get my statements online. I order books online. I rent movies online. The list goes on and on and on. We all hear horror stories about people whose identity has been compromised. Without getting overly paranoid, and worrying every time you press the ‘submit’ button, how can you make sure that the information you enter is safe?

You may or may not notice when you go to a website that typically, the URL (the web address) begins with ‘HTTP’ (which, for those of you who care [I’m not one of those people] stands for ‘HyperText Transfer Protocol’), but there are a few along the way that begin with ‘HTTPS’ (the ‘S’ standing for ‘SSL’).

There is a basic rule that I try to follow: Before entering personal information (particularly financial or credit card info), make sure that the website you are on begins with ‘HTTPS’. When the site begins with ‘HTTPS’, it means that there is a ‘combination lock’ put on the information you enter, and only the bank/merchant has the combination to unlock the information. A more technical term for this is that the data is sent in an ‘encrypted’ format.

When you go to a secure site (one on which your information is sent via encrypted mode), the URL switches from ‘http’ to ‘https’. I’ll use a popular bank’s website as the example. Here is what the URL looks like on the Home Page:

image of an HTTP URL

This is an UNSECURE site – it is presenting information, rather than gathering ‘sensitive’ information.

Now, when I click on the ‘login’ area, the URL switches to this:

image of an HTTPS URL

Additionally, in the lower-right corner of your browser window, there will be a little security padlock on an HTTPS URL icon (it’s a little, gold padlock). I always look for the padlock, as opposed to the ‘https’ (no reason, just what I pay attention to).

That little gold padlock means that you can enter sensitive information – like SS #, Credit Card #’s, etc. here and it can’t be ‘read’ without the combination to decode it.

There are sites which are not secure (i.e. those which begin with a simple ‘HTTP’) which ask for Credit Card info or SS #’s. That doesn’t necessarily mean that they are bad, but those sites are NOT encrypted, and people (i.e. hackers) CAN intercept the information and ‘pluck’ your personal info and use it for evil (I have no idea how they do it, but they can and do). That doesn’t mean that they WILL do that…just that they CAN do it. I have given my CC over non-secure sites when I’m fairly sure that that site is not a major target of hackers, and I have entered the site from the browser by entering the URL (as opposed to clicking on a link in an e-mail). I know that I take a calculated risk by doing this, but I admit that I have done it.

I’ll give you an example. I’ve been a nut for Lucy the Elephant in Margate, NJ since I was 5-years-old and gave money to ‘save’ her with change from candy purchases at the penny-candy store.

Lucy the Elephant, Margate, NJ

(Sidenote: “Lucy” was a novelty hotel in the early part of the 20th century. She has been restored and is now a wonderful museum…make sure you visit her if you’re at the Jersey Shore.)

When I heard that some of her ‘skin’ had blown off during a storm, I wanted to donate to help repair her. I went to this link on the “Lucy” site to donate:

http://www.lucytheelephant.org/donate.html

You can see that it is NOT a secure site (no ‘HTTPS’). Anyone (well, anyone with a certain skill-set) could have plucked my CC # and Security Code from the ether. I thought about mailing the check, but wasn’t at home. Instead, I took the calculated risk that there wasn’t anyone ‘camping out’ on that site to harvest my info, and hit the ‘submit’ button. Nothing bad happened, but it COULD have and it would have been my fault. I try to make that kind of an event a rarity, rather than the norm.

Bottom line: Just because a site is NOT secure doesn’t mean that your information WILL be compromised, it just means that it CAN be harvested. THINK before you CLICK!!!

Convert a PDF Document back to Word
(or Excel or Powerpoint)

(This topic is at the request of one of our readers. If you have a specific request, please feel free to drop me a note and I’ll see what I can do!)

Back in December, we wrote about creating PDF’s for free (to check out that topic, please click here), and why you might want to create a PDF document, rather than sending an ‘open’ document (be it Word or Excel or anything else) to a client, vendor, etc.

Here’s the flip-side of that discussion. What happens when you RECEIVE or have a PDF, but don’t have the original document. If you want to edit the document, include portions of that PDF in another document, utilize a portion of an existing contract as the basis for a new contract, etc. WITHOUT RETYPING, what do you do? Can you get it back into an ‘open’ document? The answer: It depends. Huh?

The first thing that you need to do is to figure out whether the PDF was created as an image or not. How do you do that? Easy. Open up the PDF in question. We’re going to be using two as samples here:

This is a PDF created from a Word document:

PDF Created as Text

This is a PDF that was created as an image from a scanned document:

PDF Created as Image

What’s the difference, you ask? They look the same as the PDF, don’t they (well, different words, but the same ‘look’)? They do until you try to copy/paste from within the documents:

This is the one where the PDF was created from the original text document:

PDF Created as Text

Click here to try to highlight the text version for yourself.

This one was the scanned document that turns into an image during the scan:

PDF Created as Image

Click here to try to highlight the image version for yourself.

You’ll see that the one that was created from the original Word document highlights as distinct lines. The one that ended up as an image simply highlights in its entirety.

If you find that your PDF highlights when you try to copy like the image immediately above, sorry…you’re probably going to have to re-key the document. Its not likely that you can readily convert it.

If you find that your PDF highlights as individual lines, as the first example, you’re in luck! You have options for conversion. You’ll have pretty good luck in converting your PDF back to text you can manipulate.

The easiest option is simply to copy the PDF and paste into a Word document. You’ll lose formatting, but you won’t need to rekey everything. Just edit and reformat and away you go.

A copied/pasted document might look something like this after you copy it back to Word:

PDF Converted to Word by copy/paste

A PDF run through a free converter called “Free PDF to Word Converter” which is available for download and readily installs on your local computer looks like this:

PDF Converted to Word by free conversion

A PDF run through a FREE online converter called “PDFtoWord.com” (no installation required on your computer – you upload the PDF to be converted, and the converted file is e-mailed right back to you) might looks like this:

PDF Converted to Word by free conversion

You’ll note that none of the ‘converted back to Word’ documents are identical to the original PDF, but all are serviceable. You can easily reformat them back to their original brilliance! Different conversion utilities will produce different results depending upon the contents of the document. Try more than one if the original try isn’t satisfactory.

There is another FREE online tool which converts PDF’s back to Excel. PDFtoExcelOnline.com works just like the PDFtoWord online converter. Upload the file, enter your e-mail, and the converted file is e-mailed to you.

Powerpoint presentations that have been converted to a PDF can also be converted back to Powerpoint using the FREE online tool ConvertPDFtoPowerpoint.com

Bottom line: There are a bunch of FREE tools available that can help you convert PDF’s back to their original files. Each alternative (and I’ve named just a few of them here) ends up with slightly different results. So, if you don’t like the results from one alternative, try another. (Suggestion: Google “free converter pdf to _____” and insert what you’re trying to get back to in the blank to find alternate tools).

More Keyboard Shortcuts – highlighting a word or paragraph

This is just going to be short and sweet today, gang. Somehow, the number of hours in a day are simply not stretching to cover the amount of work on my desk!! 🙂

A few weeks back, I did a post on Windows 7 keyboard shortcuts. People seemed to enjoy picking up one or two new useful tricks, so I thought I’d pass along a couple of more.

This week, I ran across two keyboard shortcuts that I’d forgotten about that are really useful. Most of us know that we can left-click and drag our mouse across a word (or paragraph) to highlight it. For those of you who might not know, you might do this in order to delete a word, make a word bold, or make a word italicized, etc. Maybe you want to copy a word or paragraph and paste it somewhere else. If you want to do any of these things, you start by highlighting the word (or paragraph).

Well typically, I click to the space immediately to the left of the word(s) that I want to highlight, and then I hold down the left-click button on my mouse, and drag the cursor across the word to highlight it, ending by releasing the button. Then, I do whatever I want to it. I can click the ‘B’ button on my toolbar to ‘bold’ the word, etc.

Click-in in front of the word:
click in in front of a word

Hold the left-click button down and drag to the end of the area to be highlighted:
drag to highlight a word

That’s all fine and dandy, but it requires some manual dexterity to do it accurately. It can be particularly tedious for people with a touch-pad mouse which is either overly sensitive or too ‘dull’.

Anyway, here’s the trick (I know, I know…get to the point already!! I just wanted to make sure that everyone knew what I meant by highlighting text).

Simply double-click on the word (to highlight a word) – anywhere in the word – OR – triple-click (yes, TRIPLE click) in a paragraph to highlight an entire paragraph. Voila! You’ve highlighted either the word or the paragraph in one fell swoop. Much faster than dragging to highlight because you don’t need to worry about the precision.

If you single-click in to a word, it will appear like this:
single-click a word

If you double-click on a word, the whole word highlights:
double-click a word

If you triple-click anywhere in a paragraph, the entire paragraph highlights:
triple-click a word

From there, you can do whatever you wanted…right-click and copy, hit CTRL+B to bold the word/paragraph, hit CTRL+I to italicize the word/paragraph…the possibilities are endless!! All from a simple double-click or triple-click. (NOTE: when I say something like ‘CTRL+B’, it means hold down the ‘CTRL’ key on your keyboard, then press the ‘B’ key – press the ‘CTRL’ key PLUS the ‘B’ key)

(See, I threw in a couple of extra keyboarding shortcuts – just for good measure!)

From the ashes (well actually, puddles) of a disaster…

Backups…one of ‘those’ words that no one wants to think about/deal with/contemplate. I know, it should qualify as a 4-letter word. Alas, it’s a lonely, 6-letter word (or 7-letter if its plural). I’ve ‘learned the hard way’ often enough (meaning I’ve lost data when a hard-drive fried or whatever) to be pretty good (Note: pretty good is NOT great, nor is it an acceptable plan) about backing up. Well, I learned recently that pretty good just doesn’t cut it – and I’m changing my habits.

The lesson goes like this: I’m sitting in my office and the phone rings. Before I even get out the “Good morning, this is Sandy”, a semi-hysterical voice on the other end says, “Sandy, please tell me that you have our data!” Not a good opening sentence – no matter the scenario.

Needless to say, the person was a client of mine. Now typically, I don’t keep client data in my office. There are times, however, when I have a copy for development purposes. It’s not a backup, it’s usually not even current…but it is (or was) an accurate representation of their data at some point in time. “Well, I may, but if I do it’s at least a few months old – WHY!?!? Don’t you have backups?”

The short version of the story is that ‘yes’, my client diligently backed up their data every night to an external hard-drive (one of those hard drives that plugs into a USB port in your computer onto which you can copy however much of the data from your main computer(s) you consider important). Here’s the rub…

The external hard-drive sat right next to the server in the closet that houses the computer equipment. Well, during the night, a pipe burst DIRECTLY OVER THAT CLOSET and drowned not only the main server, but also the external hard drive. They were both, to use a highly technical term, kaput. The main computer was dead and the backup wasn’t any good, either. They were in deep doo-doo (another technical term!).

We don’t need to recount the painful recovery here. What we want to realize is that a ‘disaster’ – including, but not limited to, your computer crashing – can happen to ANY of us. Buildings can burn, floods can happen (seen that one up close and in person), robberies can occur, etc. So, in order to have a LEGITIMATE backup plan – for your personal information OR your business records, you need to have OFF-SITE BACKUP!!

Off-Site backup simply means having a copy of your important files somewhere besides the primary location. So, if you have an office, keep a copy of your backup at your house. If you work out of your house, keep a copy of your backup at your mom’s house, or in a safe deposit box. There are all kinds of ‘off-site’ storage facilities available that don’t cost anything. With the cost of external hard drives so low (a 4GB flash drive is under $10.00 while a 500GB external hard-drive can cost under $75.00), you can buy several, and rotate them out…always keeping the most recent copy in a DIFFERENT LOCATION than the computer.

If, however, you find it difficult to be disciplined about making those backups and moving them off-site, then perhaps you should consider one of the many on-line backup services which are very affordable nowadays. These backups go to the ‘cloud’. In other words, your computer backs up over your internet connection, and the data is stored in a server far, far away from you. If disaster ever strikes, your data is safe…just download it when you have a computer set up again.

Personally, I have used the ‘keep a copy in the safe deposit box’ method for a number of years. I’ll admit, sometimes I’m better at remembering to refresh that copy than others. After this client’s ‘near death’ experience, they went with a ‘cloud’ solution, and I found their experience so positive that I tried it as well. Now, I back up to the ‘cloud’ virtually continuously. For under $50.00/year (I use mozy.com, but there are a bunch of reputable companies out there who provide this type of service for a very reasonable cost), all my files – both personal and professional (don’t forget all those digital photos that are so precious, or your family tree research that live on your personal computer) are backed up to the cloud.

I have tested recovering files, and it works just fine (an online backup isn’t any good if you can’t recover a file that you’ve lost for some reason). I was very skeptical about ‘losing control’ of my data, but based upon research I’ve done and discussions I’ve had with people who have far more experience than I have with online backup/storage solutions, I believe that my data is safe. [If you want to read about a bunch of people’s opinions on the subject check out this CNET Forum discussion: “What’s your take on online backup services?”]

So, there are a BUNCH of alternatives to help you avoid a disaster like my client had to deal with. The only alternative that is NOT acceptable is doing NOTHING. Create a backup plan. Make sure that it includes keeping a copy of your important data somewhere else. Follow the plan! Regularly test the recovery process by recovering a file that is on the backup to verify that the backup plan is working. WHEN trouble strikes (and it is just a matter of ‘when’ and to what degree, not ‘if’), you’ll be prepared. Annoyed that you have to deal with it, but not devastated by the event itself.

Dealing with Technophobia (fear of technology)

As some of you may have picked up during these discussions, while I am often considered a ‘techie’ by people who are intimidated by technology, I’m really not an early adopter (typically) of technology. I tend to take my time, allow other people to ‘take the lumps’, and then, when the technology (whatever it is) gains a little bit of traction (or ‘a-lot-a-bit’ of traction), I’ll consider including it into my technology portfolio. I consider my approach prudent. You can argue with that, but that tends to be my approach.

That said, there are certain people who are really technophobes. Wikipedia defines ‘technophobia’ as:
The fear or dislike of advanced technology or complex devices, especially computers. The term is generally used in the sense of an irrational fear, but others contend fears are justified. (Wikipedia definition)

I do NOT consider myself a technophobe, but I can be resistant to adopting new technologies.

Currently, I am being resistant to several things:
1. Office 2007/2010 (Office 2003 is just so darned comfortable)
2. Trying a Mac (I don’t know why…I tell myself I don’t want to pay the premium for the Apple product, yet I have an iPod)
3. Digital Book Readers (I like the ‘feel’ of a book in my hand)

Here’s what I’ve found helps when I’m feeling overwhelmed by all the technology around me:

1. Find someone else who has/uses that technology and try it out – or get them to show you the BASICS (note: the BASICS, not all the fancy stuff). It’s far less scary when you try it with someone who already uses it.

2. See if there is a portion of the technology that you can try before you fully commit. A couple of examples are: a. Test out the ‘trial period’ version of software. Oftentimes, you can get a 30 day peek at a software without shelling out the dollars. Then, at the end of the 30 days, if you like it, you can purchase it. b. Sign up for a service and just lurk. Watch what happens. Social Media is a prime example of this. Just because you sign up for a Facebook account doesn’t mean that you HAVE to actively participate. ‘Friend’ a couple of people (or accept one or two friend requests that you already have out there). ‘Like’ a merchant or organization that you want information from. Sit back and watch…you’ll get the feel for it without a huge time investment.

3. Determine whether its something that you’ve ‘gotta have’ or whether you’re doing it ‘because everyone else is’. In this day and age, you probably HAVE TO HAVE a computer, but you don’t NEED TO HAVE the biggest/fastest one.

4. Wait a bit – until the initial adoption phase is over. Let someone else work out the big kinks. Just don’t kid yourself that 2-3 years is the ‘breaking in period’…in that amount of time, the technology has changed totally.

5. Don’t worry about ‘everyone else’ using it/doing it. If the technology that you have does what you need it to do, stick with it until it breaks. THEN invest in the more modern technology. Not only will you have fewer issues because other people have shaken the kinks out, but it will probably cost less because you won’t be paying for that ‘latest gadget’ premium.

Lessons from my 83-year-old Uncle

Do you ever have those moments of total clarity? Moments when you step back, look at something, and say ‘why didn’t I see that before’, or ‘why didn’t I think of that’, or whatever? Some people call them ‘Aha’ moments. Well, I recently had a two MAJOR ‘aha’ moments.

Let me set the stage. My uncle LOVES technology. Yup. You read correctly. He’s 83, but he never hesitates to try out something new gizmo or gadget. In fact, he dives in with both feet, so to speak.

This past fall, he decided that the DVR provided by the cable company didn’t really do all the things that he wanted it to do, so he went online, researched Tivo, called them up and ordered a Tivo box. When it arrived, he dismantled the existing configuration and inserted the Tivo box. His TV setup now allows him to record four different shows at one time – two on the Tivo, one on an old DVR, and one on an old VCR. All of them are set up with the gorgeous flat-screen TV that he purchased some five years ago – before most people had flat-screen TVs. Last year, he bought, and installed, a sound bar, so that he got stereo quality sound, rather than the weaselly sound that comes out of the TV speakers.

My uncle doesn’t call other people to do the installations. He doesn’t wait until someone shows up in the house who can do the installation. He just jumps right in and tries it. If it works, great. If it doesn’t, then he’ll begin researching from the point of the breakdown and try any suggestions that he comes across. Most of the time, he solves any issues himself.

His love of technology doesn’t stop with the A/V stuff. He has a computer network (which he installed) in his house, and 3 computers on which he works (one is a Netbook, one is a laptop, and one is a desktop). He has a proper backup system installed, so that he doesn’t lose his work.

He set up a website locally on his laptop to ‘try it out’. This wasn’t just static web-pages either, but a SQL driven website! Really!

He subscribes to PC World magazine, and reads it cover-to-cover the day it arrives. He saves them, so that if he needs to research something later, he’ll have the issues handy. If he can’t find it in the magazine, he’ll try online at pcworld.com or cnet.com.

OK, Sandy…get back to the ‘moment of clarity’. Actually, there were TWO moments of clarity.

The first: He asked me what I thought about digital book readers (e.g. Kindle, Nook, etc.). I told him that I wasn’t all that jazzed about them because I like the feel of a book in my hands. ‘Why are you asking?’, says I. ‘Oh, I’ve been researching them [this time Consumer Reports was the backbone of the research], and I’ve decided to get a Kindle’. WHAT!?!?! I don’t want to give up my paper books, and my 83-year-old Uncle is going to? Yikes.

The second: Before he starts any project, he READS THE DIRECTIONS!! What a concept! If the directions don’t come with the product, he’ll find them online and print them out. It’s amazing what reading the directions will do to make a project run smoothly. (I’m more of a ‘jump right in with both feet’ kind of person, and often have to backtrack to clear up issues I’ve created for myself).

My ‘aha’ moments?

1. That maybe I should be more willing to try out new technology before it becomes ‘old’ technology.
2. The next project I begin (regardless of what it is), I vow to actually READ the DIRECTIONS!!!

Take it from an 83-year-old…technology is something to be embraced!