(Mostly) Free Tools

Are directions to your business/home in online maps missing or incorrect?

Saturday, while I was putting stuff out on my driveway for a yard sale, I realized that maps – the kind you used to get at the gas station or AAA – are quickly becoming a thing of the past…maybe even collector’s items. I actually thought about pulling them back into the garage, but decided that I’d let someone else make ‘millions’ from my old Esso (remember that?) maps of New Jersey.

Like many people, I use online directions and mapping (typically Yahoo Maps, Google Maps or Mapquest) to get from place to place. No, I don’t have a GPS in my car yet. I know that my smartphone can act as a GPS, but it drains the battery very quickly, so I don’t use it. I try to plan ahead {grin} and print off my directions. There are times when I have NO IDEA where I’m going (no familiarity with the town or area), so I’ll print off directions from more than one site. Why? Because I have found times when the online maps fail me!! They tell me to turn left into a brick wall, or make me get off at a different exit than the signs indicate I should. It can be frustrating, but usually, I get where I’m going.

Real trouble can arise when you try to find something relatively new. Say, for example, your friends just moved into a new development. The directions get you as far as the entrance to the development, but not through the maze of the development itself. Or perhaps, as happened with one of my clients, your address changes with the Post Office (no, the business didn’t move…the USPS simply changed the address), so now the old address is the one in the mapping, but the new address is the one that people need. If you put the new address into mapping software, you end up about 3 miles away from the ‘real’ location you’re trying to reach.

I’ve always thought that you just have to wait it out, that the maps will eventually get changed. I never knew ‘how’ Google or Yahoo or Mapquest would ‘know’. I just figured that they have some way of ‘catching up’. For my client, it’s been 18 months, and the maps are still wrong. I didn’t know that there was a way to get the Google Maps, at least, caught up.

Imagine my surprise when I stumbled upon Google Map Maker. Google Map Maker allows you to map things previously unmapped (e.g. your favorite corner tappy or pizza joint), fill in buildings on your college campus, create walking paths, and yes, even correct locations!

Click here to go to Google Map Maker for the US

Edits that you make will be reviewed before going live. You can move addresses if they show up in the incorrect location. You can add local spots, so they will appear on maps. You can add building outlines to show greater detail than just a dot on a map. Add walking paths, parks, bike paths, etc.

I almost can’t wait until the next time the directions fail – I’m empowered to go in and help to correct the situation, so others don’t get stuck! Yes, I have already submitted the address change for my client’s location.

I’m not sure if Mapquest or Yahoo have similar self-updating options available. I looked, but didn’t find any links. I’d be happy to post the links if someone happens to have them.

Is there an easier way to access my “Cloud” storage?

In the last post, we discussed some free off-site computer storage which can be accessed from anywhere. If you have started using Amazon Cloud Drive storage or Google Docs or some other ‘cloud’ storage, you might find the various interfaces confusing, or get tired of always having to sign in to these alternate accounts to access your information. For me, a Cloud storage location would be most beneficial if the location “looked” and behaved just like a local drive. When I plug in an external hard drive or a flash drive (one of those little gizmos that that fits in your pocket and is great when you move from machine to machine – please don’t use flash drives as primary storage…they are notorious for losing data), it is automatically ‘mapped’ as a local driver (e.g. F:\ or E:\ or whatever other letter my computer chooses).

In other words, I want my cloud storage to behave like a local drive.

My wishes have been answered! I just found a terrific FREE tool offered by Gladinet which you can install on your computers (however many computers you have) which will make the cloud storage appear as a drive on your local computer – just as a flash drive or external hard drive does. YEAH!!! Imagine being able to switch between computers you work on regularly and having the files you want available in a mapped drive that reaches out to the “Cloud”. Talk about convenient!

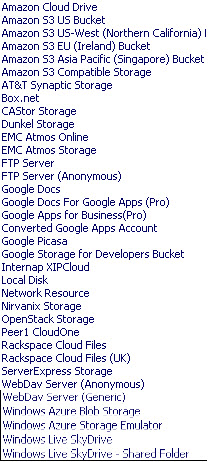
The cloud storage providers that Gladinet Free supports currently are:

Gladinet Mapping Providers

I downloaded the program, and was able to easily map my Google Docs and Amazon Cloud Drive using this tool, so that I can copy/paste files or access files just as if it was on my local computer. You’re kidding, right? Nope, I’m not. This is just what I’d hoped for.

Even though I have two ‘Clouds’ mapped (Amazon and Google Docs), only one drive is mapped as my Gladinet drive as shown below:

Gladinet Drive Mapping

Within that drive, my two ‘clouds’ appear as folders. If I double-click on the Gladinet drive (on my computer it mapped as the ‘Y’ drive), then I can see the two Cloud storage locations that I have set up:

Gladinet Mapping

How can you do this for yourself? Go to www.gladinet.com and locate the ‘Free Starter Edition’ downloads (there is a paid version of this same program, but the free version works just fine for me). If you have a 32-bit computer, click that link. If you have a 64-bit computer, click that link. Directions on installing Gladinet locally will appear. I was able to easily follow them to install the program and be up and running in about 10 minutes. Not a bad time investment for the convenience I’m going to get! No more confusion with the different interfaces. No more needing to sign in/out of each one to move files around. I can work right on the document out there on the cloud, or I can simply copy/paste the file to move it up or down from the cloud! As simple as moving files around right on my computer. Now, THIS makes Cloud Computing much more convenient for me!

Note: The paid version appears to allow you to use the cloud as a continuous backup location or will allow you to sync files. The free version is an ‘on demand’ version – you have to move the files yourself.

Simple, free way to begin using “Cloud” computing

What the heck is ‘cloud computing’ and why do I care? If I decide I care about it, how can I take advantage of it?

First of all, there’s a good chance that you’re already taking advantage of ‘cloud computing’ – whether you know it or not. If you use your browser (Internet Explorer, Firefox, Safari, or the like) to access e-mail, then you’re already using ‘cloud computing’. If you log in to your place of employment from off-site (like your home), you’re using ‘the cloud’. If you use Google Docs, you’re storing information in ‘the cloud’. If you back-up to a hosted service (like Mozy.com), you’re in the ‘cloud’. In fact, these days, it’s getting hard to NOT have a part of your computer time in the clouds.

Basically, if you can access your information or data from any computer – be it your home computer, work computer, a computer at a hotel, a friend’s computer, then you have some information stored in the cloud.

So, what’s the big deal? Well, there are a multitude of things, but from my point of view, there are two great benefits of working in the cloud:

First, I don’t need to have MY computer with me all the time. If my information is stored in the cloud, then I can use ANYONE’S computer to get to MY information. It saves lugging my laptop all over creation AND it is very convenient.

Second, someone else is taking care of backing up my data. Rather than trusting my data to my aging laptop, my data is stored on a server somewhere else. This server is probably in a large ‘server farm’ (a collection of servers in one location) which is monitored 24/7 by someone other than me! If there’s a technical issue. they are usually alerted before I even know there’s a problem.

So, you’re ready to start utilizing the cloud, but don’t know how/where. While there are a lot of choices (more arriving every day, it seems), I’m going to focus on one that seems to be a really easy way to get going. Amazon (yes, THAT Amazon) is offering ANYONE 5GB of storage on a ‘Cloud Drive’. This is simply a drive like your C: drive – only it lives ‘out there’ on the web. It is a 5GB Hard Drive for your exclusive use. Have some precious photos, that you would be devastated if you lost? Store them in the cloud. Have a document that you always want to access, but it is only located on your local computer? Store it in the cloud.

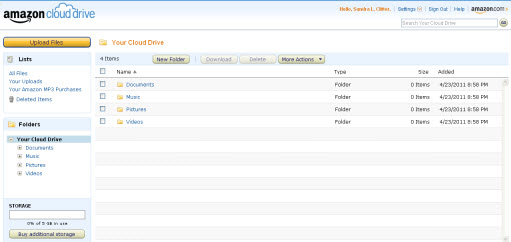
To take advantage of this feature, go to www.amazon.com/clouddrive. You’ll need an Amazon account. Sign up for one, or sign in using the same login you would use to go shopping on Amazon. After answering a couple of Terms and Conditions questions, you’ll find yourself on this screen:

Amazon Cloud Main Screen

From this screen, you can click the ‘Upload Files’ button and upload files to your new web storage location. By default. Amazon sets up four folders – Documents, Music, Pictures, Video. You can set up more if you like. You can add sub-folders if you like. You control the information just as you would a local drive.

Personally, I would not store sensitive or confidential information on a free, cloud-based system…just in case the security isn’t what it’s cracked up to be – or the security is breached (I’m sure that in the agreements I signed virtually, there’s something that says Amazon is not responsible if the files are lost, or security is breached), but for many files, this would be a perfectly safe place to store them, so that I have ready access from any computer.

Why would Amazon offer this service free? They’re hoping that you like it so much that you want to store MORE than 5GB of information, and that you’ll pay for the privilege! The ‘Buy Additional Storage’ button is prominently displayed while you’re working on your Amazon Cloud Drive.

Please be aware that there are LOTS of other alternatives (Google Docs not least among them, but I plan on discussing Google Docs at a later date). I happen to like this simple interface…it is one of the more comfortable ones that I’ve encountered.

Another tool to keep your computer running in a tip-top manner

I used to have an acquaintance that said she never wore the same blouse twice. What? What do you mean? I probably wear my blouses for way past their ‘best look’ lifespan. How could this person not wear a blouse twice? Well, I started paying attention, and darned if she didn’t wear a different blouse every day. No repeats. I would guess that the local clothing charity really liked her because she donated her ‘gently worn’ blouses to charity after one wear. Personally, while I don’t love doing laundry, I’m not morally opposed to it, and I much prefer getting my money’s worth out of my clothes before replacing them.

What does this have to do with computers?

None of us like to think about/deal with maintaining our computers, but *sigh* we need to! Unless you are wealthy (as was my acquaintance from above), most of us must work to get the longest life out of our electronic machines that we possible can. As we rely more and more on our electronic ‘friends’, we need to pay better attention to keeping them running and running efficiently. Not only will a little attention make our lives easier in the long run, but it will also e-x-t-e-n-d the life of your computers, thereby keeping money in your pocket for a longer period of time. Who doesn’t like that?

Last week, we discussed ‘Defrag’. This week, we’re going to discuss a ‘sister’ product to ‘Defrag’ and that is ‘Disk Cleanup’.

To begin, what is ‘Disk Cleanup’?

Disk Cleanup is a process that you can run that will help you to free up space from files that the computer created temporarily, but then didn’t discard.

For example, you are reading this page right now. Your computer has taken a ‘picture’ of the page and stashed it somewhere on your computer. You don’t really need to keep a copy of this page because if you want to refer to it again, you can just come back to the blog and call it up again. Regardless of that ability to find it again, your computer has made a copy. An image of every page that you go to on the internet can be stored on your machine (those are called ‘temporary internet files’). If you watch a You Tube video, a copy is actually on your computer. If you listen to a sound bite, that is also stored on your computer.

Likewise, when you open up a document (e.g. Word or Excel), a copy of the document is stored as a temporary file while you’re working on the main document. You may have had opportunity to ‘recover’ a file from a temporary file if you computer crashed while you were working on a document. When you open up Word or Excel, there’s a sidebar that says ‘Do you want to recover this file’? If you’ve ever seen that, then you’ve recovered from the temporary files.

When you install new software, the installation process creates all kinds of temporary files while its going through its installation gyrations. Many of those files too, just hang out there on your computer until you tell it to get rid of it.

You can imagine that as time goes by, your computer is stashing and storing a lot of information that it doesn’t really need to hang on to forever.

Enter ‘Disk Cleanup’. Windows has a built-in feature which can be accessed through Start-Programs-Accessories-System Tools, then finally, select ‘Disk Cleanup’. When you open it, it will look something like this (different computer configurations mean that different selections will appear on different computers):
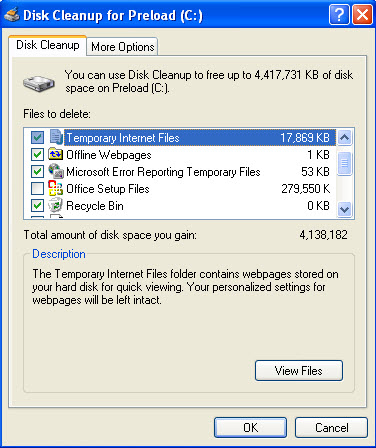
Windows Disk Cleanup

You’ll note a couple of things in the image above:

1. There is a checkbox next to each item. Check off those things that you want to ‘clean’. If you don’t want to clean up a particular area, just uncheck the box.

2. If you highlight the item (as ‘Temporary Internet Files’ is highlighted above), then a description of what that particular item will ‘clean’ if you check it is described below (under the label ‘Description’).

3. The ‘Compress Files’ setting will ‘squoosh’ (that’s a highly technical term) and ‘file’ items which you haven’t used for a while towards the back of your computer ‘filing cabinet drawer’, and will store it in a ‘zip-lock bag’ with all the air sucked out of it to keep it as small and compact as possible. That way, a file that you might need to keep for posterity, but don’t access frequently can be stored ‘at the back of the closet’ where it doesn’t get in the way of daily activity. If you really need it, the computer can crawl past the piles of shoes, and drag it back out for use!

4. I have chosen to NOT check the ‘Office Setup Files’ box. Why? If Office is installed, why would I need the setup files stored on my computer? Well, have you ever tried to do something in Microsoft Office and have it say ‘That feature is not currently installed, please insert the Microsoft Office Installation Disk’? If you don’t happen to have the disk handy, you can’t run the setup for the new feature. By leaving the Office Setup Files on my computer, I NEVER get that message. If Office wants to install a new feature, it just ‘reaches out’ to the setup files stored on my computer and adds the feature in. No more searching for the Office disk. I find that very beneficial, but if I needed space on my computer, I could choose to delete these, as well.

As we saw with ‘Defrag’ last week, Microsoft offers us a built-in tool for maintaining our machines, but there is another tool that I like that is available – for free! – which also helps to clean up other items on your computer. CCleaner (http://download.cnet.com/ccleaner/) will also help you clean up/maintain other areas on your computer, such as your computer’s registry. The ‘registry’ is the vault on your computer that stores all of the program and configuration settings. If you install/uninstall programs, there are probably lingering registry entries that could be cleaned up which will help your computer operate more efficiently. CCleaner also has a number of other useful computer maintenance tools too numerous to discuss here.

Personally, I run my Windows Disk Cleanup every week (along with my Defrag). If you run them regularly, they don’t take long to run…they only take all night when you never run them! I run CCleaner once a quarter, or when my computer starts acting ‘strange’, crashing unexpectedly, etc. Oftentimes, it works its magic, and my computer starts acting ‘normally’.

Whatever you do, make sure that you run your computer maintenance tools regularly. You’ll find that you’ll get far more life out of your computer than you thought you would…and you won’t be donating your clothes after one wearing!!
What does “Defrag” do anyway?

OK…so you know that you’re supposed to “defrag” your computer, but most people don’t know why they’re doing it, or what it’s supposed to accomplish. Others don’t know where/how to do it. Here’s a quick lesson.

“Defragging” your computer is short for ‘defragmenting’. Computer hard drives get disorganized as information is added and deleted. While a computer is ‘smart’ enough to be able to locate/assemble this ‘disorganized’ information, it can operate faster if the information is stored ‘neatly’. How exactly, does information get ‘disorganized’ on a computer?

I like to use the analogy of a filing cabinet. If you are filing papers in a filing cabinet, you can store information in various drawers, and within the drawers, in various folders. Inside the folders, you can store information oldest to newest, newest to oldest, or haphazardly. If you’re in a hurry, you might misfile a paper. Perhaps you put it in the wrong place in the file. Maybe you put it in the wrong folder. Worse, you put it in the wrong drawer, altogether. Finding that misplaced piece of paper takes longer and longer the more misplaced you filed it. I’m not telling you anything you don’t know…its common sense.

Now, let’s think of your computer. Your computer ‘files’ documents (electronic files) as you work on them and save them. Every time you ‘file’ your electronic document, your computer looks for the first available space to stick the piece of paper. You’re computer doesn’t work alphabetically…it works on the first available space. If only part of the file fits into the space, then it actually rips the file apart and stores some parts of the file in one place, and some in another. Then, your computer writes a separate ‘note’ to itself telling itself all the places it filed that document. Don’t worry…your computer is good at this tracking. Unfortunately, the more files it gets, stored in more places, the longer it takes to locate the various pieces of the file and present them to you.

So…what is “Defrag”? “Defragging” your computer means that you’re going to reorganize all the files on your computer, so that they are stored logically. When you defrag your computer, you tell your computer to go reorganize itself! You tell it to go through all the files, gather them together in a logical fashion (rather than the ‘haphazard’ way they are stored when you first save them), then store them in the the most accessible (for a computer) manner.

Once your computer is defragged, it will be able to locate/access files faster. The more defragmented the hard-drive (think disorganized), the longer it takes to access the files.

Windows computers all have a built-in defragmentation tool. To locate it go to Start-Programs-Accessories-System Tools, then finally, select ‘Disk Defragmenter’. Differing versions of Windows have different Defragmenters, so I won’t show screen shots because your version might look different than mine. Once you open up the program, select a drive to be defragmented (typically ‘C’), then ‘Defragment Selected Volume’, and ‘Start’. This utility is basic, but functional.

If you want a Defragmentation Tool that is a bit more sophisticated (e.g. one which will automatically defrag, but is smart enough to know when you’re working on your machine, so it shouldn’t try to defrag), try Smart Defrag. It’s a FREE tool, easy to download and install, but offering some features that the basic Windows Defragmentation Utility doesn’t offer, click here for Smart Defrag Download.

Warning: If you’ve never ‘defragged’, this process can take quite a while. I recommend starting it at night, and letting it run while you sleep! It should be done by morning!

Cheap and easy way to capture screen shots of your computer

Whether you’re trying to create documentation in a ‘how to’ manual, or send a screenshot to your boss, or trying to explain to Tech Support what’s going on with your computer, being able to do isolated screen captures is a marvelous capability to have.

First, you should know that to capture your entire screen, you only have to press the ‘PrtSc’ or ‘PrtScn’ button on your computer keyboard (usually found above the numbers keys or the F-keys). Then, open up any word processing document and click or right-click and paste or CTRL+V. Voila! Your entire screen appears in the document.

But sometimes, you only want an isolated part of your screen. What do you do then?

If you’ve read this blog in the past, you’ll see images embedded – many of them bits and pieces of my computer screen, rather than the entire screen.

For instance, if I want to show you a piece of the window I’m editing this post in, I might show something like this:

easy capture image sample

So, how the heck do I do this? There are two tools that I use – one is FREE and one costs about $50. Why not just use the free tool? Well, because the tool that you pay for has some more features that I find useful, but I started with the free tool.

As you all know, I like a free tool wherever possible…if I need to upgrade, I do so when I’m actually capable of using the additional features.

So, the two tools are:
Easy-Capture (FREEWARE)
Snag-It (30-day free trial, $49.95)

Not only do these tools allow you to capture screenshots from your computer, they also allow you to do simple image editing – which for me, is all the image editing that I’m capable of doing. I want to crop, adjust the size, adjust the color, etc. Mind you, these tools aren’t PhotoShop, but if you only need to work on an image occasionally, and just need to make simple changes, then these tools may work for you.

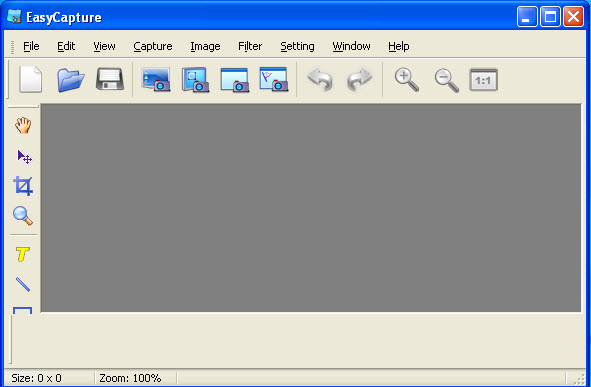
How do they work? What do they look like? I’ll use the Easy-Capture as an example:

easy capture main screen

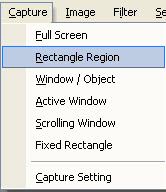
You simply select the type of capture you want to do from the ‘Capture’ menu:

easy capture capture menu

Once you’ve picked the type of area you want to capture, you’ll be given further instructions (in this case, I said that I wanted to capture a ‘rectangle region’, and it gives me this image:

easy capture area capture

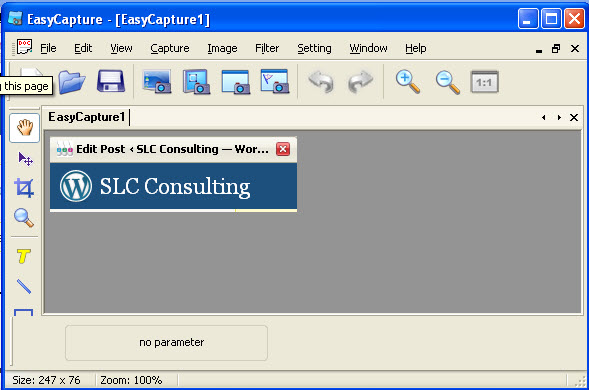
The instructions tell me to ‘lasso’ the area that I want. It took me a couple of tries the first time, but once I got the hang of it, it was very easy. When I release the mouse, the image that I ‘caught’ appears in the capture window:

easy capture image captured

From here, I can use the toolbar at the top, or the icons on the sides to manipulate the image and save it. I can save the image in a variety of formats (the typical jpg, gif, bmp, etc.). Once it’s saved on my computer, I can place it anywhere I want.

Both these tools download and install quickly without alot of computer ‘overhead’ (i.e. they’re don’t hog all of the computer resources). I use them ALL THE TIME, yet I don’t even use all the functionality that they have available. Like most things in life, I use what I get comfortable with. Tools like Photoshop by Adobe, while incredibly flexible actually have TOO MANY features for me. Additionally, I don’t need an expensive tool to do something this basic.

I find that Easy-Capture or Snag-It have all of the image capturing and photo editing capabilities that I need.

Convert a PDF Document back to Word
(or Excel or Powerpoint)

(This topic is at the request of one of our readers. If you have a specific request, please feel free to drop me a note and I’ll see what I can do!)

Back in December, we wrote about creating PDF’s for free (to check out that topic, please click here), and why you might want to create a PDF document, rather than sending an ‘open’ document (be it Word or Excel or anything else) to a client, vendor, etc.

Here’s the flip-side of that discussion. What happens when you RECEIVE or have a PDF, but don’t have the original document. If you want to edit the document, include portions of that PDF in another document, utilize a portion of an existing contract as the basis for a new contract, etc. WITHOUT RETYPING, what do you do? Can you get it back into an ‘open’ document? The answer: It depends. Huh?

The first thing that you need to do is to figure out whether the PDF was created as an image or not. How do you do that? Easy. Open up the PDF in question. We’re going to be using two as samples here:

This is a PDF created from a Word document:

PDF Created as Text

This is a PDF that was created as an image from a scanned document:

PDF Created as Image

What’s the difference, you ask? They look the same as the PDF, don’t they (well, different words, but the same ‘look’)? They do until you try to copy/paste from within the documents:

This is the one where the PDF was created from the original text document:

PDF Created as Text

Click here to try to highlight the text version for yourself.

This one was the scanned document that turns into an image during the scan:

PDF Created as Image

Click here to try to highlight the image version for yourself.

You’ll see that the one that was created from the original Word document highlights as distinct lines. The one that ended up as an image simply highlights in its entirety.

If you find that your PDF highlights when you try to copy like the image immediately above, sorry…you’re probably going to have to re-key the document. Its not likely that you can readily convert it.

If you find that your PDF highlights as individual lines, as the first example, you’re in luck! You have options for conversion. You’ll have pretty good luck in converting your PDF back to text you can manipulate.

The easiest option is simply to copy the PDF and paste into a Word document. You’ll lose formatting, but you won’t need to rekey everything. Just edit and reformat and away you go.

A copied/pasted document might look something like this after you copy it back to Word:

PDF Converted to Word by copy/paste

A PDF run through a free converter called “Free PDF to Word Converter” which is available for download and readily installs on your local computer looks like this:

PDF Converted to Word by free conversion

A PDF run through a FREE online converter called “PDFtoWord.com” (no installation required on your computer – you upload the PDF to be converted, and the converted file is e-mailed right back to you) might looks like this:

PDF Converted to Word by free conversion

You’ll note that none of the ‘converted back to Word’ documents are identical to the original PDF, but all are serviceable. You can easily reformat them back to their original brilliance! Different conversion utilities will produce different results depending upon the contents of the document. Try more than one if the original try isn’t satisfactory.

There is another FREE online tool which converts PDF’s back to Excel. PDFtoExcelOnline.com works just like the PDFtoWord online converter. Upload the file, enter your e-mail, and the converted file is e-mailed to you.

Powerpoint presentations that have been converted to a PDF can also be converted back to Powerpoint using the FREE online tool ConvertPDFtoPowerpoint.com

Bottom line: There are a bunch of FREE tools available that can help you convert PDF’s back to their original files. Each alternative (and I’ve named just a few of them here) ends up with slightly different results. So, if you don’t like the results from one alternative, try another. (Suggestion: Google “free converter pdf to _____” and insert what you’re trying to get back to in the blank to find alternate tools).

From the ashes (well actually, puddles) of a disaster…

Backups…one of ‘those’ words that no one wants to think about/deal with/contemplate. I know, it should qualify as a 4-letter word. Alas, it’s a lonely, 6-letter word (or 7-letter if its plural). I’ve ‘learned the hard way’ often enough (meaning I’ve lost data when a hard-drive fried or whatever) to be pretty good (Note: pretty good is NOT great, nor is it an acceptable plan) about backing up. Well, I learned recently that pretty good just doesn’t cut it – and I’m changing my habits.

The lesson goes like this: I’m sitting in my office and the phone rings. Before I even get out the “Good morning, this is Sandy”, a semi-hysterical voice on the other end says, “Sandy, please tell me that you have our data!” Not a good opening sentence – no matter the scenario.

Needless to say, the person was a client of mine. Now typically, I don’t keep client data in my office. There are times, however, when I have a copy for development purposes. It’s not a backup, it’s usually not even current…but it is (or was) an accurate representation of their data at some point in time. “Well, I may, but if I do it’s at least a few months old – WHY!?!? Don’t you have backups?”

The short version of the story is that ‘yes’, my client diligently backed up their data every night to an external hard-drive (one of those hard drives that plugs into a USB port in your computer onto which you can copy however much of the data from your main computer(s) you consider important). Here’s the rub…

The external hard-drive sat right next to the server in the closet that houses the computer equipment. Well, during the night, a pipe burst DIRECTLY OVER THAT CLOSET and drowned not only the main server, but also the external hard drive. They were both, to use a highly technical term, kaput. The main computer was dead and the backup wasn’t any good, either. They were in deep doo-doo (another technical term!).

We don’t need to recount the painful recovery here. What we want to realize is that a ‘disaster’ – including, but not limited to, your computer crashing – can happen to ANY of us. Buildings can burn, floods can happen (seen that one up close and in person), robberies can occur, etc. So, in order to have a LEGITIMATE backup plan – for your personal information OR your business records, you need to have OFF-SITE BACKUP!!

Off-Site backup simply means having a copy of your important files somewhere besides the primary location. So, if you have an office, keep a copy of your backup at your house. If you work out of your house, keep a copy of your backup at your mom’s house, or in a safe deposit box. There are all kinds of ‘off-site’ storage facilities available that don’t cost anything. With the cost of external hard drives so low (a 4GB flash drive is under $10.00 while a 500GB external hard-drive can cost under $75.00), you can buy several, and rotate them out…always keeping the most recent copy in a DIFFERENT LOCATION than the computer.

If, however, you find it difficult to be disciplined about making those backups and moving them off-site, then perhaps you should consider one of the many on-line backup services which are very affordable nowadays. These backups go to the ‘cloud’. In other words, your computer backs up over your internet connection, and the data is stored in a server far, far away from you. If disaster ever strikes, your data is safe…just download it when you have a computer set up again.

Personally, I have used the ‘keep a copy in the safe deposit box’ method for a number of years. I’ll admit, sometimes I’m better at remembering to refresh that copy than others. After this client’s ‘near death’ experience, they went with a ‘cloud’ solution, and I found their experience so positive that I tried it as well. Now, I back up to the ‘cloud’ virtually continuously. For under $50.00/year (I use mozy.com, but there are a bunch of reputable companies out there who provide this type of service for a very reasonable cost), all my files – both personal and professional (don’t forget all those digital photos that are so precious, or your family tree research that live on your personal computer) are backed up to the cloud.

I have tested recovering files, and it works just fine (an online backup isn’t any good if you can’t recover a file that you’ve lost for some reason). I was very skeptical about ‘losing control’ of my data, but based upon research I’ve done and discussions I’ve had with people who have far more experience than I have with online backup/storage solutions, I believe that my data is safe. [If you want to read about a bunch of people’s opinions on the subject check out this CNET Forum discussion: “What’s your take on online backup services?”]

So, there are a BUNCH of alternatives to help you avoid a disaster like my client had to deal with. The only alternative that is NOT acceptable is doing NOTHING. Create a backup plan. Make sure that it includes keeping a copy of your important data somewhere else. Follow the plan! Regularly test the recovery process by recovering a file that is on the backup to verify that the backup plan is working. WHEN trouble strikes (and it is just a matter of ‘when’ and to what degree, not ‘if’), you’ll be prepared. Annoyed that you have to deal with it, but not devastated by the event itself.

Does your computer have alot of programs you never use?

It’s almost the New Year (well, 10 days away), and close enough to start thinking about my New Year’s resolutions. Every year, my first resolution (after ‘taking more time for myself’) is to clear off my desk and clean up my computer. I do NOT want to admit how I fare on any of the three categories (miserably, most of the time). I might get my desk clear for a day or two, but it quickly returns to it’s former, cluttered self (I don’t know HOW that happens!?!?!?). I do better some times than others at taking time for myself. The last resolution – cleaning up my computer – rarely gets attacked…or, if it does, half-heartedly.

Why? Well, because its a pain to identify the ‘junk’ on my computer and then uninstall everything. There just never seems to be time in the day to attack this particular issue. I’d rather work on the ‘take more time for myself’ than ‘clean up my computer’ (or my desk, for that matter).

All these reasons for procrastination, or re-prioritization, were rendered moot by an article I happened upon in PC World (one of my very favorite resources for tips and tricks). “How to Remove Crapware and other Unwanted Software from your Computer” offers two great step-by-step sets of instructions (with screenshots) for cleaning up your computer. Honestly, the first approach (going into the Control Panel > Add/Remove Programs) is the approach that I avoid because I’m not always sure what I need and don’t need. The second approach recommended in the article really appeals to me. PC Decrapifier is designed to ‘clean’ new computers of all the extra ‘junk’ that comes pre-installed on them – not the stuff that you install, then decide you don’t want.

I’m going to give this program a try (honestly, I haven’t tried it yet – it’s in my New Year’s resolution list!), and see how it works. I never did that when I initially set up my computer, so there may be a bunch of things just clogging the system. We’ll see. Wish me luck, and let me know how you make out on your New Year’s resolutions – particularly the technology ones!!

Happy Holidays, Everyone!!!!

Inexpensive Gift Idea: Tech Support Care Package

‘Tis the season of pulling one’s hair out trying to come up with good gift ideas. Sometimes the best ideas are those which come from the heart, rather than the pocketbook. I just learned about another fabulous Google offering which I had NEVER HEARD of before. Usually, when one hears ‘Google product’, one thinks of free and/or inexpensive. They’ve done it again!!

Google has created/packaged a new ‘Computer Tutorials’ which they are labeling ‘Teach Parents Tech’, but which can be sent to ANYONE (yourself included). While the tutorials focus on very basic items, and on Google products, they are still very valuable to technophobes, or non-techy folks.

I believe that this is a brand-new Google feature, as there are only 16,161 senders as of this writing. I have already fired off a few to dear members of my family who lovingly refer to me as the ‘Help Desk’. If I can direct them to one of these videos, it’s much easier than trying to explain over the phone, and having everyone get exasperated at everyone else :-).

So, where do you find this ‘gift’? Simply go to:

http://www.teachparentstech.org

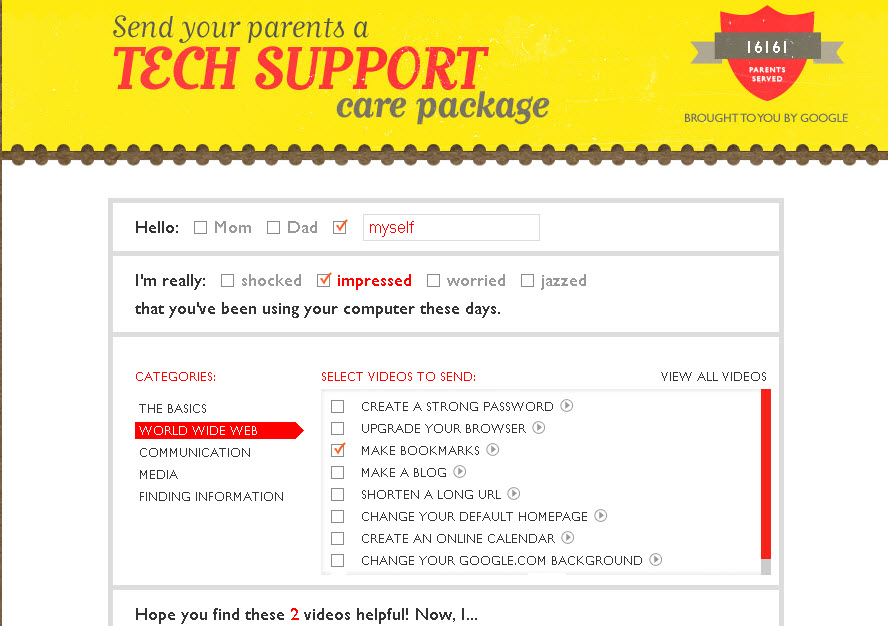
Here’s what you’ll find…remember, this is going to send the recipient (even if its you) and e-mail with embedded video links, so first, you have to create the e-mail. Simply fill in the blanks, select the videos you want to share, then click the ‘Preview’ button (at the bottom of the screen, not shown on this image):

(REMEMBER: The links and buttons and checkboxes, etc. in the images below do NOT work…these are ‘screenshots’ of the Google screens – not ‘live action’. To try it out for yourself, go to http://www.teachparentstech.org)

Google Tutorials Select Screen

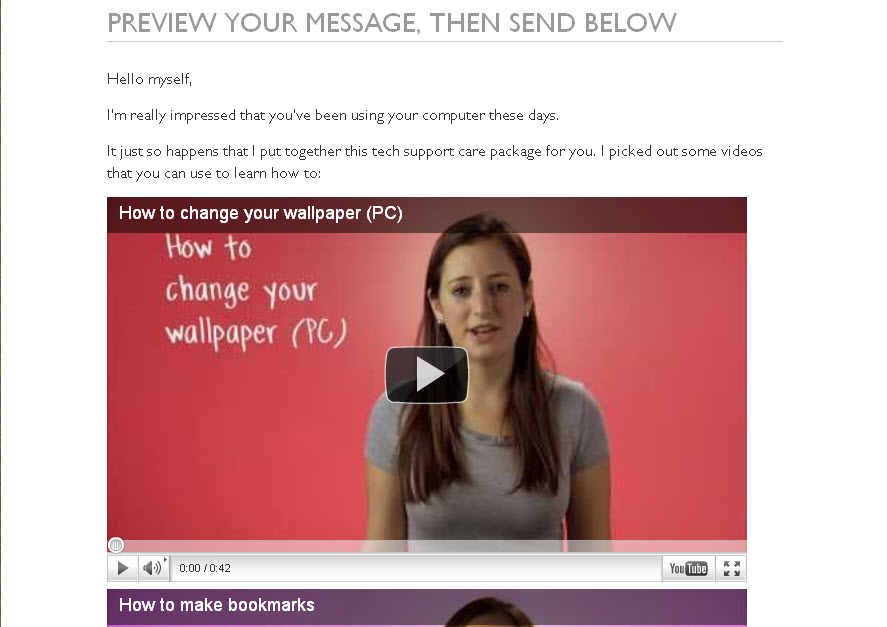
Next, you review what you’re sending. Check out your handiwork, and make sure that you’re sending the correct tips (even if it’s to yourself – nothing says you can’t give yourself a gift, right?):

Google Tutorials Preview

Enter the to/from e-mail addresses:

Google Tutorials E-mail

Lastly, send it off…you’ll get a confirmation:

Google Tutorials Confirm

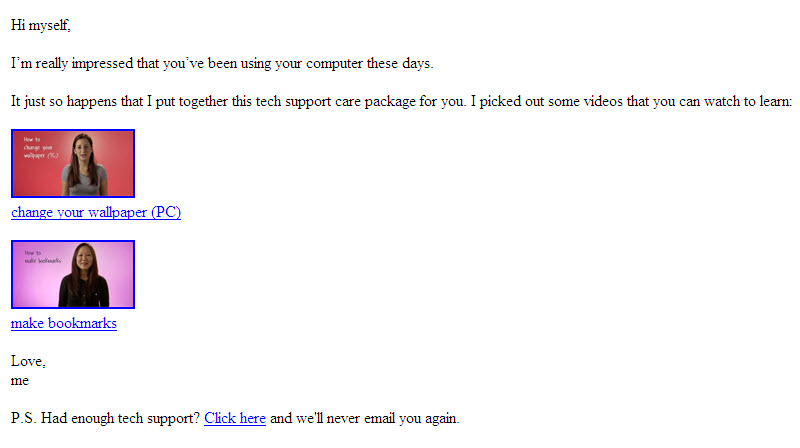
Then, the e-mail will arrive (you’ll get a copy and the recipient will get a copy)…here’s what it looks like:

Check it out…help yourself, or someone else, or both of you!