(Mostly) Free Tools

How can I access my Bookmarks or Favorites from any computer?

There are so many times when I’m working on a computer that is NOT my own and I want to get to some website that I have bookmarked (set as a ‘favorite’) on my computer. Worse still if you work primarily on public computers and can’t save your own set of bookmarks at all. Maybe you have a personal computer and a work computer, and somehow, the favorite that you need to reference always seems to be on the other computer. Some URL’s (e.g. Google) are obvious, but others are well-hidden or buried or not entirely ‘findable’ without the help of that precious bookmark.

Is there a solution? Is there a way to make your bookmarks/favorites ‘portable’ or accessible from ANY computer? You betcha!!!

Time to check out www.aboogy.com.

With Aboogy, you can set up all your favorites that can be accessed from any computer – as long as you remember you Aboogy signon. When you first go to www.aboogy.com, you’ll be asked to create a user ID and password, then click on a confirmation e-mail from Aboogy. Once that’s done, you are ready to roll with setting up your own list of favorites/bookmarks/shortcuts that can be accessed from ANY computer.

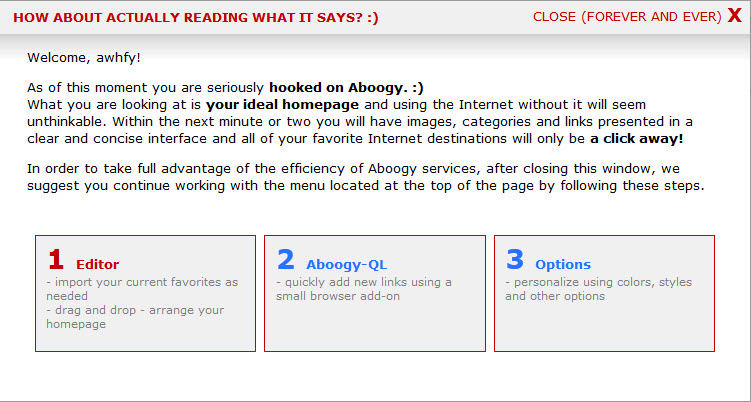
Your first time signing in to Aboogy, you’ll be asked to read this screen – they’ll only show it once!

Once you’ve closed that screen, you’ll be able to set up your favorites and tracking a variety of ways – buttons, links, images, categories – all under YOUR control!!

Start by importing your existing bookmarks or favorites from your computer:

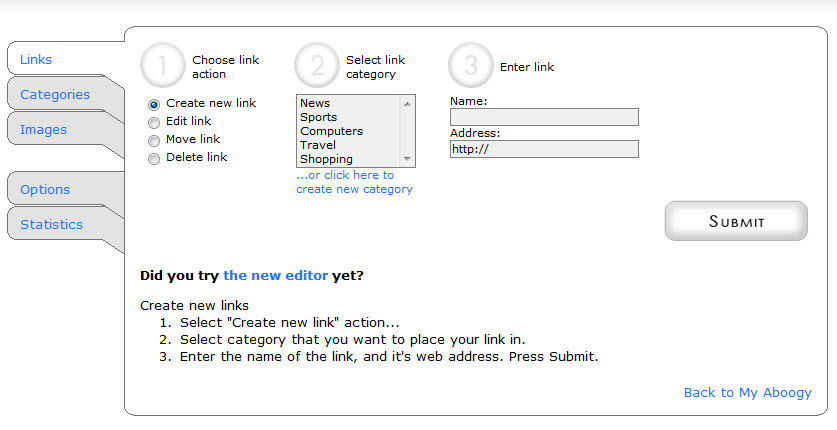
Next, edit and organize the links as you like using the ‘Editor’ tool:

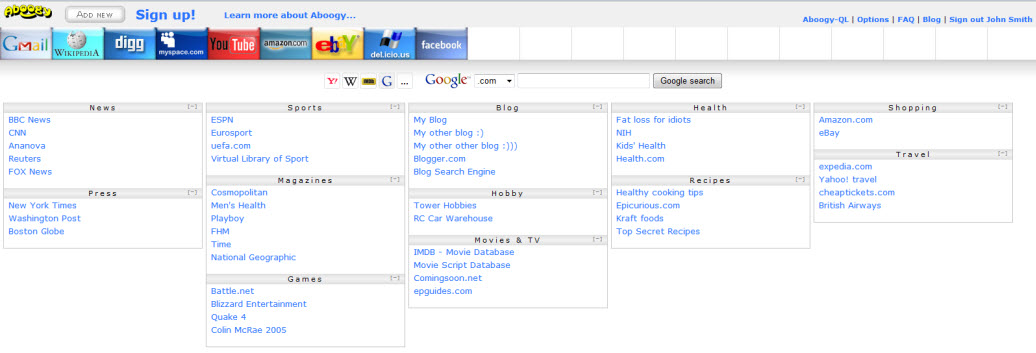
Head back to your Aboogy page and VOILA! Your bookmarks/favorites are all available to you from ANY computer:

The additional benefit is that if your computer crashes, you haven’t lost your library of bookmarks/favorites – even if backing up isn’t on your regular schedule (though shame on you for ignoring that critical chore :-)!)

Managing Photos and Video – it is soooo not my ‘thing’

Just so you know, managing photos and videos are really NOT my ‘thing’, yet questions on these items tend to generate a bunch of questions by readers of my blog. Honestly, my solution is ‘let someone else do it’, but that’s not really offering useful advice now, is it? I don’t think that ignoring the subject is too useful, either.

Confession: I have NEVER actually shot a video (well technically, that’s not true…one time I accidentally switched my digital camera to ‘video’ and took a time-lapse ‘photo’, but I don’t think that that counts).

I DO take photos from time-to-time, but I’m not the family historian, either. I do NOT enjoy spending a lot of time tweaking photos, either. I AM pretty good at resizing images and cropping them. That’s the level of my ‘expertise’. To the graphic artists and some others, I’m sure, that sounds pretty lame, but its the truth.

Unfortunately, this makes me push the requests for information on video/photo editing into the ‘too hard’ basket :-). Sorry gang, just being honest.

SOOOOOOOO, when I saw an article in PC World, written by Patrick Miller, titled “Shoot, Share, and Edit Your Photos and Video on the Cheap” I gave a whoop! Someone else has the information that my readers have been requesting. YEAH!!!!

Patrick gives you links to video editing (cheaply) in this article. Additionally, he gives you tips on photo editing and sharing by sharing this link. (Both articles are written by Jonathan Wylie, also of PC World).

Let me say a heartfelt – thank you, Patrick (Jonathan, we thank you, as well…Patrick pointed, you actually compiled the information)!!! You ventured where I just haven’t trod!!!

I will add my 2-cents worth here: No program, particularly those which are free, is perfect. Each service is going to be stronger in one area than another. Before putting all your ‘eggs’ in one basket, upload a few images or videos and ‘play around’ with the various alternatives. For some people one feature is more important than another. Find the service that is stronger in those areas that are most important to you and then start loading up that ‘basket’!

Happy editing and sharing!!!!

Get tired of your desktop background (wallpaper)?

When you spend as much time behind your computer as I do, sometimes you just want to do something ‘fun’ with your computer…I don’t mean ‘fun’ as in playing games (well, maybe YOU want to do that, but it’s just not my thing). By ‘fun’, I mean spicing up your computer with ‘funner’ things than the standard defaults.

We’ve talked about “Fences” in another post (click here to check out that desktop organization tool) which allows you to better organize your desktop. That was more of a ‘functional’, rather than ‘fun’ find.

Today, I ran across something called ‘John’s Background Switcher’. When I went to his website, John sounds like my kinda guy! He finds a solution to a computing problem, then allows the world (yes, you and me) access to the fruits of his labor free of charge. His work is called ‘donationware’. You can use it for free if you like, but if you feel you get value from it, he’d appreciate a donation (there’s a link on his website to allow you to donate should the mood strike you). You can check his site out here. The ‘Background Switcher’ allows you to change the background on your desktop (not the screensaver, but the wallpaper) on a regular basis – from every 10 seconds to once a week! The images that are placed as your background can come from the ‘stash’ you have on your computer or from any number of a variety of sources (Flickr, Facebook, RSS Feeds, Google Images, Picasa, Bing, Yahoo!, etc.). So if you like images from National Geographic, go out and create a link to their photos, and your computer wallpaper will update with the images.

To download, simply go here for a secure, verified download. Run the install, then set it up. Took me a total of 2 minutes to have a rotating wallpaper on my computer. The software appears to be ‘low overhead’ meaning that it will not drag your computer to its knees simply by its presence.

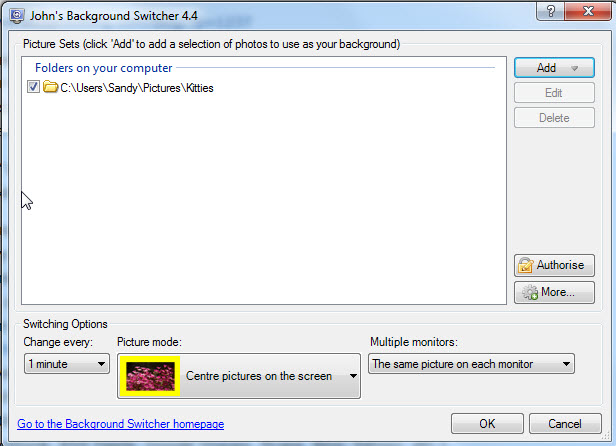
As of right now, I have only added a folder of images of my cats to rotate, but I’ll be playing with the settings and adding more ‘feeds’ – either from my computer or from the web.

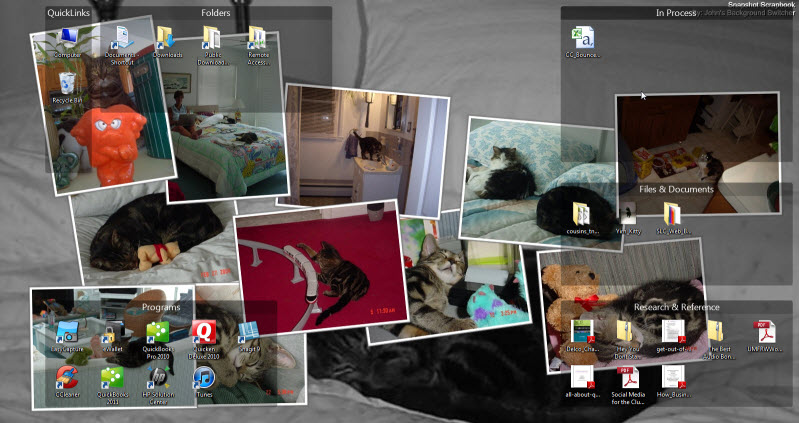
You’ll note that you can change the duration that an image stays on your desktop, select how large the image is (you can even create a montage), display different images on different monitors, add multiple feeds (I only show one added here).

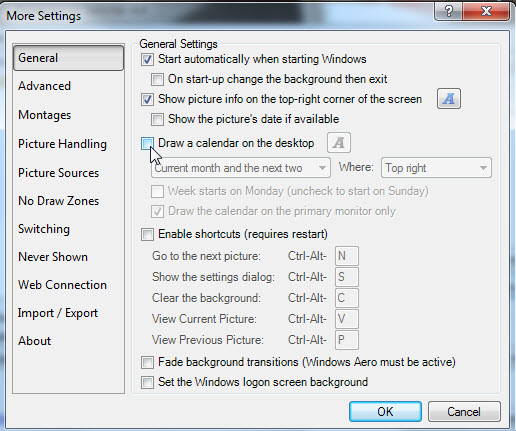
There are also a wide variety of more detailed settings if you feel like playing around with them. (Pressing the links on the left changes the settings you can set on the right)

With just a couple of clicks of my mouse, here is what my desktop looks like (much ‘funner’!!):

Even people like me who are ‘creativity impaired’ can be creative with this little program. Thanks, John!!!

How do I avoid getting bitten by a computer ‘bug’?

It seems like every day brings a new rash of evil-doers on the virtual highway. Steering clear of the bad guys can sometimes feel like a full-time job, but there are a few tricks you can use to protect yourself with little effort.

FIRST AND FOREMOST, make sure that you have anti-virus/anti-spam/anti-malware security software installed on your computer and KEEP IT UP TO DATE!!!! McAfee, Norton and Kapersky are three of the most common names in computer security, but there are plenty of others. AVG offers a free version to personal (non-commercial) users.

Now that that little lecture is out of the way, let’s discuss your e-mail. WHEN IN DOUBT, DELETE.

One of the most insidious ways to attack your computer is by your very own e-mail. Clicking on links that are from seemingly ‘safe’ site, or opening attachments from apparently ‘safe’ sources is an almost guaranteed way to get an evil virus on your computer.

Now that you’re scared to death to read your mail, how do you protect yourself? Really, it’s pretty easy. Here’s what you do – and it only takes a second…it doesn’t have to interfere with your production…VERIFY THE LINKS BEFORE YOU CLICK.

How?

Easy.

See the image above…it APPEARS to have come from Twitter. They’re telling me that I have a message to read. BUT…it’s not from Twitter…its someone phishing for information from me…trying to steal my signon and password.

The first ‘clue’ that this isn’t from Twitter is the fact that they say ‘Hi’, not ‘Dear Sandy’ (or whatever name you’ve used on your account).

The next clue comes if you hover your cursor over the link the phisher wants you to click:
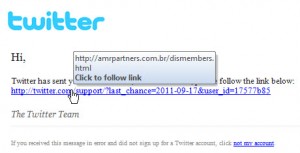
You’ll notice that this link, which is masked to look like it would go to Twitter (and should read something starting with www.twitter.com), has a link to some unknown site. That site is NOT Twitter, and not safe to click. If I really thought Twitter wanted me to check something out on my account, I would open up a browser, type in the URL (www.twitter.com), and go to my account to check it.

Here’s how easy it is to do. I created the link below (this one happens to be safe to click on, but it will NOT take you to Twitter):

http://www.twitter.com

The link above LOOKS like a legitimate link to Twitter when you first see it, but the link actually takes you right back to this blog! It APPEARS to go to Twitter, but no…it comes right back to me…and it COULD just as easily have gone to some nefarious site.

If you hover over the link on the screen (if you’re trying it, hover over the link above…the image below is just that, an image):

Then, look to the lower-left corner of your browser screen, you will see the ‘real’ destination revealed:

It’s that easy to see where someone is trying to send you – via an e-mail (hovering over the link in the email displays the real link) or on a regular web page (hovering over the link will make the real URL appear on your screen, probably in the lower-right corner of your screen).

If you get an e-mail with an attachment from someone you don’t know (they may say they are UPS, FedEx or the USPS) telling you to open the attachment to find out about a delivery you missed, STOP! DO NOT OPEN IT!! [One regular reader of this blog found that out the hard way and had to spend days trying to recover their computer. He happened to be waiting for a UPS delivery, so thought it was legit. Unfortunately, opening the zip file corrupted his hard drive.]

A fake notification will have some tell-tale signs:
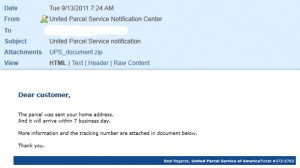
First, it says ‘Dear customer’…if they know enough to send ME an e-mail, they KNOW my name!

Next, there is no information about the shipment in the subject or body…only a link. Legit shipments contain some detailed information in the shipping notification which will assure you that the e-mail is real.

A REAL notification will include information in the subject and/or body that you can enter directly into www.ups.com or www.fedex.com or www.usps.com in order to track the shipment (you don’t need to click links).

Your name and/or address will appear in the body of the e-mail.
A tracking number or other package information will appear in the subject line or body of the e-mail.
None of the major shipping companies will attach the information in a zip, word, pdf document.
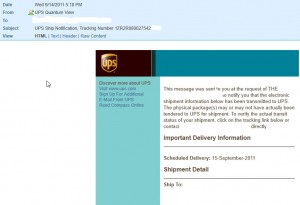
(Note: I’ve blanked out some of the personal information on this image, so you won’t see the full tracking number or address, but you get the idea).

If I wasn’t sure that this e-mail was legitimate, I could go to www.ups.com and enter the tracking number given in the e-mail. Again, there is no reason to trust the links in the e-mail.

So, to sum it up:

1. Legitimate e-mails will address you by name.
2. Hover over the link they want you to click and see if the URL is legitimate.
3. When in doubt, open up a browser and type in the url manually, then check whatever the e-mail is trying to get you to check by entering through the ‘front door’ instead of taking the shortcut.
4. Do NOT open up attachments from people you don’t know.
Password Management…grrrrr…but, ya gotta do it!

I know, I know…no one likes to think about Password Management, nor do they like to think of how vulnerable their information might be using weak and/or the same passwords on many sites. Just thinking of this issue raises my blood pressure and nerves several levels! It just feels so unwieldy.

I don’t know about you, but at last count, I had 432 passwords in my ‘repertoire’. I know that I’m not unusual…we ALL have a bunch (I guess 432 is more than a ‘bunch’, isn’t it?) of passwords to manage. There is no way, unless I suppose I had a photographic memory (which I don’t), that I could remember that many passwords.

What do we typically do to handle this onslaught of self-created information? We don’t change our passwords regularly (bad), we reuse passwords (pretty bad) and/or we use relatively simple passwords (very bad) to make that list more manageable. Even using some of these ‘shortcuts’, I can never seem to remember if this is the time I had to capitalize the first letter or add a special character to meet the password ‘rule’ that this particular site enforces.

On top of all of that, we keep a list of passwords in an Excel file, on sticky notes plastered around the frame of our monitor, or on pieces of paper in our top-desk drawer. Again, NOT GOOD!!!!

So, what’s a body to do???

First of all, do NOT store your passwords in a file on your computer called ‘passwords’ :-)!! Next, do NOT store them in a password protected Excel and/or Word file. Instead, try a password management tool on which you put a VERY STRONG* master password that’s not used as a password anywhere else as your password.

As I’ve struggled with finding the best tool(s) to manage passwords, but I’ve come up with a few gems that might help others to deal with password-rage!

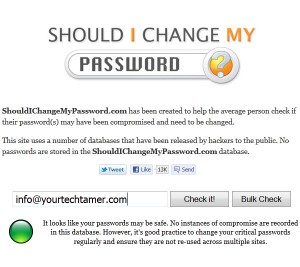
First, check to see if your e-mail address has shown up in a compromised database…this isn’t foolproof, but it’s a start. Go to ShouldIChangeMyPassword.com, enter your e-mail address, then see if you get a “green light”.

Should I Change My Password

Next, begin changing your passwords. Make sure that the new passwords are different from one another and STRONG*. You can check a password’s strength using any number of tools…CNET describes several of them here: Check Password Strength

Now, store those passwords in a SECURE manner. If you choose to store them on your computer itself, make sure that you put them in a ‘vault’ using a tool like KeePass Password Safe or Password Safe. Both of these tools are FREE and store your data in an encrypted format.

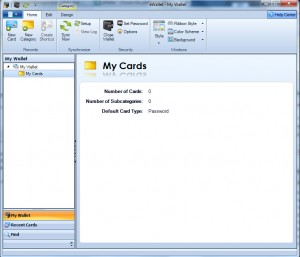
If you want to carry your passwords with you and need to store them on your Android or iOS device, eWallet may be the way to go. There is a cost ($19.99 at this writing) for the product, but it can by sync’d between your computer and your devices and gives you a similar interface in both places. Just go to the eWallet site and check it out!

So, what are your ‘going forward’ steps?

1. Download/install a new password storage system
2. Go to the most important sites first (e.g. bank accounts) and change your password NOW!
3. Go to ‘other’ sites (perhaps a couple a day) and continue changing your password
4. Delete, delete, delete the old, unsecure file on your computer
5. Throw away the scraps of paper in your top desk drawer or on your monitor!
6. Change important passwords every 3-6 months.

* “STRONG” passwords are passwords that:
Are over 8 characters long and include lower-case, upper-case, numbers AND special characters (e.g. !, @, #, $, etc.).
Do NOT contain your user name, real name, company name.
Do NOT contain complete ‘real’ words.
Are significantly different than previous passwords.

You have to use ALL of these recommendations to make a password ‘strong’.

Is your virtual desktop out of control?

I don’t know about you, but my computer desktop gets wayyyyyyyyy out of control (truth be told, my physical desktop needs some help, as well, but no one but me can help me there!). The icons on my computer desktop run amok. I have all kinds of 1/2 completed documents out there (temporary storage while I’m working on them). I have shortcuts to favorite programs. I have shortcuts to frequently used folders. I have some training PDF’s that are waiting for me to have time to work on them. I try to drag them into a logical order – Programs, you go ‘stand’ on this side. Training docs, you go to the lower-right quadrant. Truly temp files…please locate yourselves in the top-right corner. Etc. That’s all fine and dandy until I add a new icon to the desktop and it simply takes the ‘next available’ space. Then, I try to reorganize them, but the Windows ‘arranging’ features work against me (even if I have the ‘auto arrange’ feature turned off). In the end, I give up, Windows wins, and I just have to hunt and hunt to find the icon that I’m seeking when I need it :-).

I know that Apple products handle desktop organization more elegantly, but do we Windows users have to deal with what we’ve got?…or can we take control?

WE CAN TAKE CONTROL!!!

I ran across a free utility that allows Windows users to better ‘herd’ (i.e. organize) desktop icons by creating designated types of groupings that users can more readily manage. I downloaded the free version, but the paid version ($19.95) allows additional controls. Even with the free version, I’m happy that I can now find what I’m looking for on my desktop.

The utility is called “Fences” (makes sense because it puts ‘fences’ around your desktop icons, isolating them in logical groups). It is made by Stardock and is available for download here: download “Fences” here.

For demonstration purposes, I picked a desktop that wasn’t HORRENDOUSLY cluttered to be able to show an example of the before and after.

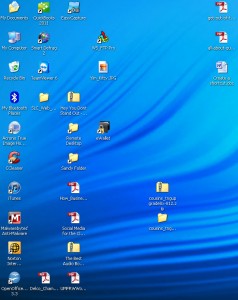
Here’s the before image:

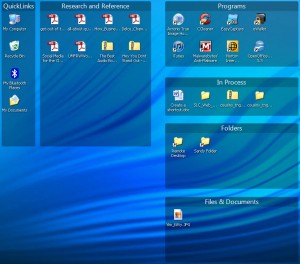
Here’s the after image:

I was able to move the location of the fences, rename the fences, add/remove icons from the fences very easily. New icons get added to the ‘non-fenced’ locations…then you can drag them within whichever fence you like.

All-in-all, I like being able to ‘tidy up’ my desktop simply by organizing the icons in a fashion which makes sense to me. Users can change a number of aspects of the appearance of the fences, but what you see above is the default. You can also back up your settings, so that you can recover, in case someone ‘messes’ with your desktop.

From an efficiency standpoint, just like having a good filing system in a filing cabinet, or good organization to your virtual documents, having good organization for your virtual desktop is essential to being able to work in the most effective manner possible – Now I just have to work on my physical desktop!

Some iOS ideas (that’s Apple’s Operating System for PC users)

Everywhere I go, I see iPads, iPhones and iTouches. While I admire each of these devices, I must do a mea culpa here and admit that I have yet to purchase one. No, I’m not an Apple hater. I think that their devices are slick and elegant. I have an (albeit Generation 2) iPod. I love it. It is years and years old, and still works just fine.

Here’s my issues (not that you care, but I know someone will bring it up, so I might as well ‘fess up right away).

1. I don’t have an iPad because I think that I might like a smaller, more compact e-reader. I’m not going to invest in both devices right now, so I will pick, and I’m leaning to the e-reader side of the world. I love how easy they are to read outdoors (I love the beach), and how small they are. While iPads are more versatile, I think that I’d get the most use out of the e-reader feature, rather than alot of the other things.

2. I don’t have an iPhone because, quite frankly, I actually use my smartphone as, yes, a phone! The service for both AT&T and Verizon is terrible in my home…therefore, the iPhone is out of the question for me until the service of the phone portion is improved.

3. I don’t have an iTouch because my ancient iPod still works perfectly well, and I can’t see throwing it away while its working and doing everything that I need it to do. Additionally, I have my Android phone which does the non-music chores that the iTouch does in addition to playing music.

All that said, I have had an opportunity to play around with an iPad (more on that in a later post) and find it quite a pleasant experience…not life-changing, but perfectly fun. I’ve played on a few iTouch and iPhone devices, as well. Sleek and elegant, for sure.

Unfortunately, because I don’t own an Apple device constructed in this decade, I don’t pay attention to that many iThing articles. Then, every once and a while, I feel guilty being so PC-centric (or Android-centric), so I’ll read an article that comes along. Today, when I saw an article titled My iOS Love Affair, I had to pop it open and read it. It mentions a product called ‘Splashtop’ which, for $1.99, allows users to view their Apple laptop, desktop, or Windows machines remotely. While I can’t check it out personally, it sounded very interesting. Perhaps some Mac/iPad users can let me know if it works as slickly as it sounds.

I also came across Ten Ways to Work Smarter on Your iPad which seemed to offer several good tips. I could see myself using them – if and when I actually get an iPad!

What are your favorite Apple tools? As I get closer to purchasing one, I find myself more interested in the ‘toys’ that are available.

Can I open my Google Docs from Microsoft Office – you betcha!!

UPDATE 9/13/13: Google Cloud is no more. Google Docs have taken over. A myriad of methods to transfer docs back and forth between systems has arisen. To find the one which suits you, please use the search engine of your choice (Google, Bing, Yahoo) and enter something like “transfer from google docs to msn skydrive” where you substitute the ‘other’ system name for ‘msn skydrive’.

Forgive me for having been ‘absent’ for a couple of weeks. Somehow, the 4th of July holiday took away more time than just a 3-day weekend!!

More and more people utilize Google Docs to share and store documents, spreadsheets and the like. I’ve talked about a number of ways to utilize and access Google Docs in other posts (“Alternative to Microsoft Office” or “Is there an easier way to access my cloud storage” or “Simple, free way to begin using Cloud Computing”).

While I’m a HUGE believer in utilizing this powerful tool to give me access to documents and spreadsheets from anywhere (including my smartphone), or when collaborating with other people, I actually don’t like the Google Docs interface for actually WORKING – composing, editing, updating, etc. Probably because I’m just so darned used to the Microsoft Office series of buttons, commands and interfaces. I often find myself downloading a Google Doc document, editing in Office, then uploading to Google Docs again. What a waste of time and counter-productive!!

I was thrilled, therefore, when I came across the following utility offered by Google:
Click here for Google/Office Connect

Just download and install and ‘voila’…you can work on your Google Docs documents from within Microsoft Office. Here’s how it works:

1. Download and install the app from this location: Download Google Cloud Connect (compatible with XP, Vista, Windows 7 and Office 2003, 2007 or 2010)

2. After the utility is installed, open up Word, Excel, Powerpoint and you will see a new toolbar:

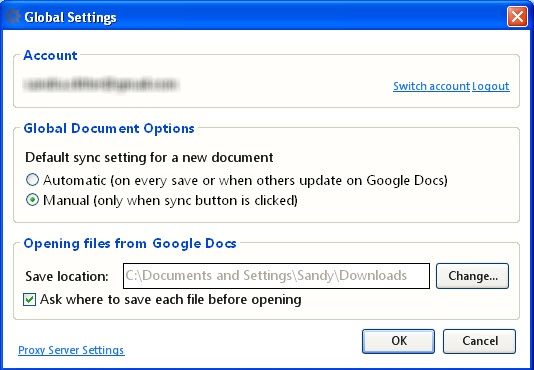
3. Click the ‘Login’ button and log in to your Google account. Once you have done this, you will be taken to a settings screen:

Select the settings that you want the sync to use – I would recommend leaving ‘automatic’ checked, so the Google Docs documents always stay ‘fresh’. This is particularly important if you’re collaborating with people because you want to be sure that you pick up any changes, and vice-versa. You can also change the default save folder – or have it challenge you whenever you save a document.

4. Open any document from your desktop and hit the ‘Sync’ button to send them to Google Docs. From this point forward (as long as you have the ‘automatic’ flag flipped), this document will always be saved to both your desktop and Google docs.

5. Now, click the ‘Google Cloud Connect’ button and you’ll see this box:

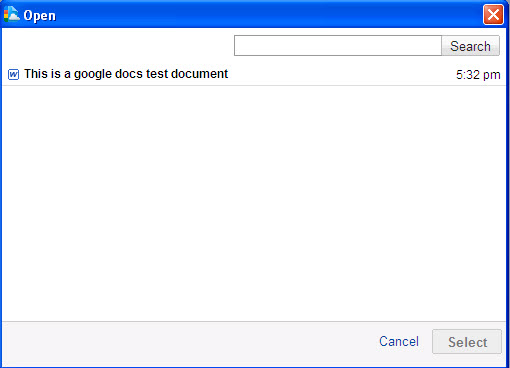
If you select the ‘Open from Google Docs’ choice:

The documents that you synced from your desktop now show up in Google Docs!!

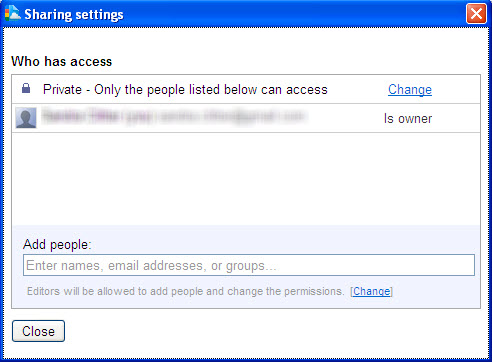
6. One fabulous feature is that you can share a document with others from within Office. Simply hit the ‘Share’ button. Looks just like the ‘Share’ button within Google Docs.

For me, this is sort of the ‘best of all possible worlds’. I can pick the documents that I want stored ‘in the cloud’. I can work on them in the setting that makes the most sense to me – no more trying to figure out how you do such-and-such in this interface or that interface – you only have to use ONE interface.

Check it out…see what you think…let me know. I’ve just started playing around with it, so I may change my mind, but it’s a nice tool to know about.

Narrowing down your Google Searches using Date Range Filters

Heavens to Murgatroyd!!! (Sidenote: When I typed this phrase, I decided that I had to find the origin of the phrase…check it out here).

When I do some Google searches, the sheer abundance of information (or irrelevant information) can be overwhelming. While I might try to refine my search terms to better narrow the results, there are times when the sheer volume can still ‘drown out’ the information you’re seeking. Is there a way to better narrow down the results (besides adding more keywords)? Of course, there is!

Here’s how you can do it…

First, run your search as you normally would using the best search string you can think of to obtain the results you’re looking for. NOW, look at the left side of the screen (that’s real estate that I often don’t notice…I’m too busy looking at the results themselves).

Google Search Filters

You’ll notice that there are a number of ways to narrow the search. If you’re looking for news articles only, just click the ‘News’ icon. Want blog postings, click ‘Blog’. Etc.

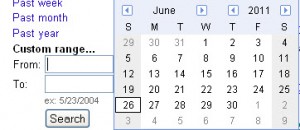
Those aren’t the best filters in my mind…to me the BEST filter is down in the ‘Any Time’ area lower on the page – CUSTOM RANGE.

Google Search Custom Date Filter

Just click on this, and enter any date range you want, or just a ‘from’ or a ‘to’ date. You don’t need to fill in both. For information posted BEFORE January 1, 2005, enter ‘1/1/2005’ in the ‘To’ field. That’s all you have to do. Irrelevant results are instantly removed from your listing.

There’s some much more complicated way to limit Google results, but I’ll use the tools they give me anytime!!

Happy Searching!!

Alternatives to Microsoft Office

Microsoft Office is an intrinsic part of my business. I use Outlook almost every minute of the day. Excel is open on my computer most of the time. Word is used daily. I develop all kinds of systems (and access to systems) using Access (no pun intended). I don’t know how I could run my business without these tools, but maybe that’s because I’m just so used to them. They are familiar. I’m comfortable with them. I know, almost without thinking, where to go to find something and do whatever task needs to be done.

That’s all wonderful until I need to upgrade. I’ll admit it, I’m still on Office 2003 (yes, really). Why? Well, besides being resistant to the new ‘ribbon’ features in Office 2007/2010 (why, oh why, did they move everything around, so that novices can find things, but experienced users get lost?), there is the $500 price tag (well, $499.99 to be accurate) to upgrade from something which is working perfectly well to something I’m going to have to re-learn (NOTE: There are versions of Office which run $279.99, but I have to have Access to do the work I need to do for my clients, and that comes in the $499.99 version). I’ll certainly upgrade, probably when I upgrade my computer, but in the meantime, I’m stretching my software dollars. If I amortize the cost of Office over the number of years I’ve used this version and the amount of time I’ve spent on the various programs, I’ve got nothing to complain about! For under $100/year, I’ve got an incredible tool.

…but I use Office ALL THE TIME! I get my ‘money’s worth’. That’s not true for everyone…

For a lot of people – business people and home users alike, there is just no way they can justify the investment. If you’re a more ‘casual’ desktop user and don’t need to be locked into the Office world, there are now a myriad of FREE alternatives available to you. I would strongly advise downloading and trying out the following FREE, FREE, FREE or low-cost software. Pick the one which suits you best. Depending upon whether you use more spreadsheet ‘stuff’ or document ‘stuff’ or presentation ‘stuff’, may determine which you prefer. It might also depend upon which software makes the most sense to you from a general navigation perspective.

So what are these ‘savior’ alternatives? Check them out below:

Open Office – www.openoffice.org – Free
Google Docs – docs.google.com – Free
Libre Office – www.libreoffice.org – Free
SoftMaker Office – www.softmaker.com – $80
Zoho – www.zoho.com – Free for individuals

Google Docs and Zoho are both web-based. That’s great if you want to access your information anywhere, but there are two drawbacks to consider to web-based software:

First, your data is stored completely on someone else’s server…make sure you back it up to your local machine regularly. Even the ‘big guys’ have accidentally deleted user data! Being in the ‘cloud’ does NOT mean ignoring backup procedures.
Second, if you don’t have a good internet connection, or you don’t have one at all, working on web-based software can be difficult to impossible.

Each of the softwares listed above has its own ‘character’ (although LibreOffice and OpenOffice are remarkably alike since LibreOffice grew out of a defection by OpenOffice users). All of the alternatives have free trial periods (or remain free), so feel free to try them all out. You decide which one might be better than the other for your particular uses!

What are your favorites…or do you stick with the familiar Microsoft Office environment?