(Mostly) Free Tools

Should I remove a program from my computer?

WOW…where does the time go? I have no excuses for being AWOL. I do, however, have tons and tons of ideas for articles…many of which can be attributed to the fact that my laptop died on me last week…Yup…done…over…kaput.

As an aside (skip over this paragraph to the next paragraph if you’re interested in the topic of this article and not my ramblings), my laptop was about a 18 months old. Sounds ‘young’ to many people, but it was an inexpensive laptop (cost in August 2011 about $450), and I used it ALL THE TIME…basically, I wore out the keyboard. Replacing the keyboard (yes, I got brave enough to try that before deciding to retire it to the big laptop parking lot in the sky) didn’t work. So, after consulting with some people who are better with hardware than I am, I decided to just bite the bullet and purchase a new laptop. After all, if I can’t type, I can’t service my clients! So I headed off to Staples and bought a Lenovo Ideapad for about $550. Not the cheapest laptop around, but certainly not the most expensive. So far, I’m OK with it. Its nice enough (geez, it has an Intel i5 processor, 8GB of RAM, and a 750GB hard drive) and the keys actually type what I ask them to – what more could you want?! It’ll take me a while to get used to the new touch/feel of the keyboard (and a smaller-than-standard numeric keypad), and a slightly smaller screen (15″ vs 17″ on my old laptop). BUT, the biggest challenge is getting used to Windows 8 – so be prepared for some upcoming articles on it. Once I found the desktop, I was much happier.

Anyway, back to the matter at hand…(those of you who skipped can tune back in here)…when one purchases new electronics (virtually any kind of electronics), one turns it on for the first time and are confronted with…all kinds of JUNK! “Bloatware” is a common term. Your computer comes pre-loaded with all kinds of programs that you may never need or want…but how do you decide what’s OK to delete and what’s not?

Aha! I found a great little tool that helps tremendously. It is called “Should I Remove It” and can be downloaded from ShouldIRemoveIt.com. Simply go to the website and press the free download button:

Once the file has downloaded, double-click on the file and install it on your computer (yes, you actually WANT this software!). Open up the newly installed piece of software and you’ll see this screen:

The bar on the right indicates the likelihood that you should uninstall a particular piece of software. Click on the name of one of the installed programs, and you can choose to investigate that program further or uninstall it – right from that screen.

It’s a pretty safe bet that if no one else has uninstalled a program that it’s an important one – but not always – so check it out and see. For instance, if your computer comes pre-installed with Microsoft Office, but you don’t want to use it, then it’s OK to uninstall that, as well, even though many people wouldn’t consider it ‘bloatware’…it is for you.

Anyway, the ShouldIRemoveIt rankings go from red (most everyone removes it) to green (only some people remove it). Check each one out. Decide for yourself, but be sure to read the ‘What Is It’ area before uninstalling those programs that aren’t clearly ‘in the red zone’. You don’t want to uninstall something ‘important’.

I found some of the statistics on the ShouldIRemoveIt.com website to be interesting. Toshiba seems to install more bloatware than other manufacturers (Acer, the least). The most actively removed program by this tool (at the time of this writing) is the Ask.com toolbar (yes, I uninstall that one whenever it creeps onto my computer).

NOTE: You can run this tool on an old computer, as well, to help clean it up. Once you’ve removed the programs, I’d recommend running something like Disk Cleanup, Defrag or CCleaner to clear any cobwebs from your computer’s brain!

Free Meeting Organizer – boy, does this save time and emails!

I don’t know about you, but for me one of the most aggravating parts of the Administrative side of my business is trying to organize meetings. Who’s available when? How do I organize all of the responses? Usually, I create something in Excel that works – sort of – but it’s tedious and manual and prone to mistakes.

Enter…MeetingWizard.com. Yes, a FREE tool that allows you – very simply – to organize meetings with no back and forth on availability.

Meeting Wizard is an incredibly simple, but elegant solution to this annoying administrative task. All that you and your invitees have access to email and a browser. It’s that simple. They promise it and they deliver!

To get started, you sign up for a free account. They only ask for the basics – your name, location and email address.

To start scheduling a meeting, click on ‘Create a Meeting’ (gee, they even label things with words that everyone can understand – what a pleasure!):

Meeting Wizard - Create a Meeting

I don’t know that I’d use this tool for a “specific time” meeting…I can do that right from my calendar, but I use the tool for ‘Propose one or more dates/times’. That’s the true beauty of this tool.

Select the dates/times that you’re proposing for your meeting. You just select a date/time from the drop-down, then click ‘add’. Select the duration of the meeting, the timezone and select ‘Continue’.

Meeting Wizard Select Dates and Times

Tell the people something about the meeting to which you are inviting them. It’s more likely that they’ll accept if you do :-)! People don’t like going to ‘mystery’ meetings.

Meeting Wizard send invite

Review the meeting invitation before you hit the ‘send’ button. You can even send an automatic reminder to participants a day or two in advance of the meeting.

Meeting Wizard - Review invitation

When the email goes out inviting participants to make their selections, they will get a link to Meeting Organizer. They don’t need a signon…they can just click on the link, then enter their response(s).

Meeting Wizard - Participant View

You’ll be able to see EVERYONE’s selections in one easy-to-review format…in fact, as meeting organizer, you can invite more people, change the meeting time, confirm the meeting, email people on the meeting list, send reminders, etc.:

Meeting Wizard - select the date

All of that back-and-forth and forth-and-back is taken care of. No fuss, no muss. Meeting scheduled.

What a terrific time-saver…and you don’t just need to limit it’s use to business…how about when you’re trying to schedule dinner with a bunch of your friends, or a weekend away with family. Give it a try, it’s painless – promise!!!

(Special thanks to one of our regular readers for telling us about this tool – it’s now an invaluable part of our virtual toolbox!)

How can I split up a PDF into smaller segments or combine multiple PDFs into one?

How many times have you run into the situation where you have a large PDF and want to share just a portion of it with someone else…or, you have several PDF’s that you want to combine into one large one? Maybe you have the situation where you want a couple of pages from one PDF and a couple of pages from another PDF. Sound familiar?

I had forgotten about a tool that I use ALL the time (yes, it’s free!), but hadn’t written about until someone asked today for just page 2 of a 2-page PDF. AHA!!! The PERFECT opportunity for a post!

There are a couple of ways you can accomplish getting a few pages out of a larger PDF. The first is to open the large PDF, then click on the print icon. Select your PDF ‘printer’ (if you don’t have a free PDF tool, click here to find out about getting one of those for free: Cute PDF), and print ONLY THE PAGES THAT YOU WANT – just as you would a ‘real’ printer. You will be challenged (as is traditional with PDF writers) for a file name…simply name your new file whatever you want and you have your ‘slimmed down’ PDF.

There is also another way to split a PDF AND merge multiple PDF’s in a bit more elegant of a manner. Enter the phenomenal tool by Adolix, “Adolix Split & Merge PDF”.

Go to http://www.adolix.com/split-merge-pdf/ and download the free version. There is a professional version that removes limitations in the free version, but most of the time, I can do what I need to with the free version. Sometimes it takes me a few more steps, but I can accomplish the task that I set out to do. If I were managing alot of large PDF’s on a regular basis, I’d spring for the $19.95 (as of this writing), and get the unlimited version, but I only have this challenge occasionally – and most of the time with smaller files.

Anyway, back to the task at hand…download and install “Split and Merge”.

When you open it, there is a simple (and relatively intuitive) interface:

Adolix Split and Merge Menu

Click on the correct tab to take the action that you want – split or merge – and away you go. We’ll start with ‘split’. Simply click on the + sign on the right side to add a file to be split:

Once you have the file(s) selected, use the middle section to say HOW you want the file(s) split (first 3 pages, one page each, pages 6-9 and 11, etc.)

Click the ‘Split’ button and voila! Multiple PDF’s:

If you exceed the ‘freebie’ length (as I did here), you’ll get this message:

No big deal…simply split your first (large) pdf into two smaller PDFs (or more, depending upon size), then continue to split until you have all the ‘smaller’ PDF’s that you’d like to have.

Next, if you want to COMBINE PDFs, click on the ‘Merge’ tab:

Just as you selected the PDF(s) that you wanted to split on the first step, this time you select the PDF’s that you want to merge. If you want to change the order, use the up/down arrows to move the pages around:

Once you’re satisfied that you have all the PDF files in the merge list (and in the correct order), press the ‘Merge Files!’ button and you’ll have one, larger PDF file…AND, the pages will be in the order your specified.

Hint: If you need to combine more than a few PDF’s into one larger PDF, and it exceeds the ‘freebie’ limitations, then combine a few PDFs, and just keep repeating the process until they are all combined into one big file. Splitting larger files works the same way – first break it down into two files, then break those two files down again, etc. It’s a bit more work, but it’s still free!

Happy PDF managing!!!

USB Flash Drives – Don’t forget to wipe them before discarding them

Ahhh…those ubiquitous little USB drives that litter our desks, briefcases, pockets, purses. How handy they are. How easy to lose. And, typically, we carry our most important information on them – or our current ‘most important’ projects. Once you’re done with the drive, you may just hand it over to someone else to use, or delete the files and leave the drive on your desk for the next use.

Here’s the problem…even if you delete the files, they’re not really ‘gone’. Hackers (or other evil-minded people) can recover deleted files from Flash Drives – even if it’s hard for you to do.

So, how do you deal with this, given the need to keep/use USB Flash Drives?

When you deleted the files (ostensibly ’emptying’ the drive), or after you’ve ‘cut’ and ‘pasted’ the files on the flash drive to another location, WIPE the drive. Use a utility to erase it completely.

Enter ‘Disk Wipe’ by Roadkil.net (http://www.roadkil.net/program.php/P14/Disk%20Wipe). This little utility is great tool to add to your virtual bag of tricks.

Download it, then unzip the file and copy the contents (there is only one file) to a separate Flash Drive (not the one you want to wipe). Run the application. All you need to do is to select the drive letter and the number of times the utility should run over the data (the more passes, the more thoroughly the data is erased – use a minimum of three passes). You can decide whether you want “junk” data written in place of your data or whether you want all data erased. Your choice.

Press the ‘Erase’ button and wait. You can now leave the flash drive laying around, hand it off to someone else, or even lose it/throw it away without fear that the data it contained will fall into the wrong hands.

By the way, Roadkil’s utilities (and there are a BUNCH of them available for download) are free. The developer does ask that donations be made if you feel like you’re getting good value, so that they can continue to offer free apps.

To upgrade to Windows 8 or not to upgrade…that is the question (and yes, my Uncle did it!)

Happy New Year, everyone!!! I hope that you all enjoyed your holidays. Now, its back to reality, working on your New Year’s resolutions and generally getting things ready for another productive year.

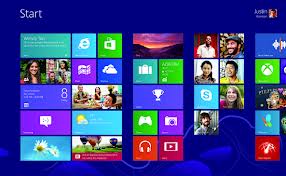
Many of you may have gotten a Windows 8 device as a gift, or are considering a Windows 8 device in the New Year. Most people know that the “traditional” look and feel of Windows has undergone a RADICAL transformation – if you haven’t seen it before, check it out below:

windows 8 start screen

Perhaps of greatest note is the lack of the iconic ‘Start’ button (which counter-intuitively is how you ‘shut down’ Windows). A techie friend of mine spend a good 1/2 hour searching for the way to turn off her machine once she updated. It’s just one of those things you’d never expect to ‘lose’! (BTW, the answer is hit ‘Windows+C’ to bring up the new ‘Charms Bar’, click ‘Settings’, then ‘Power’, then select your choice – yup…you got it – four clicks)

Anyway, I’ve been pretty much ignoring Windows 8 existence. I’ve seen major changes to operating systems and integral office productivity tools truly wreak havoc with a business’ equilibrium. Think back to the major update to Office from the 2000/2003 version to the 2007/2010 version. Offices across the country had productivity plummet when they upgraded (and some have yet to upgrade). It wasn’t that Microsoft took away functionality, but rather functionality which you could locate intuitively (after 5-10 years of use) had been moved/hidden. My sense was that Windows 8 would have similar issues…therefore, I’ve tucked my head firmly in the sand and decided that I didn’t need to deal with it yet, since Windows 7 is still available.

Imagine my surprise when I went to visit my Uncle (yes, he’s 85 1/2 now) and found that he’d upgraded his Win7 laptop to Windows 8 – and LOVES IT – mostly. He had tried to keep both Windows 7 and Windows 8 on the machine (you can do this by setting up a partition – Google “installing both Windows 7 and Windows 8” and you’ll get alot of help), but the installation went awry and he ended up with only Windows 8 on his machine.

The upgrade went flawlessly (if you ignore the fact that he didn’t end up with a machine with both Windows 7 and Windows 8), but my Uncle was a bit flummoxed by the lack of the ‘Start’ button and the inability to boot in a more ‘traditional’ Windows desktop (Microsoft REALLY wants you to work with it’s new tiles). We solved both problems with two little program/app installations.

First, we installed a nifty (and free) app which has a dual function – helps you to reinstall all of your legacy programs with one click after the Windows 8 upgrade (yes, you’ll need to reinstall/setup your programs again once you’ve upgraded) AND it has a Classic Start menu built in. This is a ridiculously easy tool and SO useful! Simply go to http://ninite.com/ and install the app.

This app allows you to install all of your major applications with one click AND automatically rejects all of the ‘junk’ toolbars, etc. that many installations try to force upon users.

This list is just a small snippet of the programs Ninite will install/update for you (the list goes on and on…I just took a snapshot of the top few). On top of that, there is the added benefit that will the click of your Windows key, you are taken to a ‘Classic’ start menu for Windows:

.

We went to a second utility, because he wanted the start button back on the desktop (not having to click the Windows key), we splurged and spent $4.99 to install Stardock’s “Start8 for Windows 8″ (http://www.stardock.com/products/start8/).

Voila! Now you can have the best of both worlds – Classic Windows or Windows 8. Now, organizations don’t need to be afraid of lost productivity because as users are getting used to the new interface, they also have the ‘classic’ view to rely upon.

My Uncle pushes me out of my comfort zone once again!!!

Making your website mobile-friendly…you have to do it!

Greetings, All –

I am so sorry for the lack of posts this past month…Honestly, it feels like I just wrote the last post a week ago, and it’s already a month old. Oye! How does that happen?!?!

First, a very Happy Thanksgiving to all our readers here in the United States. It is a time to give thanks, and I certainly thank all my loyal readers and clients – for without you, it’s no fun.

We all know that more and more people are checking out websites on their smartphones. People are on-the-go…they hear about something and immediately check it out – from their phone. UNFORTUNATELY, a ‘normal’ website will not appear correctly on a phone…well, that’s not exactly right…they appear correctly many times, but they might be itty-bitty and no mere mortal (certainly, not any mortal over the age of 35) can actually read the text, or images and text can be ‘off’. That said, converting your site can often end up in the ‘too hard’ pile…We don’t know how to go about it, we don’t have time to do it…whatever the excuse.

A reader of this blog asked if I knew ‘how to make a website mobile’. While I knew THEORETICALLY what was involved, I didn’t really know the HOW – having put my own website in the ‘too hard’ pile for making it ‘mobile-friendly’. So, I figured that it was about time to figure it out. Imagine my happiness and delight when I found a GOOGLE related site which helps you -for f*r*e*e – convert your existing site to a mobile application.

Follow along…it’s really not a bad experience!

Here is the ‘traditional’ home page for our website YourTechTamer.com

Your Tech Tamer traditional home page

We want to ‘mobilize’ this site using Google’s HowToGoMo application (HowToGoMo.com). The music to my ears (well, eyes), was the link ‘build your free site now‘.

Enter your URL and press ‘Make My Site Mobile’. GoMo presents you with an initial mobile layout that you can then edit:

GoMo layout

You can play around with any number of designs, or leave it at the default created. Once you’re happy with the basic design, it’s time to work on changing colors, etc. Click on ‘Next’ to bring up the next screen:

Go Mo Edit Design

I only changed the number of navigation items showing, but you can change any number of different things to customize the look and feel of your new mobile site. You can create a ‘push to call’ button. You can change colors/images. Basically, let your creativity shine and see where it takes you! Once you’re done, you’ll need to create a signon for ‘DudaMobile’ (they’ll be hosting your new mobile site). Once you’ve entered the information, its time to PREVIEW your new mobile site – see how it appears on the four major types of mobile devices:

Preview Mobile Website

Make sure you check how your individual pages appear…because that’s as important as how the navigation adjusts. Some highly formatted pages do not ‘mobilize’ well. Check with your web developer if they don’t.

You can also setup blogs as mobile sites – check out the mobile version of this blog at http://mobile.dudamobile.com/site/yourtechtamerblog from your smartphone.

If you’re happy with it, hit ‘Setup My Mobile Website Redirect’. This publishes the mobile site on Duda’s servers:

Mobile Conversion Publish Site

Lastly, you need to give a snipped of code to your webdeveloper to put in the header of the home page of your website. It’s an easy step and is explained very well on this screen:

Why do you need this? You need it to allow users to be directed automatically to the correct site for them based upon the device that they are using. The web can be intelligent enough to know when someone is trying to search on a site from a mobile device. If it senses that the ‘searching device’ is a mobile device, it will automatically redirect the user to the ‘mobilized’ version of the site and away from the ‘standard’ website.

There’s only one caveat…the mobile site is only free for a year…after that, it will be $108…but the good news is that you don’t need to leave a credit card on file…use the site for a full year and see how you like it…tweak it and adjust it. At the end of the year, you can pay the $108 OR you can actually give your website developer the code that was created from the site (yes, you can get to the HTML and CSS code within the ‘build your mobile website’ screens) and integrate it into your own website code. Either way appears to work.

At worst, you get experience – for free – with what you want to appear on a mobile site…then you are a knowledgeable consumer if you choose to have the mobile site integrated into your hosting…and you can show a website designer exactly how you want it to appear.

Have fun MOBILIZING!!!!

Want to read web pages later and from your other devices?

How many times have you found yourself waiting in line, sitting in a doctor’s office waiting room, racing to meet someone for a lunch or coffee only to get that text that says ‘Sorry, but I’m running 15 minutes behind’? I can answer for myself – often (I’m also a perennially early person – when I’m on time I feel late, so I often have a few minutes to spare when I arrive somewhere).

What do you do to make this time ‘productive’? I often find myself reading the ‘newspaper’ on my phone. There are many times, however, that I would rather be reading something that I had WANTED to read, but didn’t have time to read when I ran across it. In other words, that article in PC World that I meant to get back to, or an article on what my beloved Phillies are going to do in the off-season to shore up the bullpen. Be clear, these weren’t articles in a magazine or newspaper that I ripped out to get back to later…these were online articles that I just didn’t have time to read when they flashed across my screen. Oh, I’ll bookmark the pages…and say ‘I’ll get back to that when I have time’, then the free time and my ability to locate the article and my proximity to my desktop that contains the bookmark are all in different places on the space-time continuum. In other words, the articles probably don’t get read.

Enter the neatest little application by the name ‘Pocket’. Pocket allows you to take all the articles you want along with you on any device you use. Best of all, it is SIMPLE and FREE. How easy? Real easy:

Simply go to http://getpocket.com/ and sign up for an account. They only ask for a username, password and email address. That’s it.

pocket signup form

Once you create your signon, you’ll be taken to a screen which allows you to choose how you want to save your pages:

pocket getting started

Clicking on the ‘Learn How’ link takes you to this screen:

pocket how to save

Install the add-on to your browser that will allow you to ‘pocket’ the articles. Once you’ve installed it, then this icon appears in your browser:

Click on that icon from any page and it ‘illuminates’:

That illuminated icon means that the webpage has been ‘pocketed’ and will be available from any other device on which you have Pocket installed.

Start ‘pocketing’ any articles that you want to ‘get back to’. They’ll appear on your Pocket dashboard:

Now, go to the App Store for your ‘other’ device(s) and download the Pocket App. You’ll be able to read any of those articles – wherever you are and whenever you have the time. If you want to get fancy, you can tag archived items in order to group similar articles together. There are even options for saving via email or Twitter (in fact, over 300 apps let you ‘Pocket’ directly). Now that you’re aware of Pocket, you’ll start seeing the little pocket icon show up in lots of places.

Here’s to making non-productive time more productive!

Creating and Editing your Microsoft Office docs on your iPad

As many of you know, I was a late adopter to the iPad world. I didn’t get my iPad until the latest release last spring (2012). While I love the easy of use/access, I was having a hard time swallowing the need to purchase an App to effectively edit my Microsoft Office documents (after all, I’d already paid several hundred dollars for the desktop version – I did NOT want to shell out more). Therefore, I used my iPad primarily for checking emails, looking things up on the web, etc. Not for “real” work.

I had asked around my many iPad-using friends to find out what they use for Office Productivity. Some had purchased the Office App. Others use a myriad of other tools which have sprung up to close the gap between Office Documents and the iPad. When I asked what they thought of the solutions, there were varying degrees of satisfaction – from ‘not happy with the solution’ to ‘it’ll do for now’. None of those responses enticed me to try the solutions…I thought ‘there’s gotta be something better’!

Regular readers to this Blog will not be surprised that I finally got a remarkable solution – from my 85-year-old Uncle!!! Of course. Leave it to him to come up with a F-R-E-E and easy-to-use App that allows you to work within the Microsoft Office ecosystem on your iPad (Word, Excel, Powerpoint).

…and what is this wondrous app??? It is called CloudOn (www.cloudon.com) and let me tell you, it has changed my world on my iPad. One word of caution…the service is so terrific (and did I mention F*R*E*E), that it has, at times, gone down. Not my app, but the main website. Apparently, they will not allow new users to download the app if their capacity is hitting critical mass. If this happens to you, just try back a day or two later.

Anyway, what does it look like and how does it work?

First, you need to download and install the CloudOn App (it works on i-Things and on Android). CloudOn piggybacks on your DropBox installation, so if you haven’t set that up on your PC and iPad, then you need to download that service first (I haven’t tried it, but CloudOn is also supposed to work with the online storage BOX and Google Drive). For more information on DropBox, please read this Blog Post from September.

Now, let’s see how easy it is to use. Here is a document that I started on my PC (click on an image to enlarge):

Word Document Sample for CloudOn started on PC

Now, I will save this document to my DropBox folder and move over to my iPad…Tap the CloudOn icon on my iPad:

CloudOn icon

The window which appears will display your DropBox documents:

CloudOn Initial Screen

Scroll across until you see the document that you want to edit and double-tap the document to open it:

CloudOn Select Document

Add/Edit/Delete to your heart’s content:

CloudOn changed document

Any changes to the document are automatically saved (no function).

Open the document up back on your desktop and you’ll see the changes!

Suddenly, my iPad just became a much more useful productivity tool…thank you, CloudOn!!

How do I convert my Video/Audio files to view/listen on my PC?

There are what feels like a million different audio and video formats – each of which plays on a different device. GRRRRRRRR!!!! So frustrating…I never seem to have the correct format for the correct device.

A good friend of mine had to take video for work, then upload it to the web in a WAV format. She figured…simple. Simply put the SD card from the camera in her PC and upload from there. Imagine her surprise when the format on the disk didn’t match the format that needed to be uploaded. What do do, what to do?

Luckily, we were able to find a FREE utility, ConverterLite, that is very easy to use. The only downside is the installation. Installation is a bit ugly. The install isn’t difficult, but the installer desperately wants to install a lot of bloatware (probably to help subsidize the free downloads). If you remain alert during the installation, you can avoid adding a lot of ‘stuff’ you don’t want on your computer.

So, let’s get started! First go to www.converterlite.com and click the ‘Download Now – It’s Free’ button. Save the file to your desktop, then double-click to begin the install. Here’s where you need to PAY ATTENTION:

Beware of the unintentional bloatware installation

On this screen, change the installation type from ‘Express’ to ‘Custom’. Once you do that, UNCHECK each of the options (unless you actually want the extra software installed). Click ‘Accept’ to continue the installation.

There will be several (I didn’t count how many) screens following which will each be trying to install additional software. Read each screen carefully and decide whether you want to Accept or Decline that portion of the installation. We want to install ‘ConverterLite’, but not a raft of other software.

Once the software is installed, you can click ‘ConverterLite’ from your desktop icon or program menu. Here’s the main (very simple) menu:

Click on the icon which represents the type of file you need to convert. When you click on it, an Explorer window will open. Navigate until you find the file that you want to convert and highlight it:

Then, click ‘Open’. You can select as many files as you like for converting – they will all list to the right side on ConverterLite’s home screen. That said, select all ‘Audio’ if you’re converting Audio files or ‘Video’ if you’re converting all Video files…don’t mix and match:

Click ‘Next’, and a new screen appears. Pick what type of file you want to convert TO:

If you select Video, you have a bunch of conversion type selections:

Click ‘Next’ again:

Click ‘Convert’ to convert the file(s) FROM the existing format TO the new format you selected.

My friend was able to convert from AVI to WMV with no problem. While this simple, free tool probably doesn’t allow for EVERY combination of conversion available, it solved this issue quickly and simply. For people who don’t do a lot with audio/video, this helps to make it a bit less intimidating…for a very nice ‘price’!

Dropbox – What is it? Why do you have to have it?

Sorry I’ve been MIA lately…I have a cartoon hanging on my refrigerator which says ‘Summer – where laziness meets respectability’. Somehow, while I’ve been busy all the time, I haven’t been as concerned about meeting non-client related deadlines…until Labor Day hit…now I’m trying to get back into the saddle and get going!

Anyway, you don’t care about that…you care about Dropbox – or want to find out WHY you care about Dropbox.

In a nutshell (and to use Dropbox’s own words), “Dropbox is a free service that lets you bring all your photos, docs, and videos anywhere. Any file you save to your Dropbox will also automatically save to all your computers, phones, and even the Dropbox website. This means that you can start working on your computer at school or the office, and finish on your home computer. Never email yourself a file again!” Additionally, you can quickly and easily share folders or files with anyone you choose. Maybe you won’t email large files again, either!

I don’t know about you, but there are many a time when I don’t have my laptop with me and I want to access a particular document. Maybe I’m at a client’s office and I need that ONE document I failed to bring with me. Maybe I’m with friends and I want to show them photos of my High School reunion. Whatever the situation, it is sooooooo hard to keep what files are where straight. Enter Dropbox.

I will admit it…I resisted setting up Dropbox. I don’t know why, I just did. Then, a friend of mine from High School put a bunch of ‘stuff’ up on Dropbox to share with the Class (our 35th reunion – YIKES – is next weekend). When I saw how easy it was to use (I could view files just by clicking on the link in the email. I could download files easily…I didn’t even need an account), I was thrilled. When I clicked on the link that I was emailed, I got to a page that listed all of the files/folders and I could see ANYTHING in there that I wanted:

Viewing Drop Box Files

It was the 70's - don't ask!

(Once I saw some of the photos, I questioned why I wanted to see them in the first place :-))

If I want to download the files to my computer (again, without creating any account whatsoever), I can just click and download:

So, because Dropbox was ‘nice’ and didn’t force me to create an account to get to the files I wanted to see, I decided to actually set up an account (just go to www.dropbox.com to get started). It was sooooo easy to do:

Enter your name, email and a password and away you go. The setup steps are clearly laid out:

They literally walk you through each step…with pictures and descriptions that are EASY to follow! NO techno-babble at Dropbox.

Dropbox gives you 2GB of storage – for FREE – initially. You can then ‘earn’ additional space. I’m up to 50GB by simply doing a 15 minutes ‘training’ and setup on various Dropbox features. To get more space, click on the ‘Get Free Space’ button – you’ll see the steps/alternatives clearly laid out. You can earn bunches of space…for free. It just doesn’t get much better than this!

Once you’ve set Dropbox up, putting a file in the Dropbox folder on your computer will sync it to your Dropbox account which can be accessed by signing into Dropbox from ANY internet connected device. If you want to SYNC the files between devices, just install Dropbox on each device (I’ve installed it on my smartphone and iPad) and you’ll have current files on each device…no more wondering which is the current version, or forgetting the file at the office.

The first thing that I did was upload the photos from my phone to Dropbox, so that I can access them on my computer. The files were available virtually instantaneously.

THEN, on top of that realize what you’re doing…you’ve got OFF-SITE BACKUP for important files. Make sure that those ‘I’ll be dead if I ever lose this file’ files are saved to your Dropbox folder…they will be automatically backed up each time they change.

Mac or Windows or Android…Dropbox has a place in your life!

Stay tuned to find out how Dropbox will assist you in maintaining Microsoft Office files on an iPad or iPhone…It’s pretty cool!