Business Processes

To upgrade to Windows 8 or not to upgrade…that is the question (and yes, my Uncle did it!)

Happy New Year, everyone!!! I hope that you all enjoyed your holidays. Now, its back to reality, working on your New Year’s resolutions and generally getting things ready for another productive year.

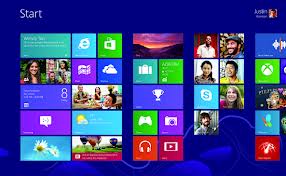
Many of you may have gotten a Windows 8 device as a gift, or are considering a Windows 8 device in the New Year. Most people know that the “traditional” look and feel of Windows has undergone a RADICAL transformation – if you haven’t seen it before, check it out below:

windows 8 start screen

Perhaps of greatest note is the lack of the iconic ‘Start’ button (which counter-intuitively is how you ‘shut down’ Windows). A techie friend of mine spend a good 1/2 hour searching for the way to turn off her machine once she updated. It’s just one of those things you’d never expect to ‘lose’! (BTW, the answer is hit ‘Windows+C’ to bring up the new ‘Charms Bar’, click ‘Settings’, then ‘Power’, then select your choice – yup…you got it – four clicks)

Anyway, I’ve been pretty much ignoring Windows 8 existence. I’ve seen major changes to operating systems and integral office productivity tools truly wreak havoc with a business’ equilibrium. Think back to the major update to Office from the 2000/2003 version to the 2007/2010 version. Offices across the country had productivity plummet when they upgraded (and some have yet to upgrade). It wasn’t that Microsoft took away functionality, but rather functionality which you could locate intuitively (after 5-10 years of use) had been moved/hidden. My sense was that Windows 8 would have similar issues…therefore, I’ve tucked my head firmly in the sand and decided that I didn’t need to deal with it yet, since Windows 7 is still available.

Imagine my surprise when I went to visit my Uncle (yes, he’s 85 1/2 now) and found that he’d upgraded his Win7 laptop to Windows 8 – and LOVES IT – mostly. He had tried to keep both Windows 7 and Windows 8 on the machine (you can do this by setting up a partition – Google “installing both Windows 7 and Windows 8” and you’ll get alot of help), but the installation went awry and he ended up with only Windows 8 on his machine.

The upgrade went flawlessly (if you ignore the fact that he didn’t end up with a machine with both Windows 7 and Windows 8), but my Uncle was a bit flummoxed by the lack of the ‘Start’ button and the inability to boot in a more ‘traditional’ Windows desktop (Microsoft REALLY wants you to work with it’s new tiles). We solved both problems with two little program/app installations.

First, we installed a nifty (and free) app which has a dual function – helps you to reinstall all of your legacy programs with one click after the Windows 8 upgrade (yes, you’ll need to reinstall/setup your programs again once you’ve upgraded) AND it has a Classic Start menu built in. This is a ridiculously easy tool and SO useful! Simply go to http://ninite.com/ and install the app.

This app allows you to install all of your major applications with one click AND automatically rejects all of the ‘junk’ toolbars, etc. that many installations try to force upon users.

This list is just a small snippet of the programs Ninite will install/update for you (the list goes on and on…I just took a snapshot of the top few). On top of that, there is the added benefit that will the click of your Windows key, you are taken to a ‘Classic’ start menu for Windows:

.

We went to a second utility, because he wanted the start button back on the desktop (not having to click the Windows key), we splurged and spent $4.99 to install Stardock’s “Start8 for Windows 8″ (http://www.stardock.com/products/start8/).

Voila! Now you can have the best of both worlds – Classic Windows or Windows 8. Now, organizations don’t need to be afraid of lost productivity because as users are getting used to the new interface, they also have the ‘classic’ view to rely upon.

My Uncle pushes me out of my comfort zone once again!!!
Creating and Editing your Microsoft Office docs on your iPad

As many of you know, I was a late adopter to the iPad world. I didn’t get my iPad until the latest release last spring (2012). While I love the easy of use/access, I was having a hard time swallowing the need to purchase an App to effectively edit my Microsoft Office documents (after all, I’d already paid several hundred dollars for the desktop version – I did NOT want to shell out more). Therefore, I used my iPad primarily for checking emails, looking things up on the web, etc. Not for “real” work.

I had asked around my many iPad-using friends to find out what they use for Office Productivity. Some had purchased the Office App. Others use a myriad of other tools which have sprung up to close the gap between Office Documents and the iPad. When I asked what they thought of the solutions, there were varying degrees of satisfaction – from ‘not happy with the solution’ to ‘it’ll do for now’. None of those responses enticed me to try the solutions…I thought ‘there’s gotta be something better’!

Regular readers to this Blog will not be surprised that I finally got a remarkable solution – from my 85-year-old Uncle!!! Of course. Leave it to him to come up with a F-R-E-E and easy-to-use App that allows you to work within the Microsoft Office ecosystem on your iPad (Word, Excel, Powerpoint).

…and what is this wondrous app??? It is called CloudOn (www.cloudon.com) and let me tell you, it has changed my world on my iPad. One word of caution…the service is so terrific (and did I mention F*R*E*E), that it has, at times, gone down. Not my app, but the main website. Apparently, they will not allow new users to download the app if their capacity is hitting critical mass. If this happens to you, just try back a day or two later.

Anyway, what does it look like and how does it work?

First, you need to download and install the CloudOn App (it works on i-Things and on Android). CloudOn piggybacks on your DropBox installation, so if you haven’t set that up on your PC and iPad, then you need to download that service first (I haven’t tried it, but CloudOn is also supposed to work with the online storage BOX and Google Drive). For more information on DropBox, please read this Blog Post from September.

Now, let’s see how easy it is to use. Here is a document that I started on my PC (click on an image to enlarge):

Word Document Sample for CloudOn started on PC

Now, I will save this document to my DropBox folder and move over to my iPad…Tap the CloudOn icon on my iPad:

CloudOn icon

The window which appears will display your DropBox documents:

CloudOn Initial Screen

Scroll across until you see the document that you want to edit and double-tap the document to open it:

CloudOn Select Document

Add/Edit/Delete to your heart’s content:

CloudOn changed document

Any changes to the document are automatically saved (no function).

Open the document up back on your desktop and you’ll see the changes!

Suddenly, my iPad just became a much more useful productivity tool…thank you, CloudOn!!

Dropbox – What is it? Why do you have to have it?

Sorry I’ve been MIA lately…I have a cartoon hanging on my refrigerator which says ‘Summer – where laziness meets respectability’. Somehow, while I’ve been busy all the time, I haven’t been as concerned about meeting non-client related deadlines…until Labor Day hit…now I’m trying to get back into the saddle and get going!

Anyway, you don’t care about that…you care about Dropbox – or want to find out WHY you care about Dropbox.

In a nutshell (and to use Dropbox’s own words), “Dropbox is a free service that lets you bring all your photos, docs, and videos anywhere. Any file you save to your Dropbox will also automatically save to all your computers, phones, and even the Dropbox website. This means that you can start working on your computer at school or the office, and finish on your home computer. Never email yourself a file again!” Additionally, you can quickly and easily share folders or files with anyone you choose. Maybe you won’t email large files again, either!

I don’t know about you, but there are many a time when I don’t have my laptop with me and I want to access a particular document. Maybe I’m at a client’s office and I need that ONE document I failed to bring with me. Maybe I’m with friends and I want to show them photos of my High School reunion. Whatever the situation, it is sooooooo hard to keep what files are where straight. Enter Dropbox.

I will admit it…I resisted setting up Dropbox. I don’t know why, I just did. Then, a friend of mine from High School put a bunch of ‘stuff’ up on Dropbox to share with the Class (our 35th reunion – YIKES – is next weekend). When I saw how easy it was to use (I could view files just by clicking on the link in the email. I could download files easily…I didn’t even need an account), I was thrilled. When I clicked on the link that I was emailed, I got to a page that listed all of the files/folders and I could see ANYTHING in there that I wanted:

Viewing Drop Box Files

It was the 70's - don't ask!

(Once I saw some of the photos, I questioned why I wanted to see them in the first place :-))

If I want to download the files to my computer (again, without creating any account whatsoever), I can just click and download:

So, because Dropbox was ‘nice’ and didn’t force me to create an account to get to the files I wanted to see, I decided to actually set up an account (just go to www.dropbox.com to get started). It was sooooo easy to do:

Enter your name, email and a password and away you go. The setup steps are clearly laid out:

They literally walk you through each step…with pictures and descriptions that are EASY to follow! NO techno-babble at Dropbox.

Dropbox gives you 2GB of storage – for FREE – initially. You can then ‘earn’ additional space. I’m up to 50GB by simply doing a 15 minutes ‘training’ and setup on various Dropbox features. To get more space, click on the ‘Get Free Space’ button – you’ll see the steps/alternatives clearly laid out. You can earn bunches of space…for free. It just doesn’t get much better than this!

Once you’ve set Dropbox up, putting a file in the Dropbox folder on your computer will sync it to your Dropbox account which can be accessed by signing into Dropbox from ANY internet connected device. If you want to SYNC the files between devices, just install Dropbox on each device (I’ve installed it on my smartphone and iPad) and you’ll have current files on each device…no more wondering which is the current version, or forgetting the file at the office.

The first thing that I did was upload the photos from my phone to Dropbox, so that I can access them on my computer. The files were available virtually instantaneously.

THEN, on top of that realize what you’re doing…you’ve got OFF-SITE BACKUP for important files. Make sure that those ‘I’ll be dead if I ever lose this file’ files are saved to your Dropbox folder…they will be automatically backed up each time they change.

Mac or Windows or Android…Dropbox has a place in your life!

Stay tuned to find out how Dropbox will assist you in maintaining Microsoft Office files on an iPad or iPhone…It’s pretty cool!

Password Protect PDFs

We’ve all done it…we’ve sent an attachment to an e-mail that contains information which shouldn’t be ‘shared’ with the public. Think documents which contain passwords or social security numbers or things of that nature. Maybe it’s a contract that has sensitive information. It could be pretty much ANYTHING that you don’t really want to share with the world. There have been times that I’ve hit ‘send’ then said ‘Ohhhh…I shouldn’t have sent that out there where it could be intercepted’. Other times, I didn’t give it a thought…just sent it. Sometimes (and I’m ashamed to admit this), I’ve known better, but cross my fingers and hope that no ‘mischievous’ person or computer will intercept it along the way.

Why didn’t I make a habit of sending things ‘protected’? Because I didn’t have a tool that was inexpensive which would allow me to password protect the files. I’ve written before (Creating PDFs for Free) about getting AND USING a PDF writer for documents which you don’t want altered (think contracts, financial calculations, etc.). While PDF’s prevent people from changing the contents of a document, ANYONE who has access to the PDF file can open/review it. Not necessarily good.

So, how to deal with this and become a better cyber-citizen? After you’ve created your PDF file, PASSWORD PROTECT IT!! How? Glad you asked!

There is a WONDERFUL site called PDFProtect (http://www.pdfprotect.net/)…and it couldn’t be EASIER…SERIOUSLY!!!

Simply go to pdfprotect.net. You’ll see this screen (click the image to enlarge):

Browse to the PDF that you want to protect.
Enter the password that you want to use for that file.
Click “Protect”.
You’re done.

This screen will appear – the protected file will be saved to your computer immediately:

Double-click in your downloads:

You will be challenged for the password (as will anyone who tries to open this document):

There you go! You can e-mail the document with peace-of-mind. Now, there’s no excuse for sending unsecured documents!!!

Radio Show – Critical Mass: Coast-to-Coast – February 16, 2012

I had the pleasure of being asked to appear on an Orange County, CA Radio Show, Critical Mass: Coast-to-Coast on February 16th, 2012. It was a distinct honor to be asked to appear, however, I was delighted to learn of the show because it is a fabulous resource for business owners, C-level managers, and people who are striving to become C-level managers or business owners. I’ve had a blast listening to recordings of past shows, and now try to catch it live if I’m at my desk late Thursday afternoons (6pm on the East Coast).

Ric Franzi, co-host of Critical Mass (the the host who interviewed me), is very able at blending two of his greatest passions: educating CEOs and talk radio. Ric has a unique interviewing style which helps his guests feel comfortable and enables them to focus on answering the questions in a conversational and relaxed environment. With expertise in running CEO Peer Groups, Ric knows the questions to ask and the ‘pain points’ that that top-level management experiences.

CRITICAL MASS: The Radio Show strives to share knowledge and information from an assortment of top business leaders. By sharing information and experiences, Ric enables anyone to gain knowledge often only available during CEO Peer Groups experiences.

The format is one that can be used when meeting new people, networking, and developing business relationships of many shapes and sizes. Here’s how Ric approached the interview with me:

1. What does your company do? (That question SOUNDS far easier to answer than it really is – at least for me!)
2. How did you get to your current position (owning or running a company)?
3. What is your guiding principle in business?
4. What is a current challenge facing your firm and how are you working on/approaching a solution?
5. If we speak again a couple of years down the road, where will your company be?

When I thought about it, that question ‘formula’ is perfect on a radio talk show, but also in meeting new clients, developing new vendor relationships, not to mention in those Peer Groups that Ric runs.

To hear how I answered those questions, click below on the podcast icon below, or on the link below that.


Listen to the interview with Sandra Clitter

(Shameless plug: The part of the show on which I appear begins at about 2:20 into the show)

To ‘Unsubscribe’ or ‘Not Unsubscribe’, that is the question…

(With all due respect to Shakespeare and Hamlet)

We all get Spam. Its probably safe to say that we all get wayyyyyyyyyyy too much Spam. Spam, by definition, is e-mail that you do not choose or want to receive. It is junk.

On the other hand, there are newsletters and such that you really DO want to receive. So, how do you know when you can ‘make it go away’ and when you shouldn’t because it will just get you MORE junk in your inbox? When should you click ‘unsubscribe’? What are the ramifications if you do?

Normally, I don’t say ‘why’ I write particular posts…I just write them. Sometimes I am asked to write on a subject by a reader. Sometimes I get asked a question so many times that I figure it would make a good blog post. Sometimes an event in life causes me to write on a given subject…and so it is with this topic. Many of my ‘life’ blog posts have had their origins with my Uncle. This is another one of those posts!

Here’s the story…

December 31st of last year, I sent out a mail blast (using the free email service, MailChimp) to my entire email list. It wasn’t a newsletter, but rather a note that the name of my company was changing on January 1, 2012. Accordingly, rather than ‘SLC Consulting’, I wanted people to start using ‘Your Tech Tamer’ and to update their email addresses, etc. What better way to communicate important information to a wide-range of people? So far, so good. Off goes my e-mail. The next morning, I get an unsubscribe notice from, you guessed it, MY UNCLE!!!! What on earth?!?! Talk about dejected…if your own flesh-and-blood doesn’t want to read what you have to write, then why bother, right?

Fast-forward about five days. I’m visiting with him and he sheepishly tells me that he accidentally hit ‘unsubscribe’ when he was scrolling down the page and was there a way to ‘resubscribe’ because OBVIOUSLY, he didn’t want to unsubscribe from something that I had sent. Whew!!! He still loves me!!! While we laughed about the incident (and I showed him how to resubscribe), he was surprised to find out that I ALREADY KNEW that he had unsubscribed. How could that be?

So, to get to the ‘meat’ of this post, here are a few things to think about and know BEFORE you hit the ‘Unsubscribe’ button:

1. Only hit the ‘Unsubscribe’ button (or the ‘If you no longer wish to receive these emails…’ type of links) if the e-mail comes from a reputable e-mail blast service. ConstantContact, MailChimp, SendBlaster, iContact, etc. are all ‘reputable’ email services. You’ll know that an e-mail blast came from those services because you’ll see their ‘bug’ (logo) in the footer of the e-mails. The ‘bug’ identifies the e-mails as having been sent through these services. Clicking ‘Unsubscribe’ on an e-mail sent by one of these services will truly ‘unsubscribe’ you, and the owner of the e-mail list will NOT be able to resubscribe you…only you will be able to resubscribe yourself.

2. **BEWARE**: The owners of the email list (me, in the example above) RECEIVE A NOTIFICATION that someone has unsubscribed and their name/e-mail address. In other words, if you unsubscribe from your best friend’s list, he/she WILL KNOW!! If you really don’t want to receive that mail, it might be preferable to mark it as ‘spam’ or ‘junk’ in your email service…your friend won’t know if you do that, so there will be no hard feelings.

3. If the email does not show an email ‘blast’ service in the footer, but appears to come from a company that you know, then double-check the ‘from’ address (the sender’s email address) – not the name that displays, but rather the actual e-mail address from which the e-mail was sent. If you recognize it as being legitimate (e.g. emailmarketing@coke.com), then hitting ‘unsubscribe’ is probably safe to do. Here’s an example of a legitimate e-mail address from which it would be ‘safe’ to hit the ‘unsubscribe’ button:

4. If the email has a sender’s name that your recognize, but the actual ‘from’ e-mail address is ‘odd’, then DO NOT hit ‘unsubscribe’ or otherwise ask to be removed from the e-mail list. If you hit this link, you will likely get EVEN MORE unwanted emails because you have only verified to spammers that your e-mail address is a ‘live’ one!

Bottom line: The rules are pretty simple.

If the e-mail comes from a legitimate e-mail blast service, it’s safe to unsubscribe, but the owner of the list will know that you unsubscribed, so decide if it’s better to send the e-mail to the junk bin, rather than unsubscribing and potentially hurting someone’s feelings.

If the e-mail comes from an apparently legitimate e-mail address, make sure by checking the exact address. Only hit ‘unsubscribe’ from e-mail addresses that are ‘real’. Otherwise, you may be bringing a deluge of further unwanted mail by clicking ‘remove’ or ‘unsubscribe’. Again, block the sender via the Junk Mail or Spam feature in your mail service, rather than unsubscribing.

Friendly word of advice: NEVER EVER unsubscribe from close family or friends e-mails :-)! It is far better to keep the peace!

How can I access my Bookmarks or Favorites from any computer?

There are so many times when I’m working on a computer that is NOT my own and I want to get to some website that I have bookmarked (set as a ‘favorite’) on my computer. Worse still if you work primarily on public computers and can’t save your own set of bookmarks at all. Maybe you have a personal computer and a work computer, and somehow, the favorite that you need to reference always seems to be on the other computer. Some URL’s (e.g. Google) are obvious, but others are well-hidden or buried or not entirely ‘findable’ without the help of that precious bookmark.

Is there a solution? Is there a way to make your bookmarks/favorites ‘portable’ or accessible from ANY computer? You betcha!!!

Time to check out www.aboogy.com.

With Aboogy, you can set up all your favorites that can be accessed from any computer – as long as you remember you Aboogy signon. When you first go to www.aboogy.com, you’ll be asked to create a user ID and password, then click on a confirmation e-mail from Aboogy. Once that’s done, you are ready to roll with setting up your own list of favorites/bookmarks/shortcuts that can be accessed from ANY computer.

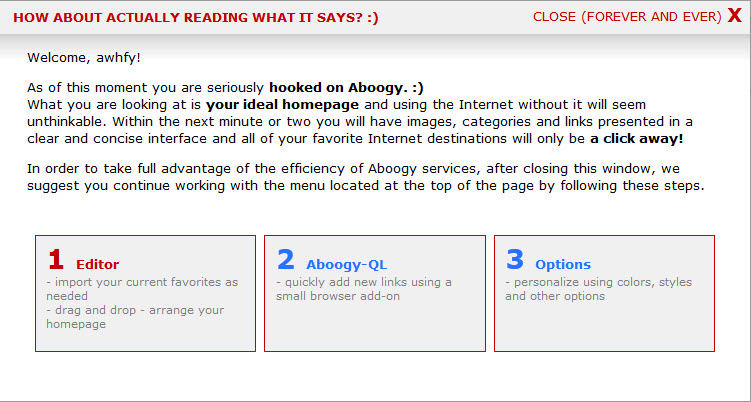
Your first time signing in to Aboogy, you’ll be asked to read this screen – they’ll only show it once!

Once you’ve closed that screen, you’ll be able to set up your favorites and tracking a variety of ways – buttons, links, images, categories – all under YOUR control!!

Start by importing your existing bookmarks or favorites from your computer:

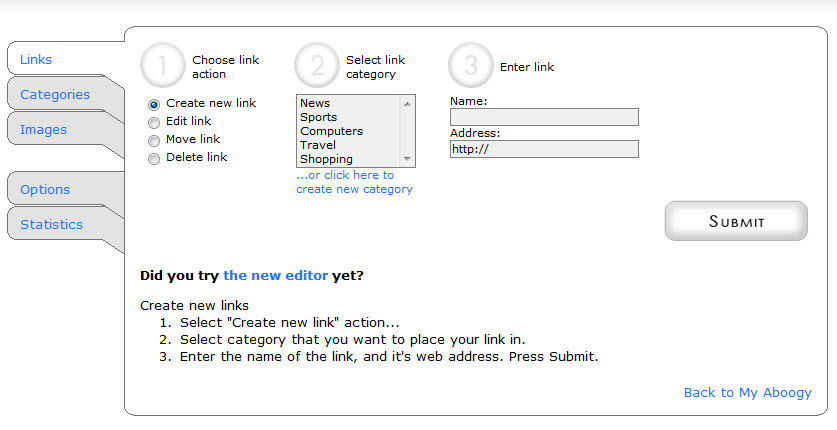
Next, edit and organize the links as you like using the ‘Editor’ tool:

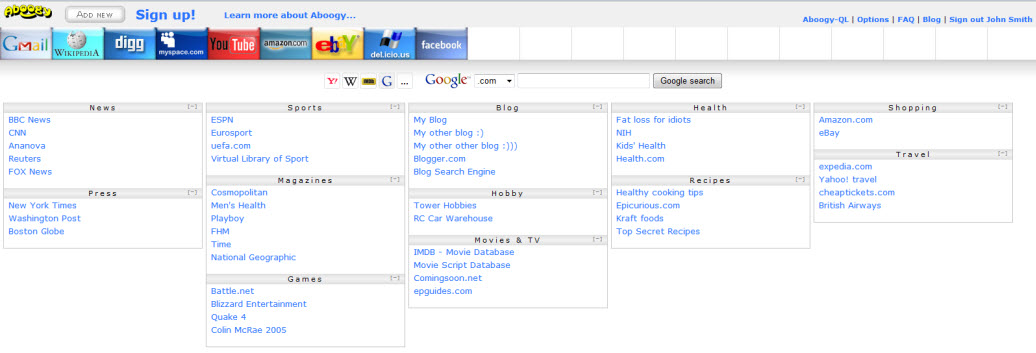
Head back to your Aboogy page and VOILA! Your bookmarks/favorites are all available to you from ANY computer:

The additional benefit is that if your computer crashes, you haven’t lost your library of bookmarks/favorites – even if backing up isn’t on your regular schedule (though shame on you for ignoring that critical chore :-)!)

Password Management…grrrrr…but, ya gotta do it!

I know, I know…no one likes to think about Password Management, nor do they like to think of how vulnerable their information might be using weak and/or the same passwords on many sites. Just thinking of this issue raises my blood pressure and nerves several levels! It just feels so unwieldy.

I don’t know about you, but at last count, I had 432 passwords in my ‘repertoire’. I know that I’m not unusual…we ALL have a bunch (I guess 432 is more than a ‘bunch’, isn’t it?) of passwords to manage. There is no way, unless I suppose I had a photographic memory (which I don’t), that I could remember that many passwords.

What do we typically do to handle this onslaught of self-created information? We don’t change our passwords regularly (bad), we reuse passwords (pretty bad) and/or we use relatively simple passwords (very bad) to make that list more manageable. Even using some of these ‘shortcuts’, I can never seem to remember if this is the time I had to capitalize the first letter or add a special character to meet the password ‘rule’ that this particular site enforces.

On top of all of that, we keep a list of passwords in an Excel file, on sticky notes plastered around the frame of our monitor, or on pieces of paper in our top-desk drawer. Again, NOT GOOD!!!!

So, what’s a body to do???

First of all, do NOT store your passwords in a file on your computer called ‘passwords’ :-)!! Next, do NOT store them in a password protected Excel and/or Word file. Instead, try a password management tool on which you put a VERY STRONG* master password that’s not used as a password anywhere else as your password.

As I’ve struggled with finding the best tool(s) to manage passwords, but I’ve come up with a few gems that might help others to deal with password-rage!

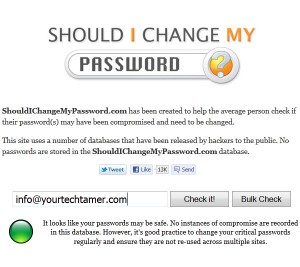
First, check to see if your e-mail address has shown up in a compromised database…this isn’t foolproof, but it’s a start. Go to ShouldIChangeMyPassword.com, enter your e-mail address, then see if you get a “green light”.

Should I Change My Password

Next, begin changing your passwords. Make sure that the new passwords are different from one another and STRONG*. You can check a password’s strength using any number of tools…CNET describes several of them here: Check Password Strength

Now, store those passwords in a SECURE manner. If you choose to store them on your computer itself, make sure that you put them in a ‘vault’ using a tool like KeePass Password Safe or Password Safe. Both of these tools are FREE and store your data in an encrypted format.

If you want to carry your passwords with you and need to store them on your Android or iOS device, eWallet may be the way to go. There is a cost ($19.99 at this writing) for the product, but it can by sync’d between your computer and your devices and gives you a similar interface in both places. Just go to the eWallet site and check it out!

So, what are your ‘going forward’ steps?

1. Download/install a new password storage system
2. Go to the most important sites first (e.g. bank accounts) and change your password NOW!
3. Go to ‘other’ sites (perhaps a couple a day) and continue changing your password
4. Delete, delete, delete the old, unsecure file on your computer
5. Throw away the scraps of paper in your top desk drawer or on your monitor!
6. Change important passwords every 3-6 months.

* “STRONG” passwords are passwords that:
Are over 8 characters long and include lower-case, upper-case, numbers AND special characters (e.g. !, @, #, $, etc.).
Do NOT contain your user name, real name, company name.
Do NOT contain complete ‘real’ words.
Are significantly different than previous passwords.

You have to use ALL of these recommendations to make a password ‘strong’.

Are you bored in TSA lines when traveling through airports? Off-Topic? Not really.

At first, this post seems to be way off-topic – but really, its not! Believe it or not, we have something to learn from a creative approach to an annoying problem – airport security lines and the TSA explanation of what we can/can not do as we approach the ‘dreaded’ screening point.

As we deal with technology (among other things in life), there are times when we really don’t want to do something, but ‘security’ or someone/something else, requires us to do it a certain way.

For example, let’s say that in order to sign in to the company server from outside the building you have to jump through several hoops in order to connect and get to the information you’re seeking. There can be a multitude of reasons for this, but you don’t really care, you want to sign on in a more efficient manner. If you complain, someone’s just going to say ‘sorry, its policy’. On the other hand, if an explanation were given in a creative fashion which explained the why’s and how’s, you’d probably better remember the sequence of hoops you have to jump through to accomplish your goal, plus you’d be more understanding of the ‘why’.

Do you wonder ‘why’ you need to complete a certain task by the end of business on the first Friday of the month when you never see anyone actually USING the information until about the 3rd week of the month? There’s probably a good reason. If that reason were shared with everyone, it would help alleviate the annoyance. Even better if the reasons were shared in an entertaining way.

When searching for ways to improve processes within a business, it is almost always advisable to give the stakeholders (anyone who fits into the process or interacts with the process) an explanation of WHY you’re asking them to do what they do, as well as, an understanding of what happens further down the line (later in the process) if they fail to accomplish their ‘mission’ in a timely and accurate fashion.

Ta-Da!!! Enter the TSA and airport security lines (I told you that I would connect the two!)…

Here’s the way the Cindi Martin, Director of the Glacier Park International Airport in Montana dealt with the problem of long, boring lines security lines…she had a video created to counteract the boredom and uncreative way the TSA shares information on screening with you, the traveling public…

Now, let me ask you…are you more likely to be in a positive frame of mind at the end of the line if you’ve been watching this, or after watching the usual TSA explanatory video?

While I’m still working on creating videos (yes, I’m really trying to make that happen), I still try to employ other methods to make ‘dull and boring’ or ‘confusing’ or ‘challenging’ times be a little bit less frustrating. Let me give you an example. One of the services which we provide is to assist companies with improving the flow of information throughout their business. By getting all of the department heads and senior management into one room, and diagramming the process, disconnects and questionable information flows come to light. Unfortunately, at the same time, the senior management (oftentimes, the President or owner of the company) can get a bit heated or overinvolved in the conversation. Alternately, someone can get defensive or nervous about losing control of a process that they want to oversee. The permutations can be endless.

How do I combat this problem? I have the ‘Talking Chicken’. No, it’s not a chicken that talks…its a rubber chicken (one of those horrible, ugly, rubber, plucked chickens). Without possession of the ‘talking chicken’, you don’t get to open your mouth – it doesn’t matter if you’re the janitor or the president – no chicken, no talking. As an outsider and moderator, I can control the discussion using the chicken – making sure that everyone has an opportunity to speak or defend their position. People end up laughing and remembering the chicken…they don’t remember being ‘put in their place’, or in effect, being told to ‘shut up’.

How can you improve your communication using fun and creative approaches to make difficult or boring topics more enjoyable?

P.S. Sons of Beaches, you’re terrific!!! Please come ‘fix’ the Philly Airport TSA lines 🙂

P.P.S. McCarran International Airport in Las Vegas, NV created their own 13-part video which replaces the TSA video, as well, but let’s face it…one expects something like that in Las Vegas!!! You can view the McCarran videos here.

Can you create a shortcut to auto-paste your email address onto the clipboard?

Back in May, I wrote about ways to create your own keyboard shortcuts
(Click here to see that post). A reader of that post posed the following question:

Do you know how to create another type of shortcut? I want to have my email address entered with a Ctrl + something.

Normally, I don’t post articles two days in a row, but I wanted to get the reader the response, and this isn’t something that I can copy/paste into an e-mail, then post later. So, this week we’re having a rare ‘two days in a row’ posting.

Well, it took a bit of digging, but we found a way to add your e-mail address to the clipboard with shortcut keystrokes, then you can use CTRL+V to paste the e-mail anywhere you need it.

NOTE: This assumes that the reader is using Windows 7. For readers who are still on Windows XP, you’ll need to incorporate another program (http://www.nirsoft.net/utils/nircmd.html) to add the information to the clipboard (using the “Add the text content of clipboard to info1.txt” related command because Windows XP does not recognize the ‘clip’ command used in the batch file below).

So…Windows 7 users, continue on! Windows XP users, I’ll make a note below where you’ll need to install/reference the additional program.

First, open up Notepad by going to “Start, All Programs, Accessories”, then selecting ‘Notepad’.

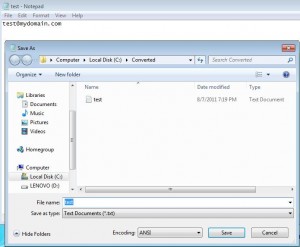
Enter your e-mail address (or any other text that you want copied to your clipboard using the shortcut you’re going to create), then save the file to a location of your choosing as shown below by selecting “File, Save As” from the toolbar:

Create Text File
(click on any image to see a larger version of the image)

Next, open up a new document in ‘Notepad’.

Type in the following two lines (or copy/paste from below):

C:\Windows\System32\cmd.exe /k clip < c:\Converted\test.txt
c:\exit

Substitute the location/name of your text file for the portion of the code which reads ‘c:\Converted\test.txt‘. Everything else should match what is typed above exactly.

Windows XP users, assuming you have downloaded and installed the NirCmd utility, you would substitute the following line:

nircmd.exe clipboard readfile “c:\My Files\info1.txt”

for the first line (C:\Windows\System32\cmd.exe /k clip < c:\Converted\test.txt) above. Everything else should be the same.

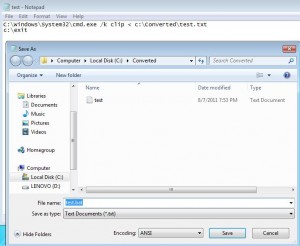
Save the newly created file to whatever location you want, but change the extension to ‘.bat’ instead of ‘.txt’. By this, I mean that you go to “File, Save As”, select a location, then name the file ‘whatever_you_want.bat’ where you substitute your own word for ‘whatever_you_want’, but be sure to end it as ‘.bat’ in the ‘filename’ location. In the sample below, it is being named ‘test.bat’.

Create batch file

At this point, you’ve created the files which will place your e-mail address on the clipboard. Now, you have to create a shortcut, and assign keystroke shortcuts to that shortcut.

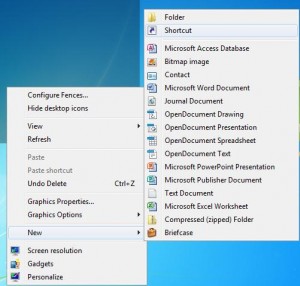
So now, go to your Desktop (or any other location you want to create your shortcut). Right-click in blank space (i.e. not when you’re hovering over any other files/icons) and navigate to “New, Create Shortcut” as shown in the image below.

Create Shortcut

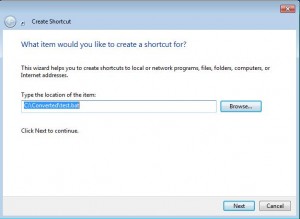
This will take you into the ‘Create Shortcut’ wizard.

Use the ‘Browse’ tool to locate the batch file that you just created above (the one ending in .bat, NOT the one ending in .txt).

Program Location

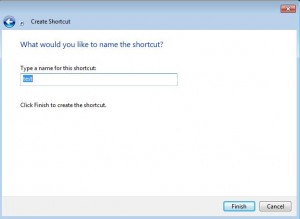
Next, enter the title you want on this shortcut.

Shortcut Name

When you press ‘Finish’, the newly created shortcut will appear on your Desktop, or in the chosen folder.

Shortcut

Hang in there…you’re almost done!

Right-click your newly minted shortcut and select ‘Properties’

Shortcut Properties

The field labeled ‘Shortcut Key’ will read ‘None’ when you first see it. Click into the field, and press whichever letter you’d like to have the shortcut execute (in the sample, I pressed the ‘A’ key – nothing else). Windows will automatically fill in CTRL+ALT.

Click ‘OK’ to save your setup.

Now, when you press the CTRL+ALT+A keys on your keyboard (regardless of where you are), whatever is in the txt file that you created will be copied to the clipboard. If I now open a blank Word document (or put my cursor in the ’email’ field of a website), and press CTRL+V, the e-mail (or whatever I had stored in that text file) will paste into that location.

Voila!! You’ve created your own mini program which allows you to have a keyboard shortcut to entering your e-mail address (or any other information you need to enter frequently).