http://www.yourtechtamer.com/blog/2010/11/how-on-earth-did-you-create-your-blog-part-2/
Now that you’re hooked, and you’ve made the commitment to writing a blog, you need to install your platform. Again, for purposes here, I’m discussing only WordPress (because its what this blog is using), but there are all kinds of others out there. Google’s blog creator is ‘Blogger’ which you can find at www.blogger.com. Google ‘free blog services’ and you’ll get myriad of alternatives.
So, back to what I encountered as I established this blog…
As we discussed in Part 1, I installed WordPress on my website, so that I host the blog, rather than WordPress hosting the blog (both alternatives are available). Next, I selected and installed a theme that expressed my ‘personality’ or the ‘personality’ of the blog.
Here was the first lesson: When doing most anything on WordPress, first you ‘install’ it, then you ‘activate’ it, then you ‘configure’ it. ‘Installing’ it downloads the appropriate files to your site. ‘Activating’ it actually makes the item operational on your site. ‘Configuring’ something means putting in your variables (e.g. the URL for your blog, or your Twitter address, etc.)
Next, I created a post – and commented on my own post. It was something innocuous that I could use to see what the site would look like when it was up and running. I actually tried installing and activating several themes before I decided that I liked this look and feel. One neat thing about a blog (unlike a LinkedIn discussion) is that you can edit or delete a discussion any time you want. So, you can put test ‘stuff’ out there, and see what it feels like and looks like to the community at large. If you change your mind later, just delete the post, or alter the blog configuration.
Because I want people to be able to subscribe to this blog, I went to the ‘plugins’ area and searched for a couple of plugins which would allow people to subscribe to the blog in various ways. I ended up using ‘Feedburner Feedsmith’ plugin to control the e-mail subscriptions. I was surprised, but not displeased, when I found that this was a Google product (my Google signon got me into the Feedburner site). Once the plugin was installed and activated, I sort of ‘lost’ it. That’s one tip to pass along: Once you install and activate a plugin, it will show up SOMEWHERE else in your tools for actual configuration and maintenance. In this case, the Feedburner plug-in appeared in my ‘widgets’ section. From there, I could configure it to suit my needs. The Feedburner plugin on my site controls the e-mail subscription area. I can see exactly WHO has subscribed to the e-mail subscription for the blog, how often those subscribers have visited, etc.
This is the portion of this Blog that is controlled by Feedburner:

Feedburner Installed on this blog
I also wanted to allow people to subscribe via and RSS feed, Twitter or use a graphic to subscribe to the e-mail service. There were lots of alternatives (and I certainly did NOT try them all – I tried them until I found one that worked for me), and I settled upon ‘Subscription Options’ by Tom Saunter. Again, I downloaded and activated it, then had to hunt around until I ‘found’ where it had been stashed in my control panel. Voila! I found it under ‘Widgets’ again (just like Feedburner). I dragged the widget to the location I wanted it, put in several configuration pieces of information and I was done. Pretty darned easy, once I got the hang of A) looking for the Plug-In elsewhere once installed and activated, and B) figuring out that there is minor configuration once you activate it. This is the portion of the blog that is controlled by the ‘Subscription Options’ plugin:
Subscription Options
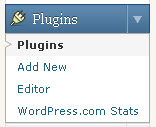
Lastly, I installed a plug-in to track the statistics on the blog itself. The plugin is not so creatively, but certainly effectively named “WordPress.com Stats”. Again, installed and activated…oops…need to sign up for a WordPress login in order to get an API code (whatever that is!)…got the code, entered the code…and where did the stats go? Hmmm…this one isn’t for the ‘public’, but for the Administrator, so it stays on the ‘behind the scenes side of the world’. This one is found in the Plugins area of the WordPress control panel:

WordPress.com Stats PlugIn
Now, when I click on that item in the navigation, I get a visual look at the activity on the blog. Very useful if you’re trying to quantify the success you are having with your blog.
After each PlugIn was installed, I checked how it performed from the ‘front side’. Tweaks and adjustments to get it ‘just so’ were required, but the basic functionality simply ‘was’. It just ‘appeared’ because I had activated and configured the plugin.
So, three steps to most plug-ins: Install, Activate, Configure. Only the configuration step really varies from plugin to plugin.
Next time, we’ll talk about the categories, tags and the big ‘launch’.


2 Comments
Very clear. You could write instruction manuals! I’m going to try to create a blog based on your guidelines and let you know how it goes. Now I only need to think of something to talk about!
Thanks, Becky!! Actually, a good portion of my job IS documenting processes, so I’ve had a lot of practice…and I always believe in keeping it professional, but fun. That’s sort of how my style evolved. I can’t wait to read YOUR blog!!!! Let me know when you get it going!